This page provides information about the Partner Manager Connector, including:
Overview
The Partner Manager Connector provides connectivity to Anypoint Partner Manager. The connector enables the management of Anypoint B2B connectors from Partner Manager and tracking of B2B exchanges.
Installing the Connector
Follow the steps below to install the Partner Manager Connector in Anypoint Studio.
-
On the Help menu in Anypoint Studio, select Install New Software… to bring up the Available Software dialog box.
-
Press the Add… button, next to the Work with selection box, to add the Partner Manager Connector’s update site. The location for the update site is http://edi-module-update-site.s3.amazonaws.com/beta-updates.
-
Once added, expand the Premium drop-down and choose Partner Manager Connector.
-
Click Next >. The Install Details page appears.
-
Review the details of the item you selected and click Next >.
-
Accept terms and conditions of the product and press Finish.
-
Click Restart Now to complete the installation.
Configuring the Connector
Configuration without file persistence
-
From Anypoint Studio, select the Global Elements view and press Create.
-
Enter Partner Manager in the filter.
-
Choose Basic Configuration and click OK.
-
In the API Key attribute, enter your private API key which is generated from Partner Manager.
-
Enter in the Environment attribute the CloudHub environment you want the Partner Manager Connector to run in.
-
Press OK.
Configuration using Amazon S3 for file persistence
-
From Anypoint Studio, select the Global Elements view and press Create.
-
Enter Partner Manager in the filter.
-
Choose Amazon S3 File Storage and click OK.
-
In the API Key attribute, enter your private API key which is generated from Partner Manager.
-
Enter in the Environment attribute the CloudHub environment you want the Partner Manager Connector to run in.
-
Enter the settings of the S3 bucket to be used for storing files. These settings are obtained from your AWS console.
-
Press OK.
Configuration using a Mule flow for file persistence
-
From Anypoint Studio, select the Global Elements view and press Create.
-
Enter Partner Manager in the filter.
-
Choose Custom File Storage and click OK.
-
In the API Key attribute, enter your private API key which is generated from Partner Manager.
-
Enter in the Environment attribute the CloudHub environment you want the Partner Manager Connector to run in.
-
Type in the name of the flow to be used for persisting files in the Flow Name attribute.
-
Optionally, inside the File URL attribute, set a MEL expression to read the file URL from the message produced by the flow.
-
Press OK.
Supported Operations
The connector supports the following operations:
Track Transmission
This operation allows you to track transmissions that occur outside of Anypoint B2B Connectors like reading a file from the filesystem. Tracking includes, but not only, keeping a record of the transmission’s metadata, file’s content and format. Tracked transmissions are can viewed in Anypoint Partner Manager.
Example
The following is a sample config of the Track transmission operation:
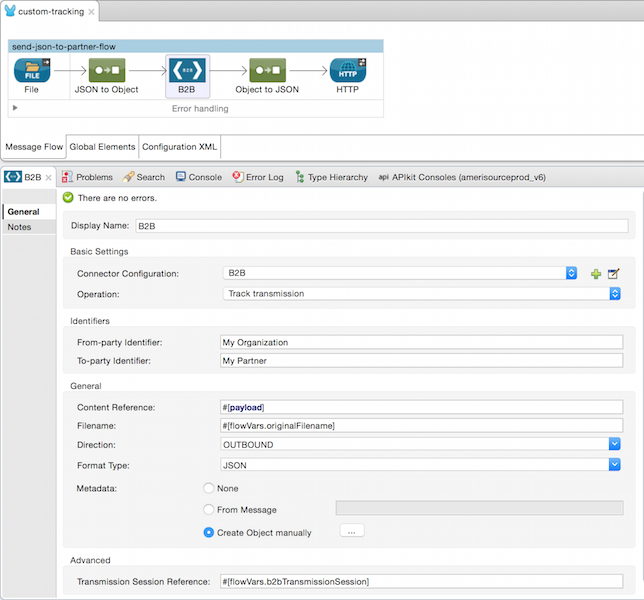
The above operation will track who is the transmission’s originator and receiver in addition to the file content, filename, direction, and format type. User-defined metadata will also be tracked. The connector expects metadata to be a java.util.Map. You have the option to define the map, representing metadata, inline via the Object Browser, or alternatively, specify from the operation config its location in the Mule message:
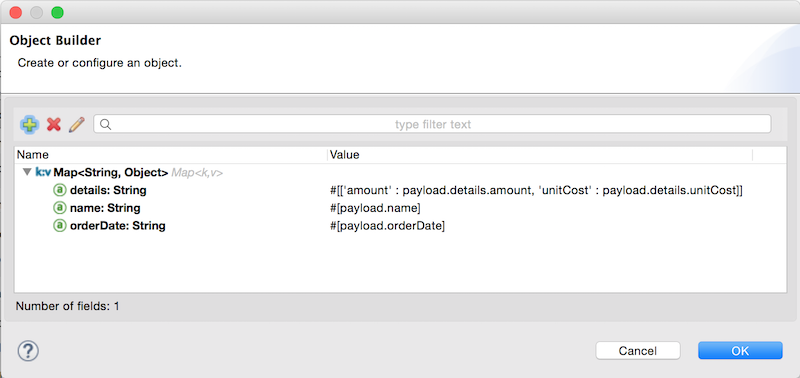
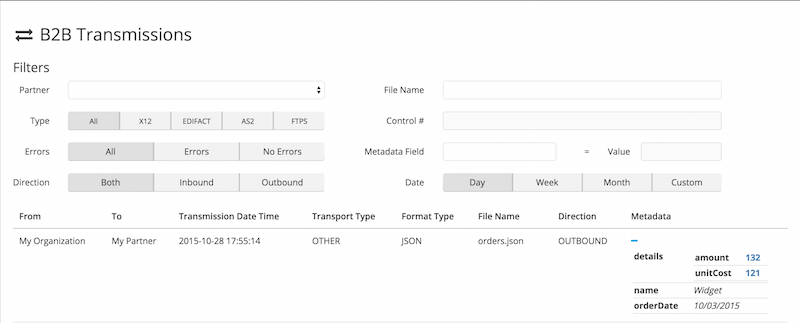
As seen in the above screenshot, you can store any amount of metadata for a given transmission, including nested metadata. Once Partner Manager has processed the tracking, you can view the recorded transmission from Partner Manager: