The ModusBox’s JDE Connector leverages the internal capabilities of Oracle’s JD Edwards EnterpriseOne™ solution to a broader extent.
JDE Connector
The JDE Connector aims to provide integration from and to Oracle’s JD Edwards EnterpriseOne™.
Contents
-
Introduction
-
Prerequisites
-
Requirements
-
-
Installing & Configuring
-
Installing
-
Configuring
-
Upgrading from a Previous Version
-
-
Using the Connector
-
Use Cases and Demos
-
Adding to a Flow
-
Increasing Performance
-
-
Example Use Case
-
Anypoint™ Studio Visual Editor | XML Editor
-
Example Code
-
-
Demo
-
F.A.Q
-
See Also
Introduction
ModusBox’s JDE Connector leverages the power of Oracle’s Java Dynamic Connector to provide interoperability with Oracle’s JD Edwards EnterpriseOne™ and external systems.
After reading this guide, you should be able to accomplish the following scenarios:
-
Log into JD Edwards EnterpriseOne™
-
Invoke a BSFN on the server using proper parameters
-
Invoke a UBE function by name
-
Check a UBE call’s status asynchronously
-
Log out
At design time, the JDE Connector allows you to discover functions by name providing full access to all BSFN signatures. Given that discovery is a heavy duty process, the Connector manages a cache repository for all function’s metadata used at least once.
The results of a function call will be injected into the flow as a Map containing key-value pairs with the invocation’s output values. This approach gives the end user freedom of choice to construct complex flows and manage custom exception strategies.
Prerequisites
This document assumes that you are familiar with Oracle’s JD Edwards EnterpriseOne™ basics, Mule the Anypoint™ Studio interface.
Requirements
-
Mule 3.6.1 server Runtime or higher
-
Anypoint Studio January 2015 onwards
-
Access to your Oracle’s JD Edwards EnterpriseOne™ installation java libraries
Compatibility Matrix
The following matrix displays the Oracle’s JD Edwards EnterpriseOne™ Tools versions supported by version
1.0.0 |
9.1.4.6 onwards |
Installing and Configuring
Installing
-
Launch Anypoint Studio and click on Help → Install New Software.
-
Press Add to create a new repository.
-
Type in "ModusBox Inc" in the Name field and http://modusbox.com/jde-update-site/ in the Location field
-
Expand Select and select JDE Connector. Press Next > to review the items to be installed.
-
Press Next > again to review and accept the license. Press Finish to install the connector.
-
Press OK to accept the prompted security dialog box and allow Anypoint Studio to restart.
Configuring
In order to set JDE configuration you must first know your Oracle’s JD Edwards EnterpriseOne™ configuration needs. See the sample project below for a configuration walkthrough.
Updating From an Older Version
This is currently the first version of the connector.
Preliminary Setup
In addition to meeting the requirements listed in the Prerequisites and Requirements section, a bundle has to be created to establish a connection to the JDE Enterprise Server. This bundle will be created only for the first time and it can be reused in other applications.
This adapter is a bundle of JAR files that come with the JD Edwards EnterpriseOne distribution.
These steps illustrate how to create bundle connector component so that you can include in the flow that needs connect to JDE Enterprise Server.
Step 1
Create a folder in the file system that it will include the following subfolder:
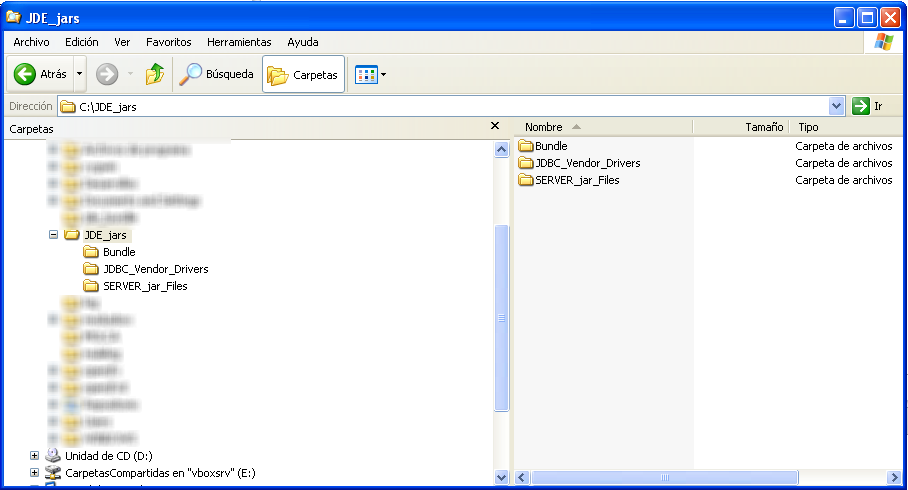
SERVER_jar_File:
In this folder we need all the jar file that come with the JD Edwards EnterpriseOne distribution. The files can be found at <Enterprise Server directory>\system\classes on the JDE Enterprise Server to which you are connecting.
For Tools Releases prior to JD Edwards EnterpriseOne Tools Release 9.1 Update 4, copy these files:
-
ApplicationAPIs_JAR.jar
-
ApplicationLogic_JAR.jar
-
Base_JAR.jar
-
BizLogicContainer_JAR.jar
-
BizLogicContainerClient_JAR.jar
-
BusinessLogicServices_JAR.jar
-
castor.jar
-
commons-httpclient-3.0.jar
-
commons-logging.jar
-
Connector_JAR.jar
-
EventProcessor_JAR.jar
-
Generator.jar
-
JdbjBase_JAR.jar
-
JdbjInterfaces_JAR.jar
-
JdeNet_JAR.jar
-
jmxremote.jar
-
jmxremote_optional.jar
-
jmxri.jar
-
ManagementAgent_JAR.jar
-
Metadata.jar
-
MetadataInterface.jar
-
PMApi_JAR.jar
-
Spec_JAR.jar
-
System_JAR.jar
-
SystemInterfaces_JAR.jar
-
xalan.jar
-
xerces.jar
-
xmlparserv2.jar
For JD Edwards EnterpriseOne Tools Release 9.1 Update 4 and later releases, copy the following files:
-
ApplicationAPIs_JAR.jar
-
ApplicationLogic_JAR.jar
-
Base_JAR.jar
-
BizLogicContainer_JAR.jar
-
BizLogicContainerClient_JAR.jar
-
BusinessLogicServices_JAR.jar
-
castor.jar
-
commons-codec.jar
-
commons-lang2.6.jar
-
commons-logging.jar
-
Connector.jar
-
EventProcessor_JAR.jar
-
Generator_JAR.jar
-
httpclient.jar
-
httpcore.jar
-
httpmime.jar
-
j2ee1_3.jar
-
JdbjBase_JAR.jar
-
JdbjInterfaces_JAR.jar
-
JdeNet_JAR.jar
-
jmxremote.jar
-
jmxremote_optional.jar
-
jmxri.jar
-
ManagementAgent_JAR.jar
-
Metadata.jar
-
MetadataInterface.jar
-
PMApi_JAR.jar
-
Spec_JAR.jar
-
System_JAR.jar
-
SystemInterfaces_JAR.jar
-
xerces.jar
-
xml-apis.jar
-
xmlparserv2.jar
JDBC_Vendor_Drivers:
In this folder we need the JDBC driver files that correspond to the database to which you are connecting.
Bundle:
It will be an empty folder that will be used be the JD Edwards Setup to prepare the bundle jar file.
Using This Connector
Use Cases and Demos
-
Invoke a BSFN
-
Invoke a UBE
-
Get UBE Job Status
Adding to a Flow
Using the JDE Connector in your application is explained in detail in the Example Use Case section below.
Example Use Case
This use case example will create a simple flow to get the address book name from the Address Book table (A/B) invoking the Master Business Function (MBF) on Oracle’s JDE EnterpriseOne Server.
Anypoint Studio Visual Editor | XML Editor
Step 1
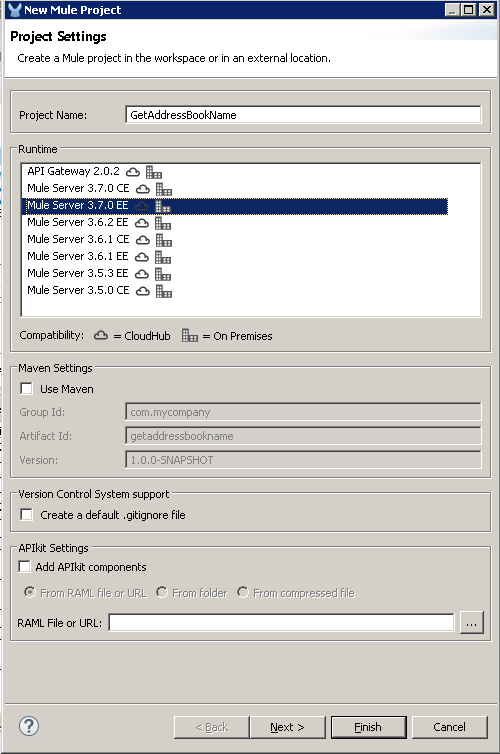
Create a new Mule Project with Mule Server 3.7.0 or larger EE as runtime:
After create the project, you need to build the Oracle JD Edwards' lib bundle. Please refer to the section 10. Oracle JD Edwards' bundle Creation. The jar bundle will be used by the connector. This jar bundle will be created once and it can be reused for all the projects that it needs connect to JD Edwards.
Notes: In case you use Maven, the process to assign the Oracle JD Edwards' lib bundle will be different. It will explain with detail later.
Step 2
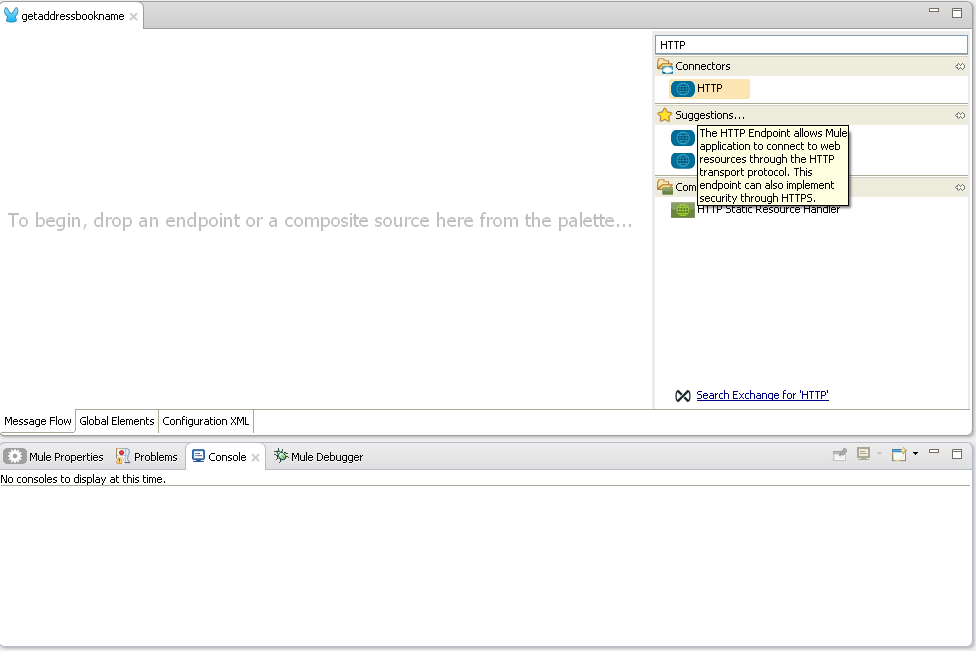
Locate the HTTP Endpint connector on the right hand-side palette:
Step 3
Drag the connector over to the canvas:
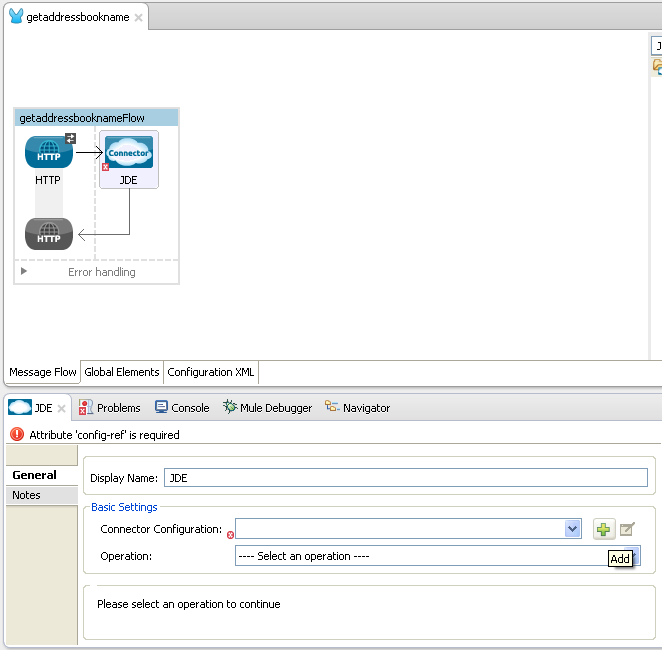
Step 4
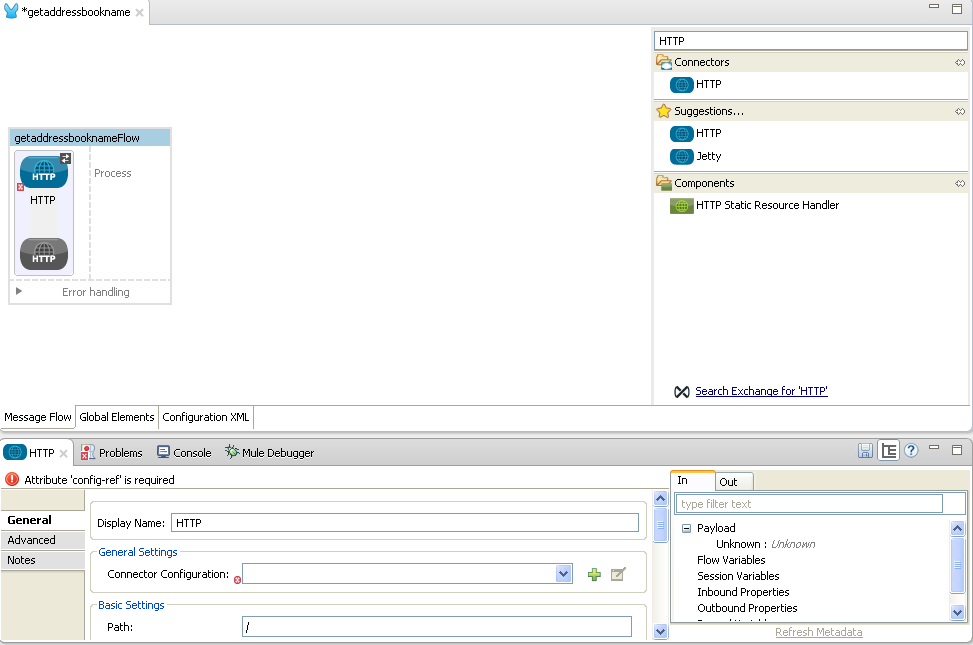
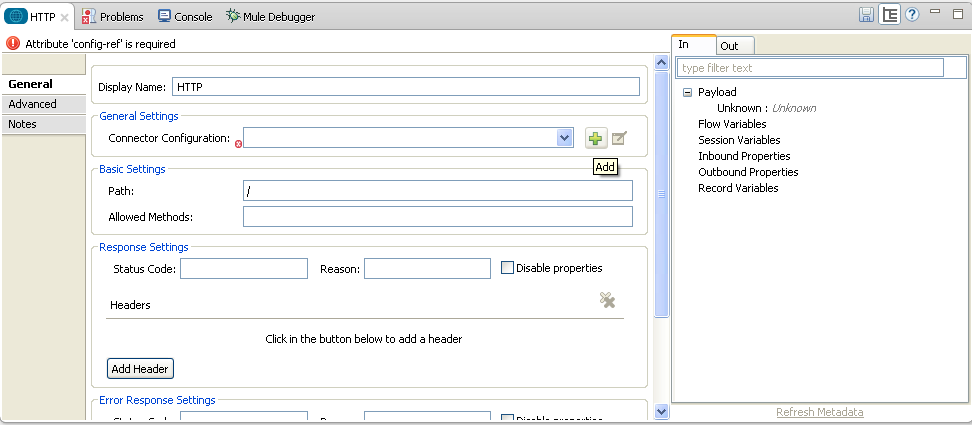
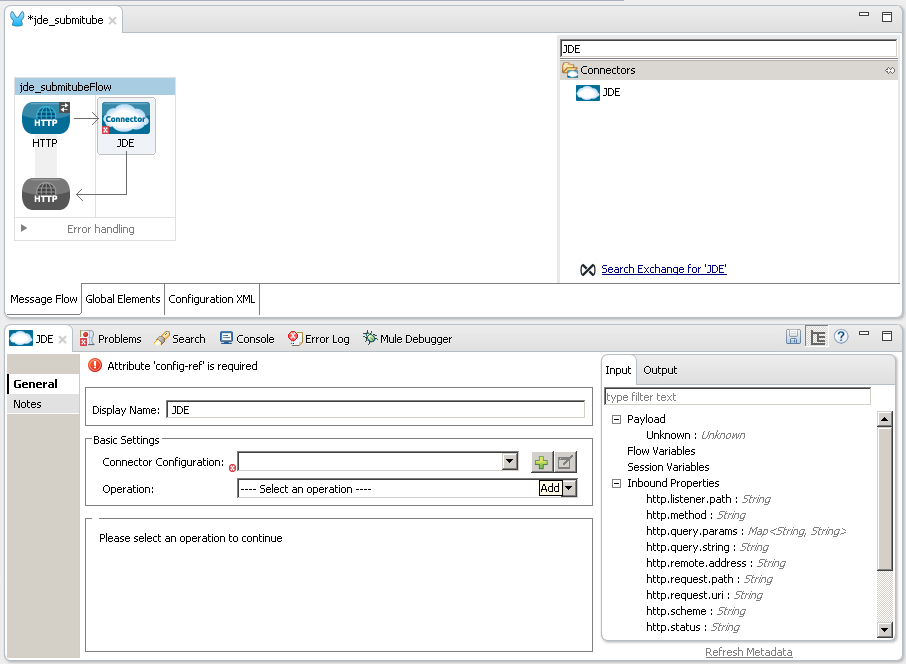
The connector requires an Connector Configuration; click on Add to create a connector configuration.
Step 5
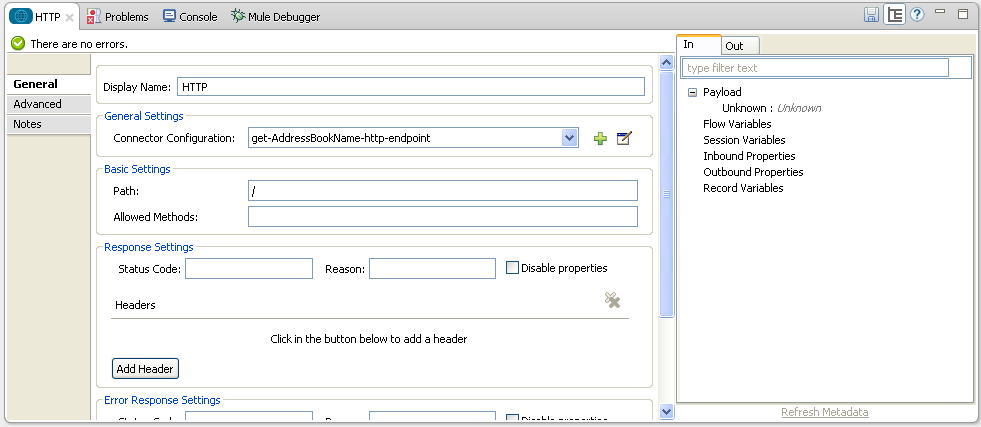
Give the HTTP endpoint a more descriptive name like “get-AddressBookName-http-endpoint” and press OK to go back to the global HTTP endpoint dialog box:
Step 6
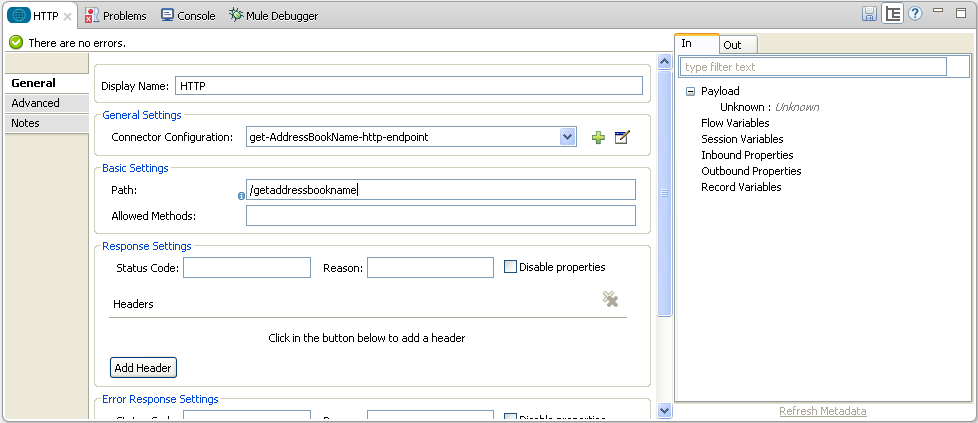
Add a path to the URL like "getaddressbookname" and press SAVE the project. The connector will be ready to process requests.
Step 7
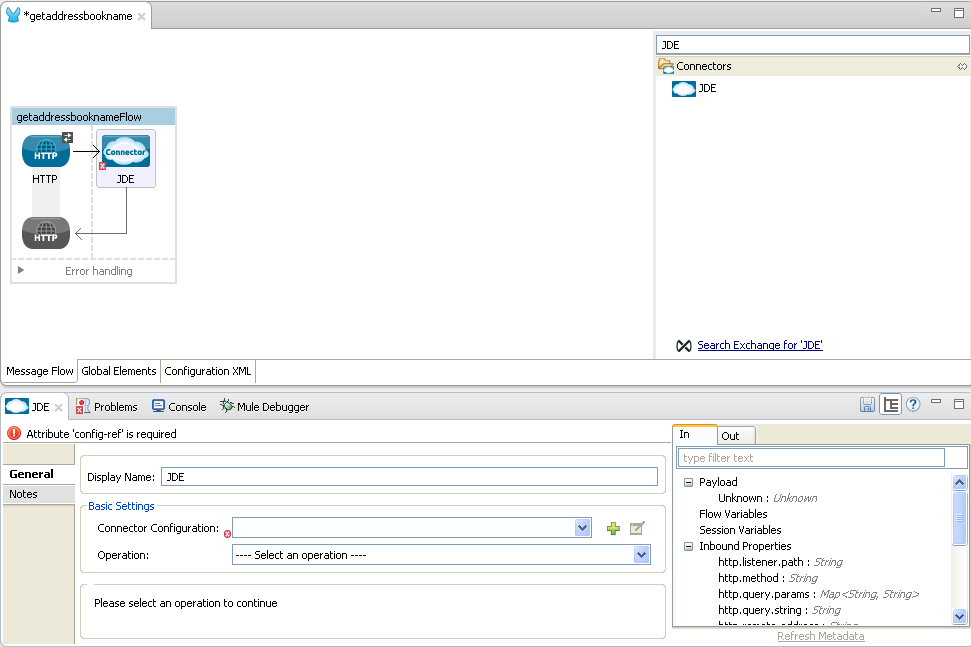
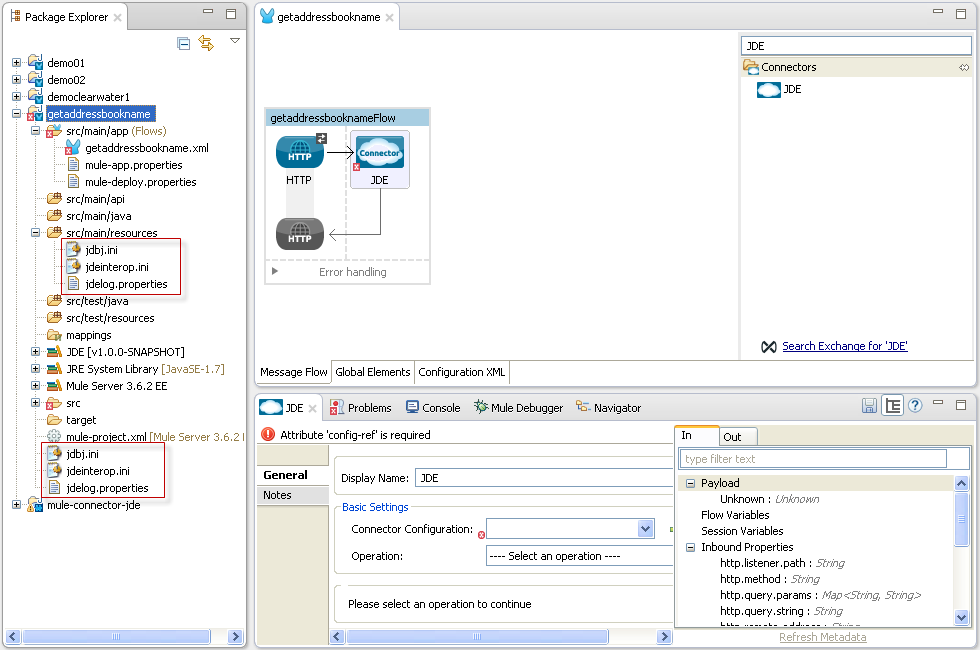
Back to the Message Flow view, you need to Locate the JDE Connector on the right hand-side palette:

Step 8
Drag the connector over to the canvas:
Step 9
The JDE Connector relies on Oracle’s Java Dynamic Connector to establish the link to the server. In order to achieve this, setting up the follwing standard configuration files is needed:
-
"jdbj.ini"
-
"interop.ini"
-
"jdelog.properties"
-
"tnsnames.ora" (for Oracle RDBMS based installations only)
These files are distributed with both Fat Clients or Enterprise Server modules.
In case you get the files from a Fat Client, the folder containing them can be found under the path ini/sbf of your installation.
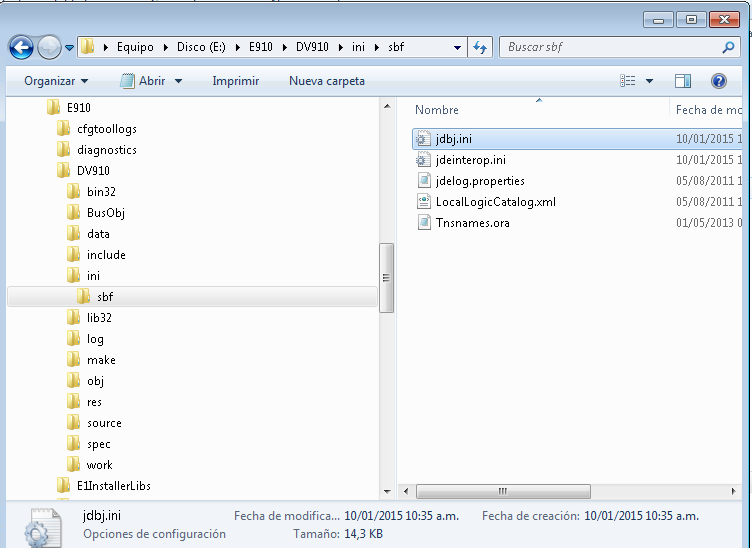
Step 10
Put the files inside the project folder in the folder:
-
source/main/resource
-
root folder of the project
Step 11
Edit jdeinterop.ini, jdelog.properties, and jdbj.ini for proper settings.
Refer to the Guide "JD Edwards EnterpriseOne Tools Connectors Guide"
Step 12
Now you can continue with the JDE Connector. You need to add a new Connector Configuration:
Step 13 (Only for non Maven Project)
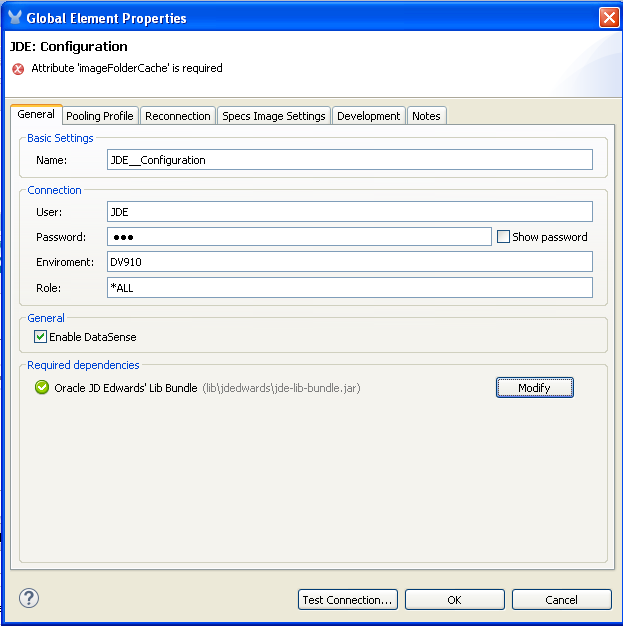
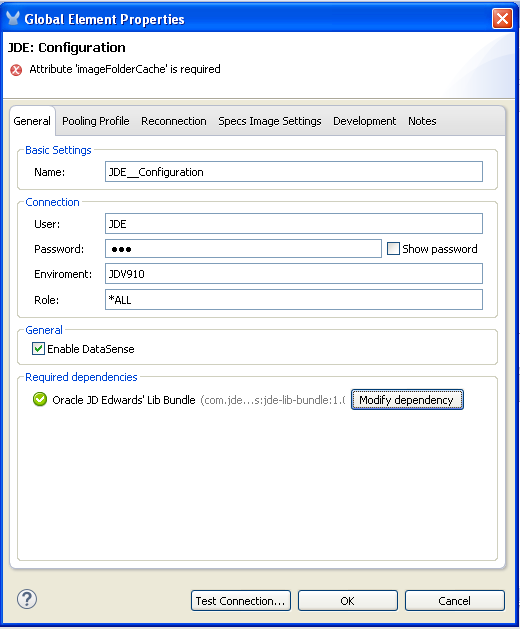
Put login information to E1, check Enable DataSense
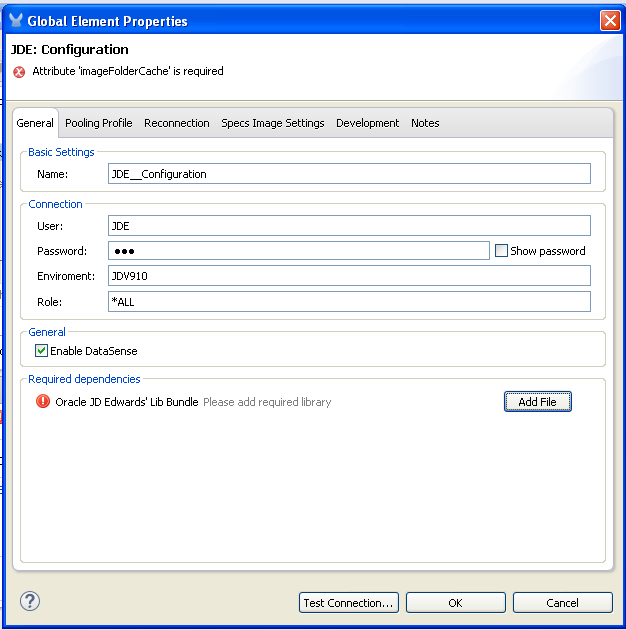
Now you need to include the Oracle JD Edwards' lib bundle generated previously using JD Edwards setup
Press button Add File and select JD Edwards' bundle created.
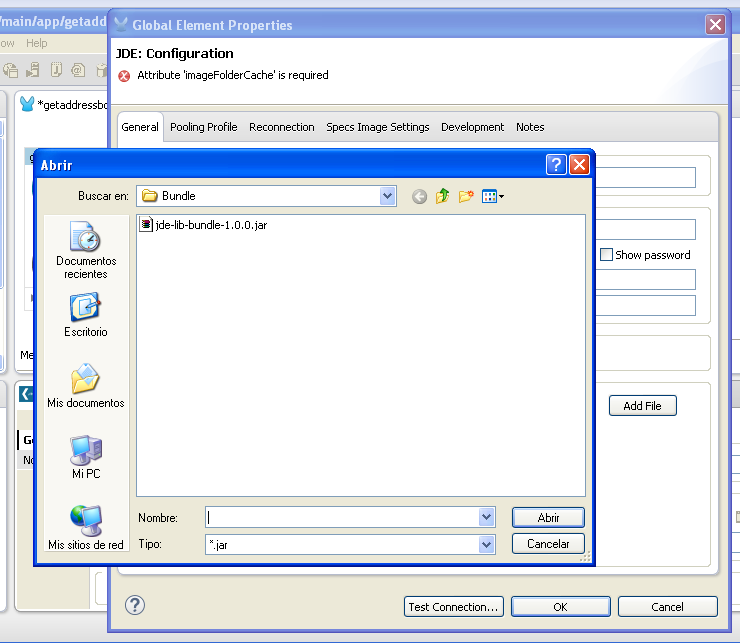
the result will be:
Step 13 (Only for Maven Project)
Put login information to E1, check Enable DataSense
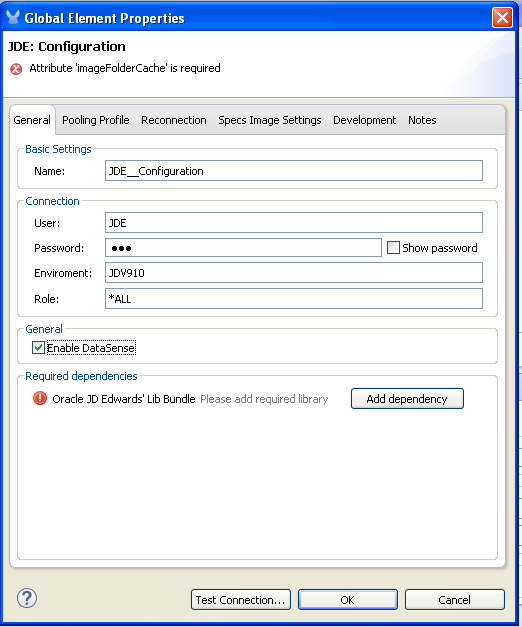
Now you need to include the Oracle JD Edwards' lib bundle generated previously using JD Edwards setup
Press button Add Dependency and select JD Edwards' bundle created.
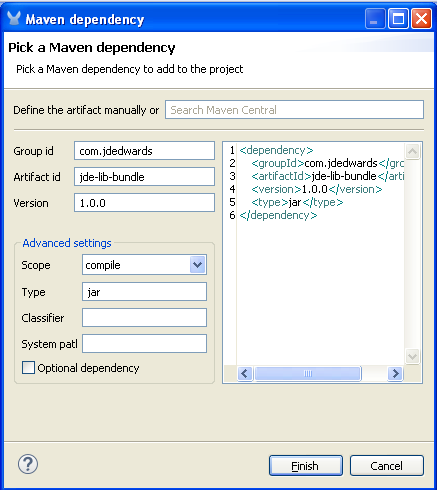
the result will be:
Step 14
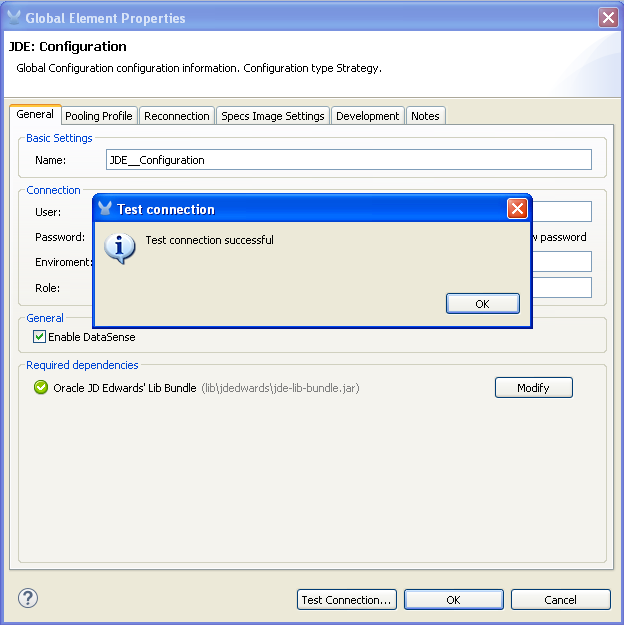
Before continue, you need to test connection pressing TEST CONNECTION… button
Step 15
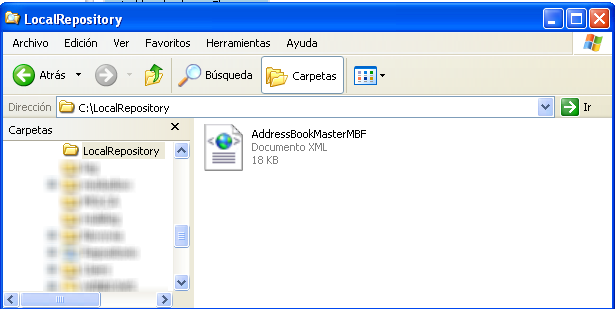
You need to define the local repository to save the specs of the bsfn locally.
Step 16
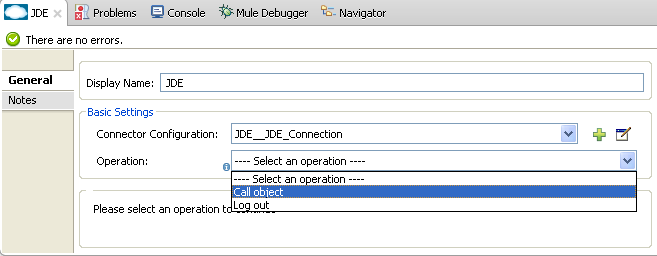
Press OK and return to the JDE Connector configuration.
Step 17
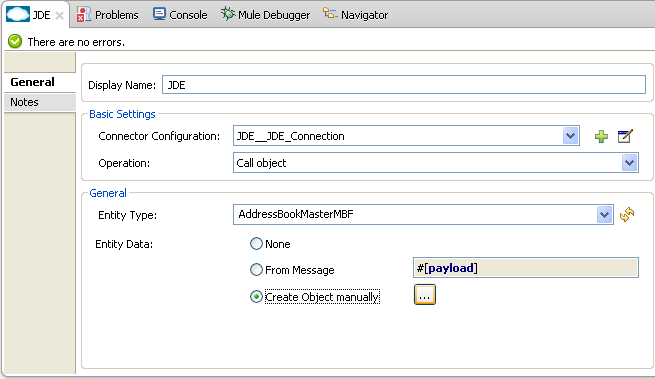
You need to select the operation "Call object"
Step 18
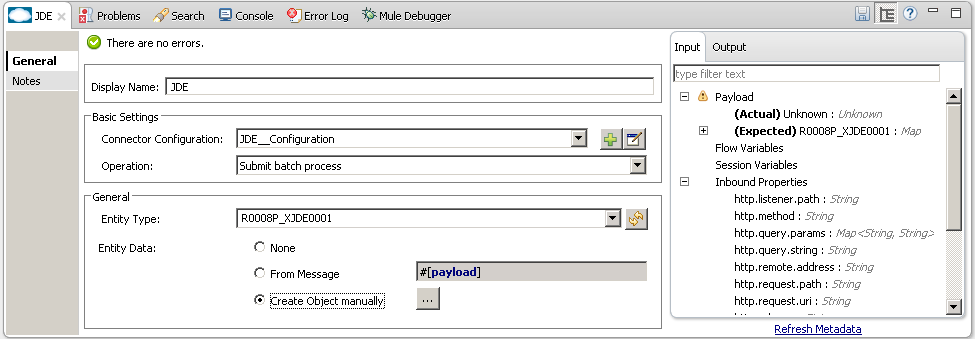
Now, you need to write the bsfn to call in the Entity Type field and press ENTER:
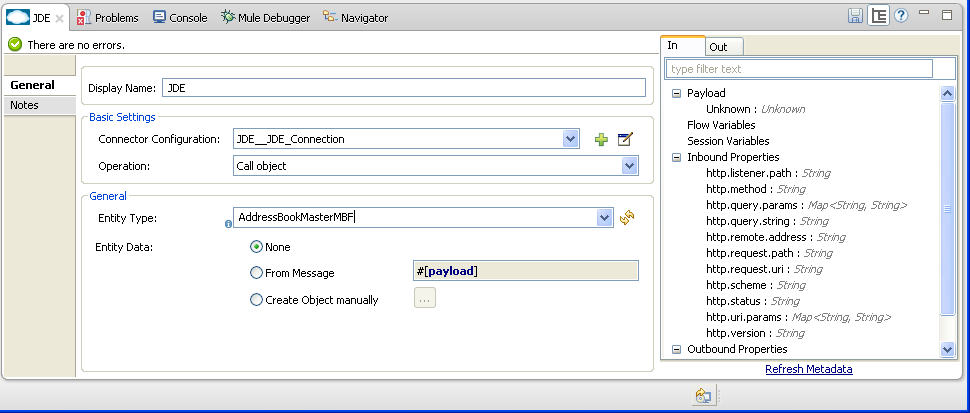
The connector will get the specification from the server and it will put the specification in the local repository.
Step 19
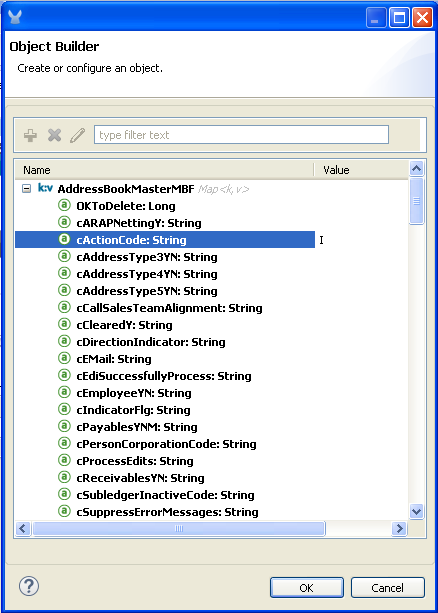
After the connector get the specs from the server, you will need to populate the parameters. To do this, you need to select the option: Create Object manually
Press the button […] and populate the parameters:
Action Code to "I" Inquire
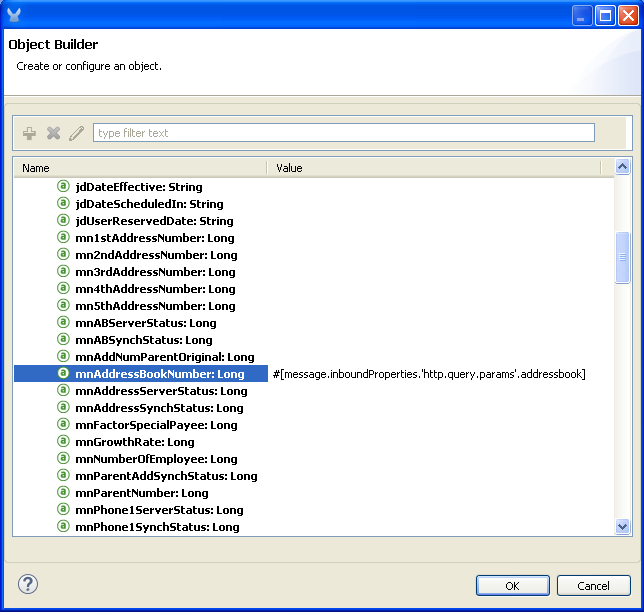
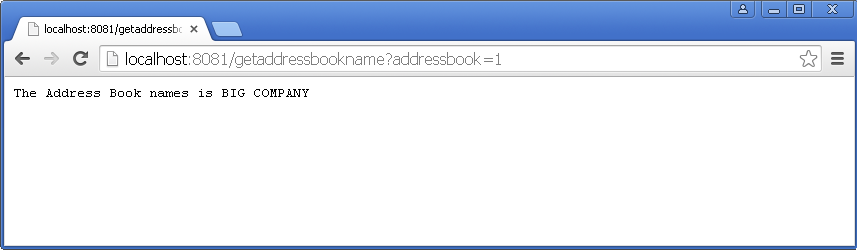
And Address Book Number the address number that will be part of the URL parameter.
Ex: localhost:8081/getaddressbookname?addressbook=1
Press OK button to return to JDE Connector configuration. Save the project.
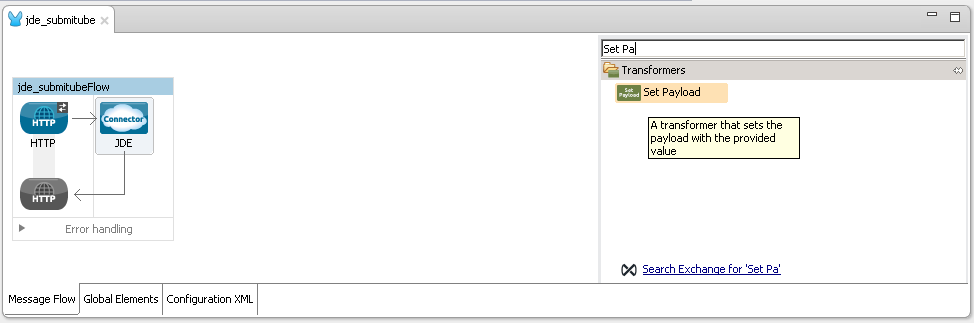
Step 20
Back to the Message Flow view, and you need to Locate the Set Payload on the right hand-side palette to return the address book name.
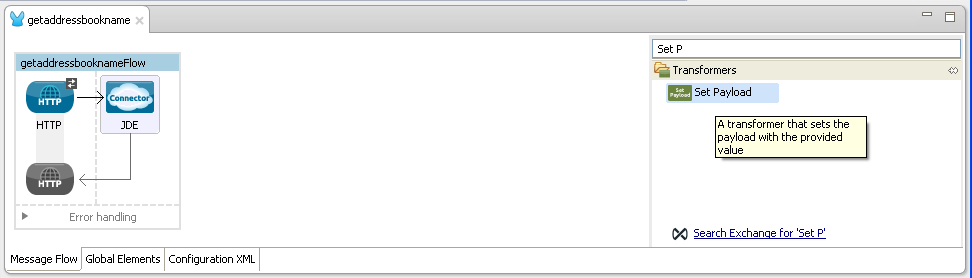
Step 21
Drag the Transformer over to the canvas and write the answer.
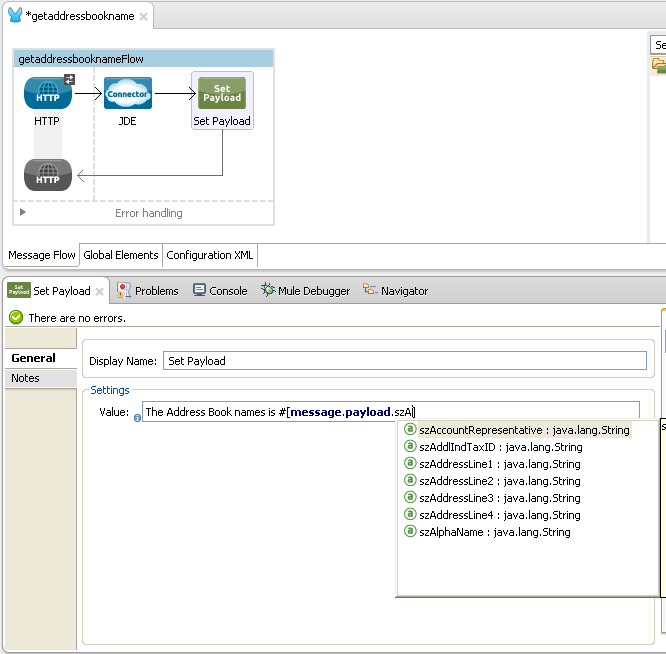
The answer will be:

Step 22
Finally, run the example as a Mule application
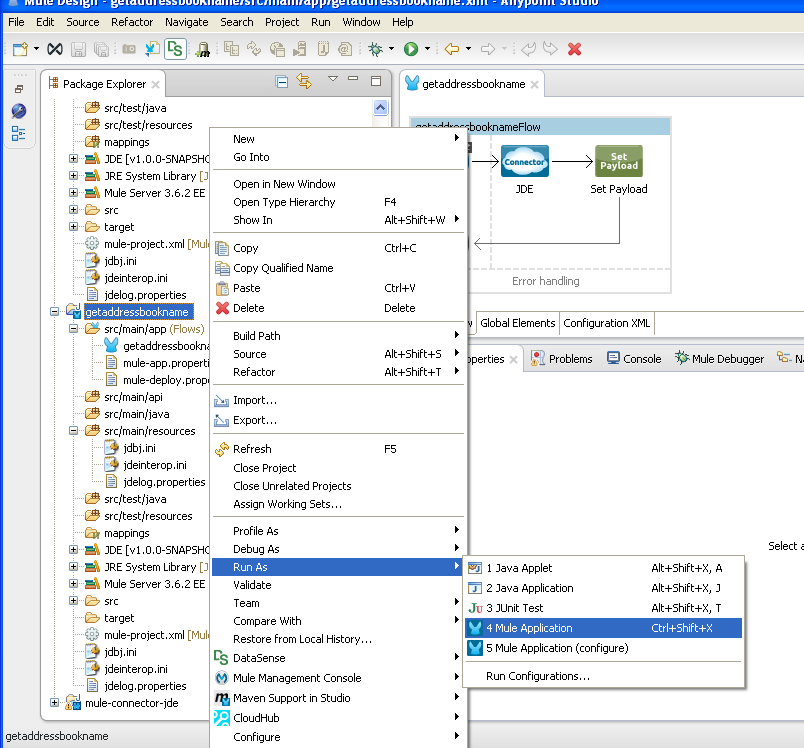
Step 23
Test the Mule Application
Write the URL:
localhost:8081/getaddressbookname?addressbook=1
Example Use Case
This use case example will create a simple flow to submit an UBE to JDE Enterprise Server.
Anypoint Studio Visual Editor | XML Editor
Step 1
Create a new Mule Project with Mule Server 3.7.0 or larger EE as runtime:
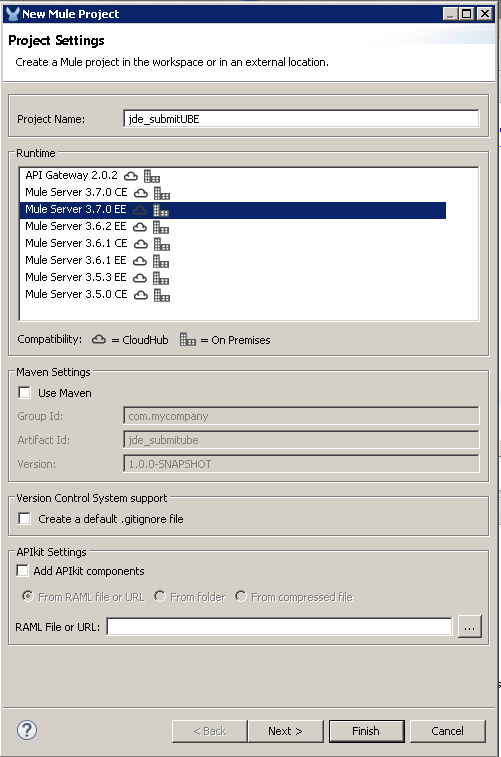
After create the project, you need to build the Oracle JD Edwards' lib bundle. Please refer to the section 10. Oracle JD Edwards' bundle Creation. The jar bundle will be used by the connector. This jar bundle will be created once and it can be reused for all the projects that it needs connect to JD Edwards.
Notes: In case you use Maven, the process to assign the Oracle JD Edwards' lib bundle will be different. It will explain with detail later.
Step 2
Locate the HTTP Endpoint connector on the right hand-side palette:

Step 3
Drag the connector over to the canvas:
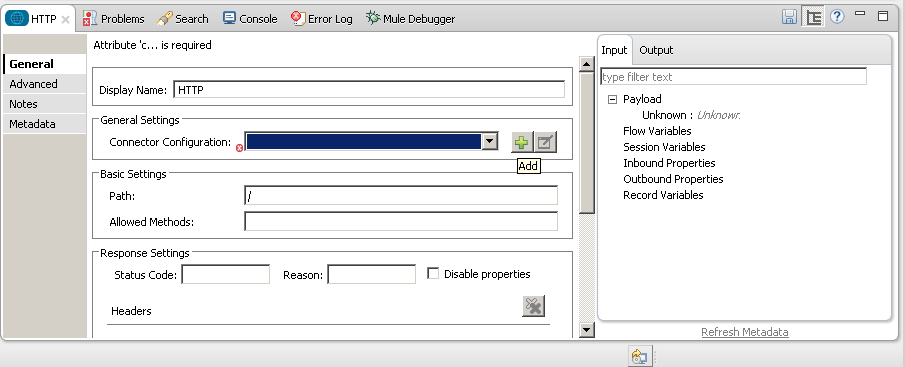
Step 4
The connector requires an Connector Configuration; click on Add to create a connector configuration.
Step 5
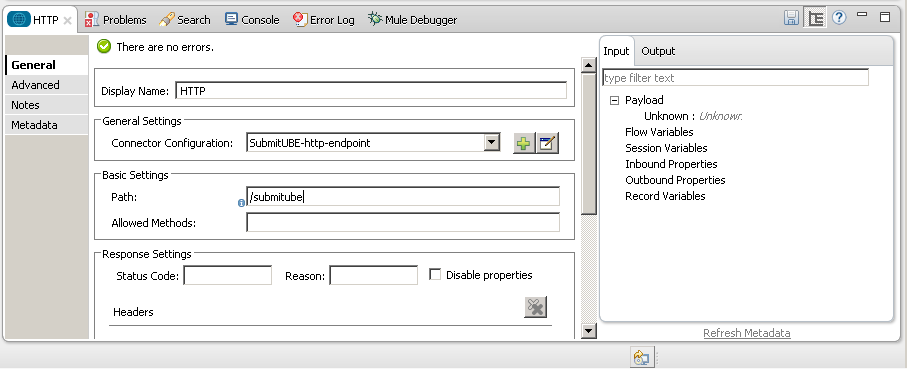
Give the HTTP endpoint a more descriptive name like “SubmitUBE-http-endpoint” and press OK to go back to the global HTTP endpoint dialog box:
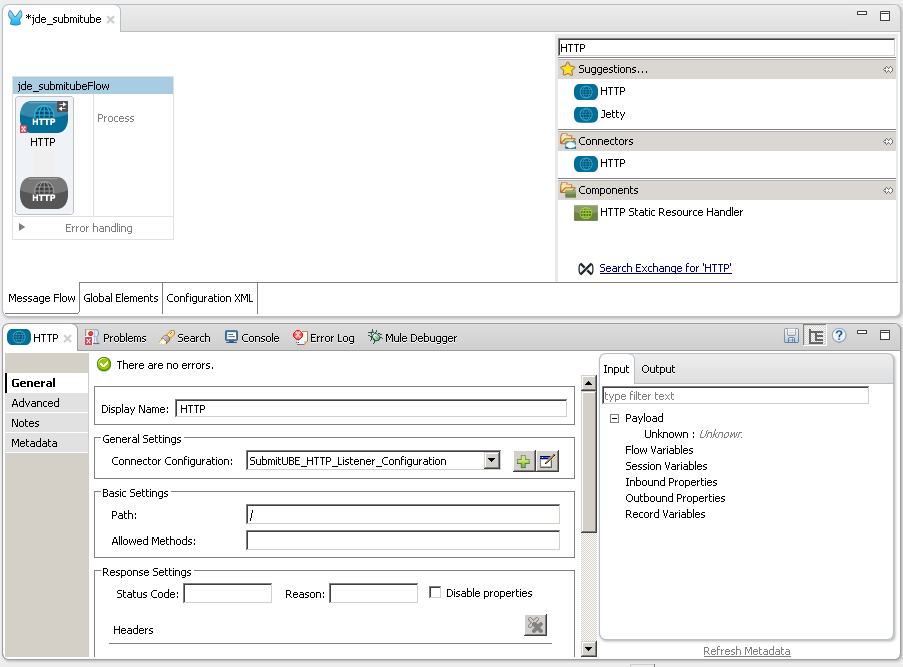
Step 6
Add a path to the URL like "submitube" and press SAVE the project. The connector will be ready to receive request.
Step 7
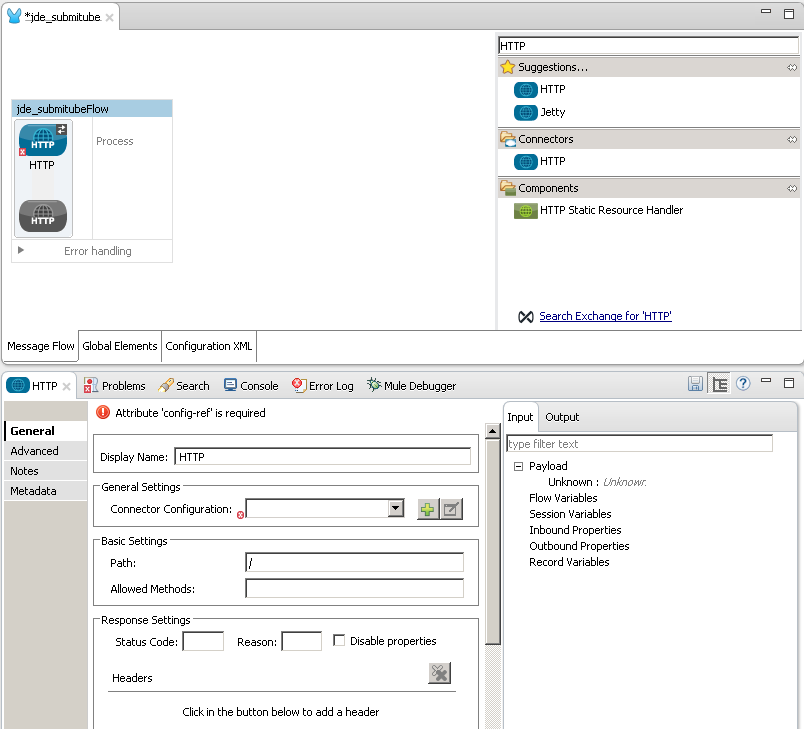
Back to the Message Flow view, you need to Locate the JDE Connector on the right hand-side palette:
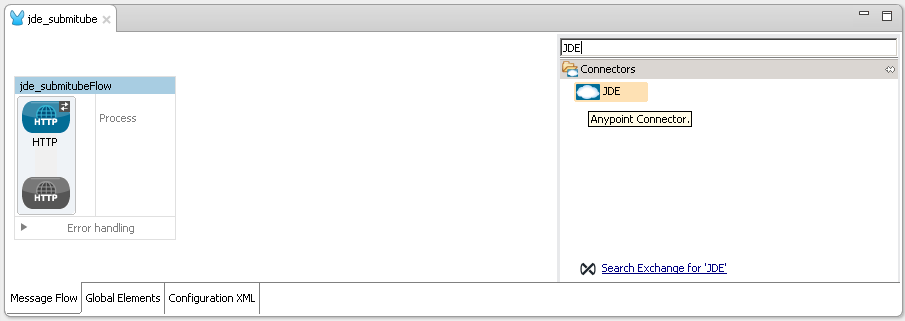
Step 8
Drag the connector over to the canvas:
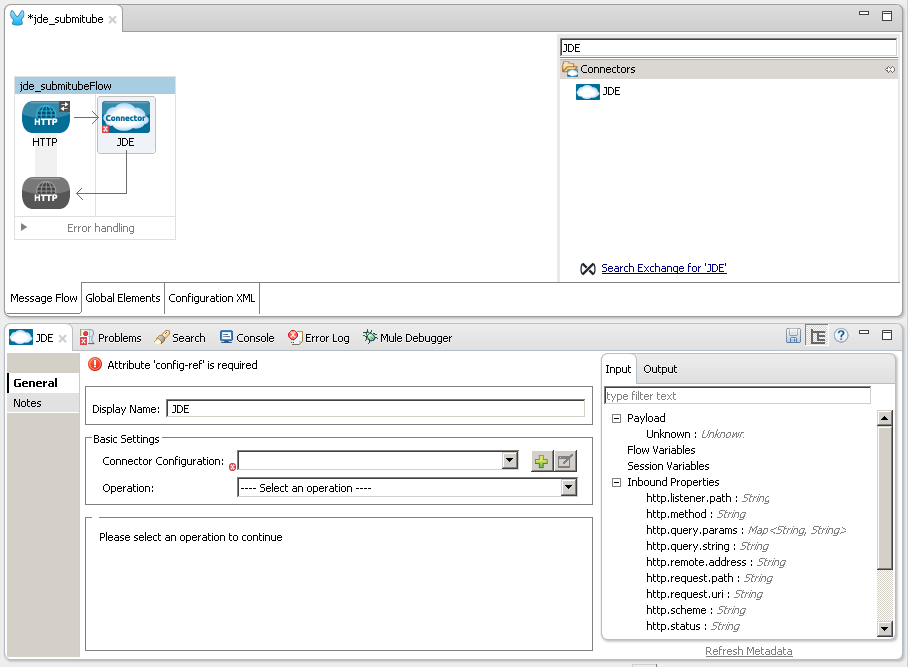
Step 9
The JDE Connector relies on Oracle’s Java Dynamic Connector to establish the link to the server. In order to achieve this, setting up the follwing standard configuration files is needed:
-
"jdbj.ini"
-
"interop.ini"
-
"jdelog.properties"
-
"tnsnames.ora" (for Oracle RDBMS based installations only)
These files are distributed with both Fat Clients or Enterprise Server modules.
In case you get the files from a Fat Client, the folder containing them can be found under the path ini/sbf of your installation.
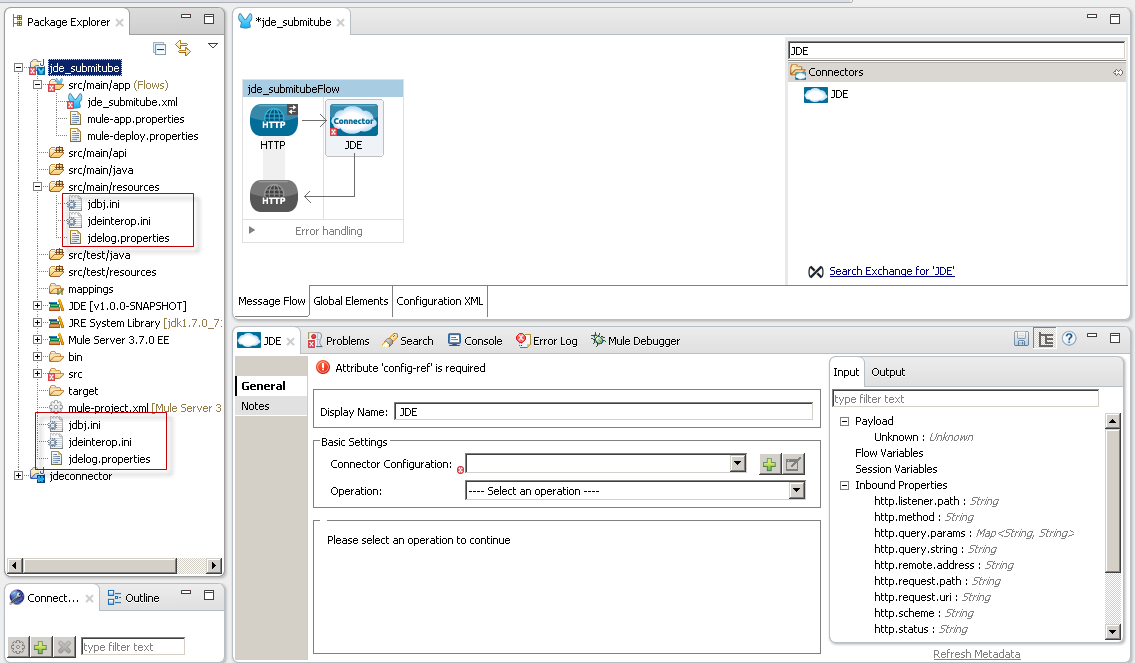
Step 10
Put the files inside the project folder in the folder:
-
source/main/resource
-
root folder of the project
Step 11
Edit jdeinterop.ini, jdelog.properties, and jdbj.ini for proper settings.
Refer to the Guide "JD Edwards EnterpriseOne Tools Connectors Guide"
Step 12
Now you can continue with the JDE Connector. You need to add a new Connector Configuration:
Step 13 (Only for non Maven Project)
Put login information to E1, check Enable DataSense
Now you need to include the Oracle JD Edwards' lib bundle generated previously using JD Edwards setup
Press button Add File and select JD Edwards' bundle created.
the result will be:
Step 13 (Only for Maven Project)
Put login information to E1, check Enable DataSense
Now you need to include the Oracle JD Edwards' lib bundle generated previously using JD Edwards setup
Press button Add Dependency and select JD Edwards' bundle created.
the result will be:
Step 14
Before continue, you need to test connection pressing TEST CONNECTION… button
Step 15
You need to define the local repository to save the specs of the bsfn locally.
Step 16
Press OK and return to the JDE Connector configuration.
Step 17
You need to select the operation "Submit batch process"
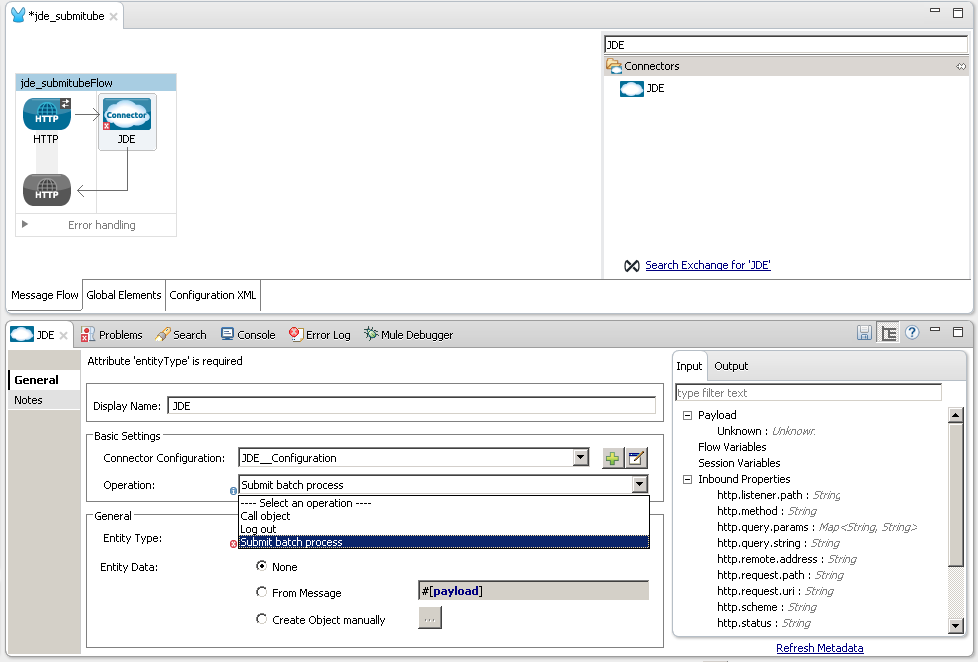
Step 18
Now, you need to write the UBE/Version to submit in the Entity Type field and press ENTER:
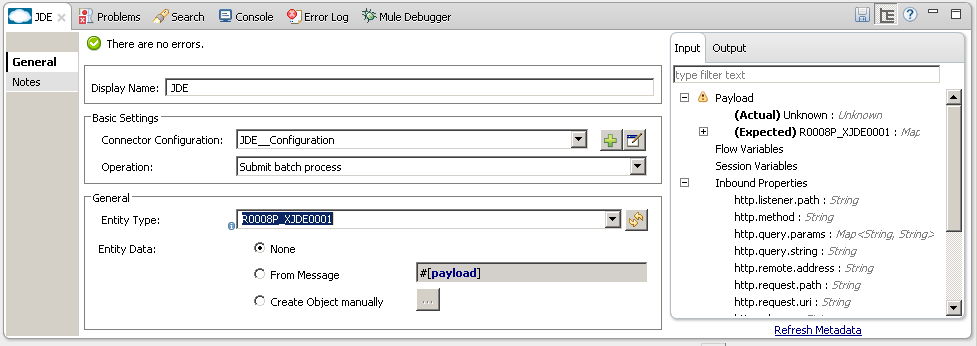
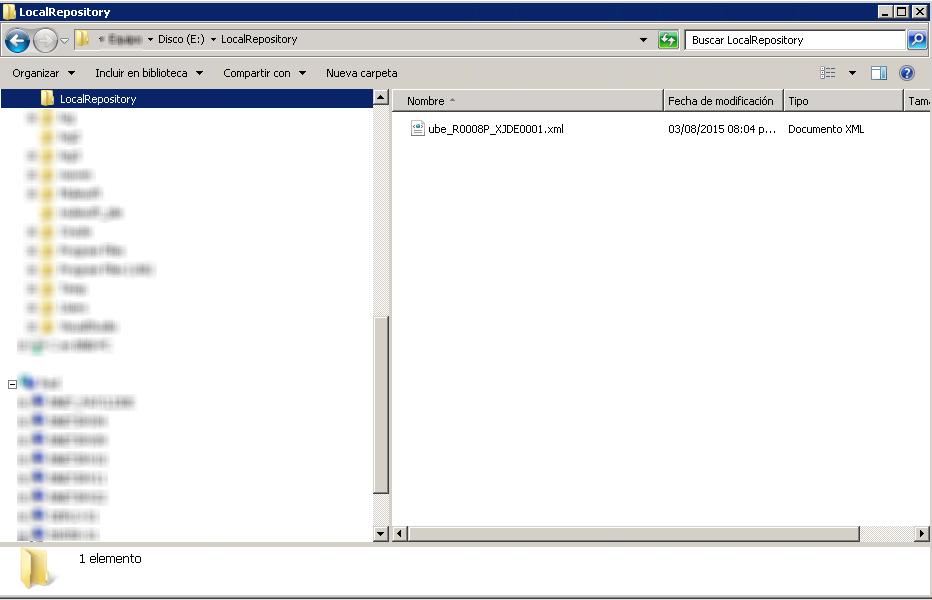
The connector will get the specification from the server and it will put the specification in the local repository.
Step 19
After the connector get the specs from the server, you will need to populate the parameters. To do this, you need to select the option: Create Object manually
Press the button […] and populate the parameters:
_Job Queue: Enter the Job Queue or empty if you prefer default job queue for the UBE selected
cFiscalDatePattern: F

Press OK button to return to JDE Connector configuration. Save the project.
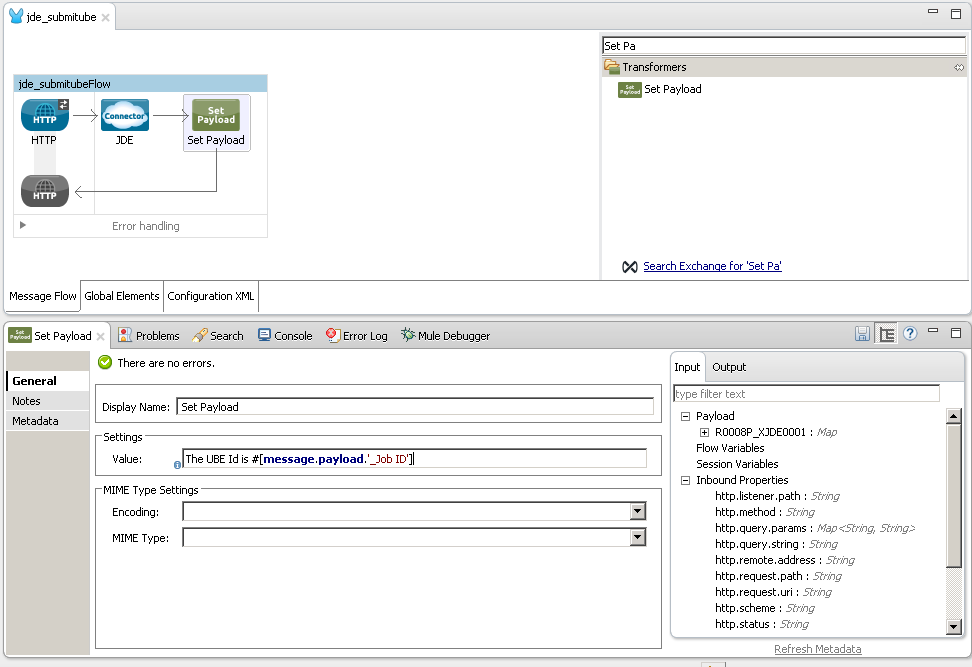
Step 20
Back to the Message Flow view, and you need to Locate the Set Payload on the right hand-side palette to return the address book name.
Step 21
Drag the Transformer over to the canvas and write the answer.
Step 22
Finally, run the example as a Mule application
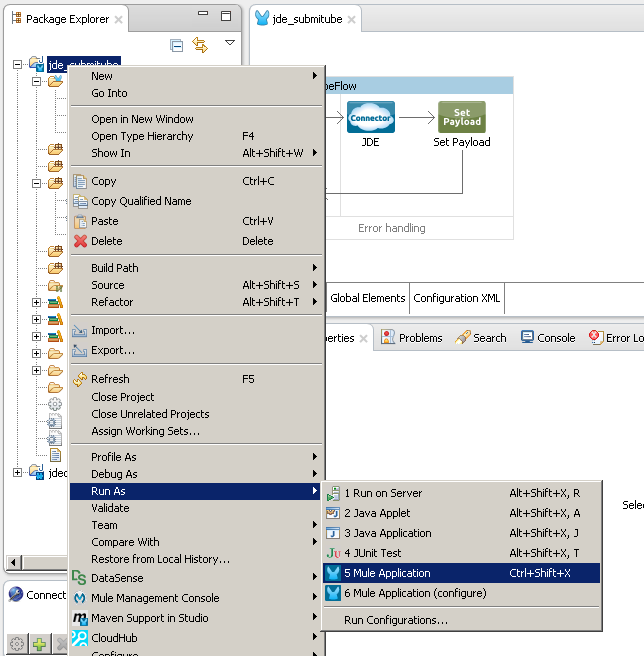
Step 23
Test the Mule Application
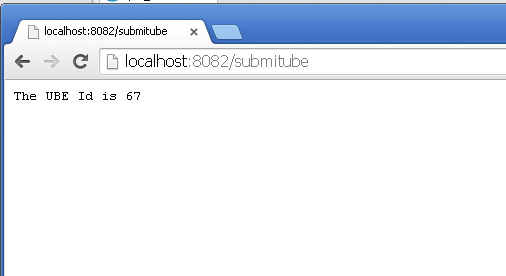
Write the URL:
localhost:8082/submitube
Step 24
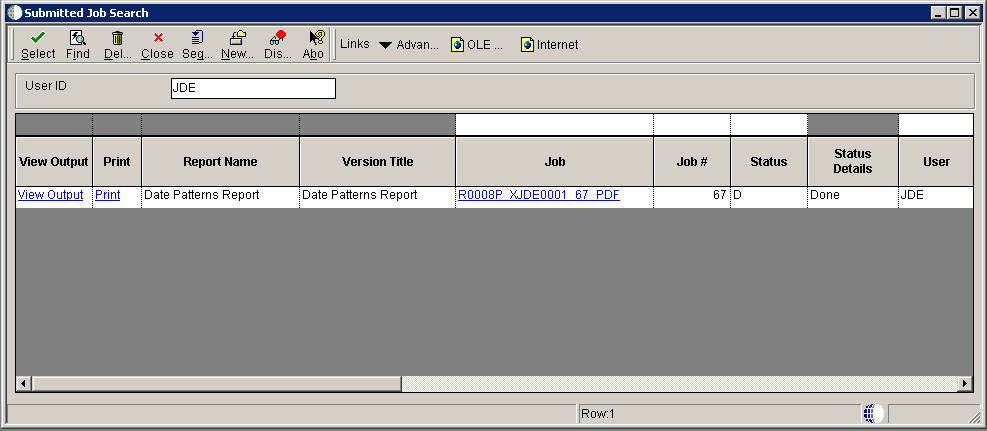
Check Work Submit Job from E1
Example Use Case
This use case example will add an control to the previous example to get an UBE state from JDE Enterprise Server after Submit UBE.
Anypoint Studio Visual Editor | XML Editor
Step 1
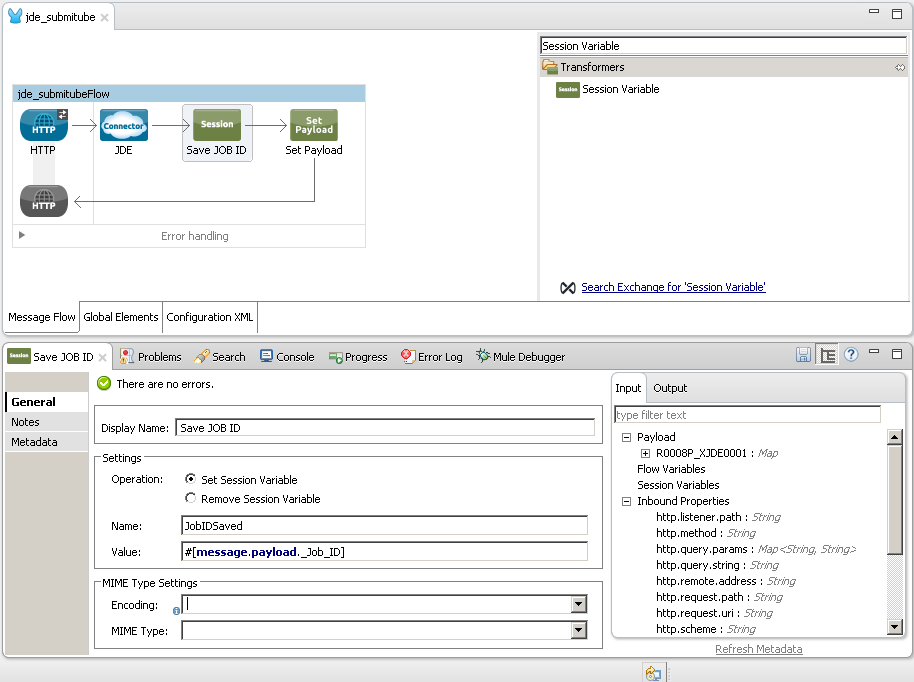
Back to the Message Flow view, you need to Locate the Session Variable on the right hand-side palette:
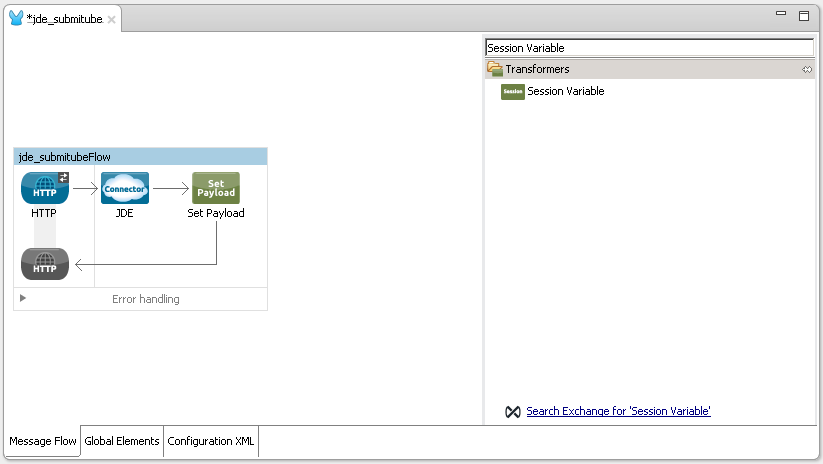
Step 2
Drag the Transformer over to the canvas after JDE Connector:
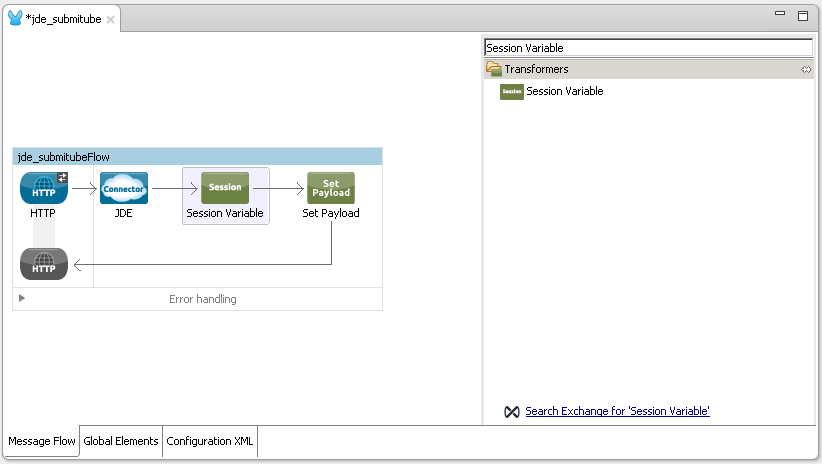
We use this transformer to save the JOB ID generated by the previous UBE Submit.
Edit Session Variable and add the following values:
Display Name: Save JOB ID
Name: JobIDSaved
Value: #[message.payload._Job_ID]
Step 3
Back to the Message Flow view, you need to Locate the JDE Connector on the right hand-side palette:
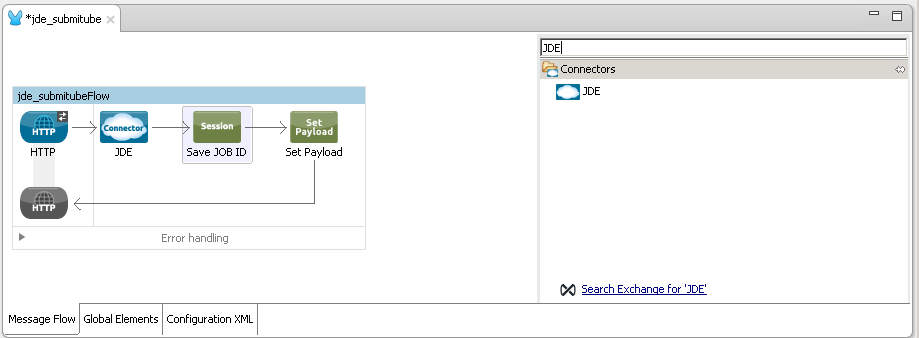
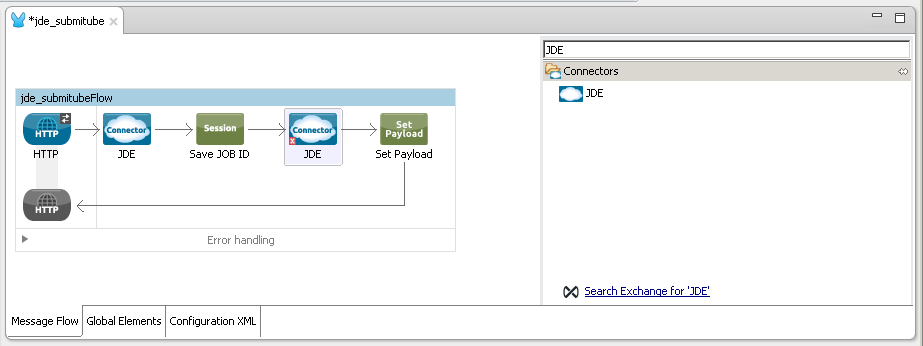
Step 4
Drag the connector over to the canvas after Session Variable Save JOB ID:
Step 5
You need to select the same Connector Configuration as previous connector.
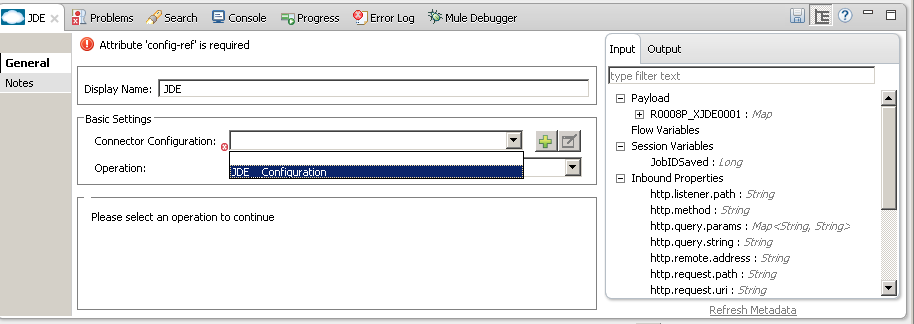
Step 6
You need to select the operation Get batch process information
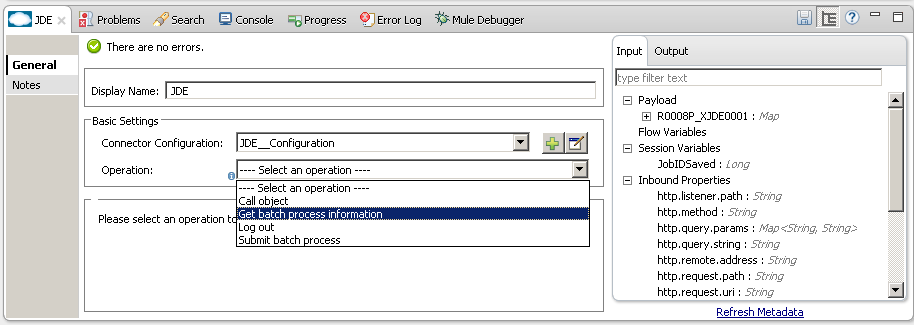
Step 7
Refresh metadata and select Get Job Status
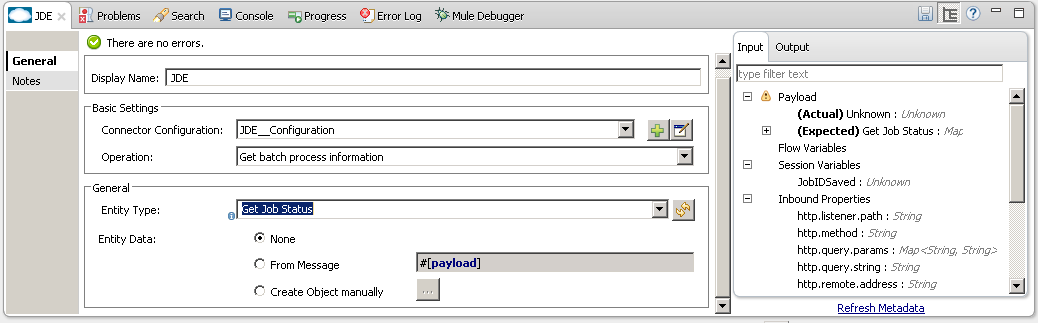
Step 8
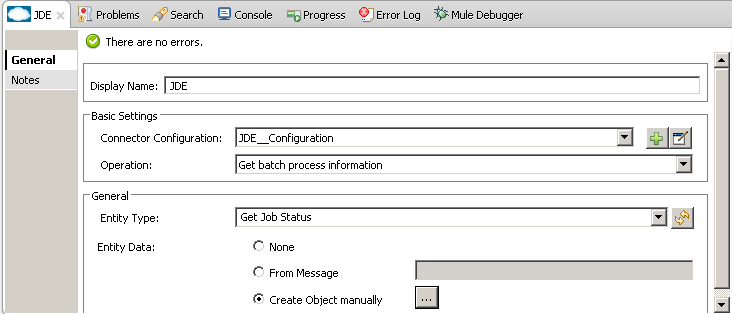
You will need to populate the parameters. To do this, you need to select the option: Create Object manually and press the button […]:
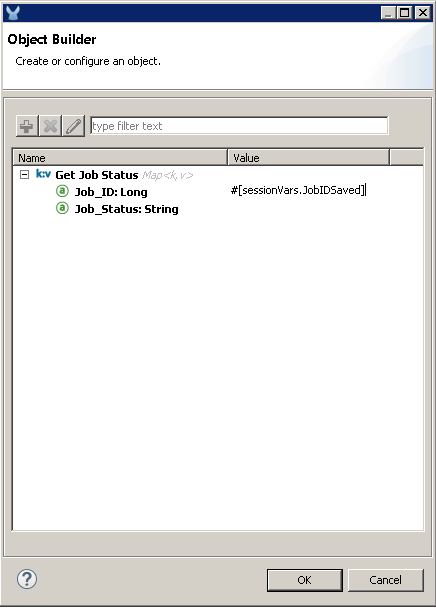
Populate the parameters:
Set Job_ID to value: #[sessionVars.JobIDSaved]
Step 9
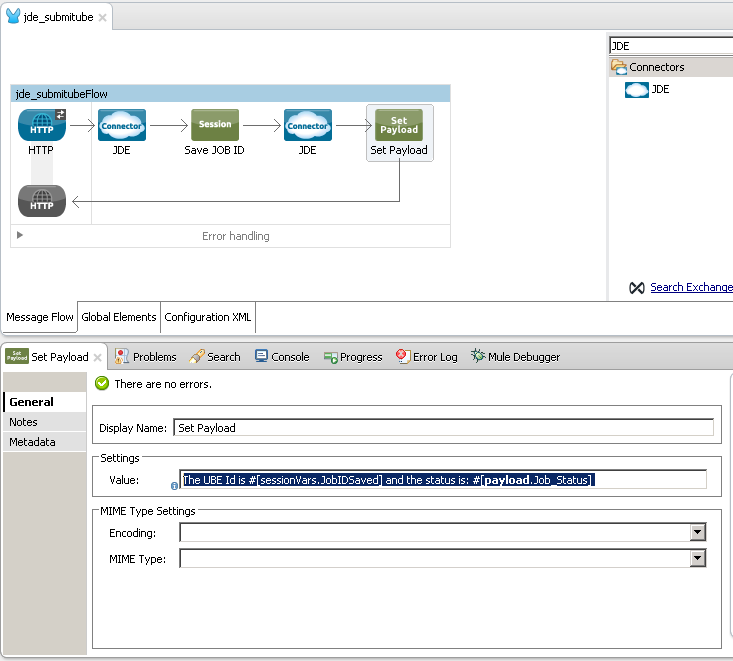
Update the last "Set Payload" with the following value:
The UBE Id is #[sessionVars.JobIDSaved] and the status is: #[payload.Job_Status]
Step 10
Finally, run the example as a Mule application
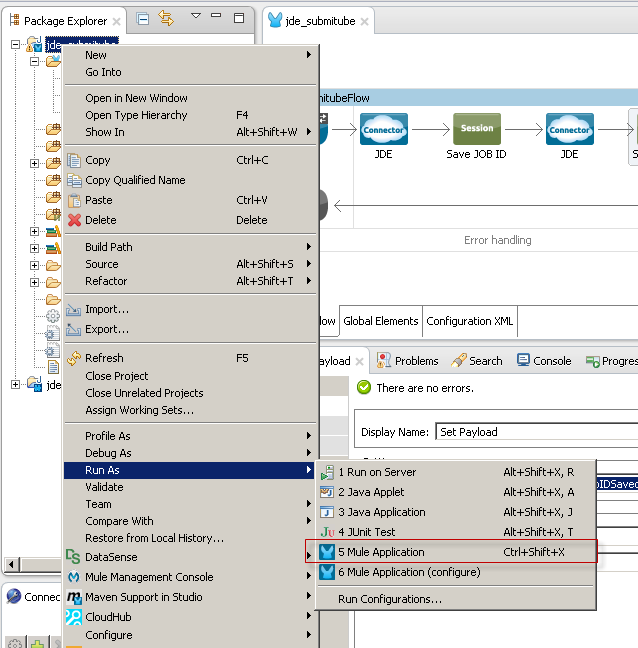
Step 11
Test the Mule Application
Write the URL:
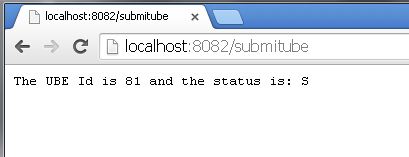
The possible values of job status are:
S: In Queue
W: Waiting
P: Processing
D: Done
E: Error
H: Hold
Oracle JD Edwards' Bundle Creation
Due that the bundle build needs the project, we will created this section as reference illustrate how to create bundle connector component so that you can include in the flow that needs connect to JD Edwards Enterprise Server.
Step 1
Select the project created and press right mouse button to show context menu.
Select JD Edwards setup from the JDE Context Menu options.
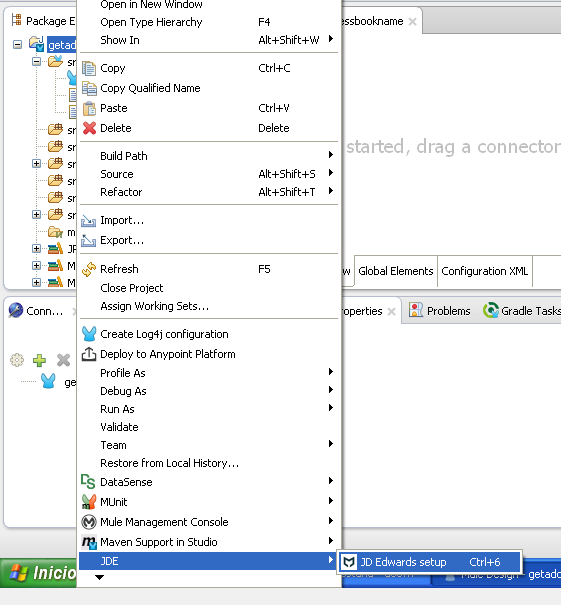
This option will open the following screen:
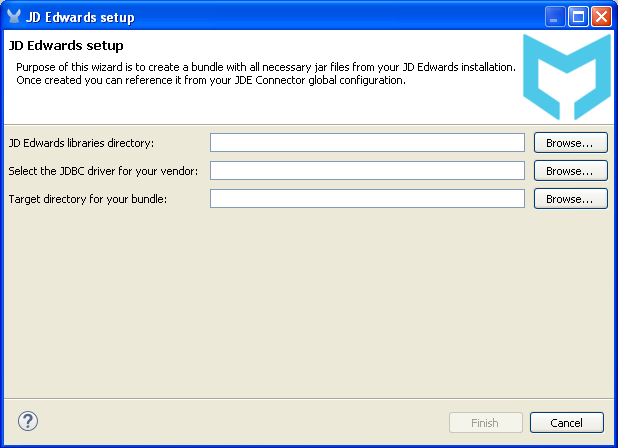
Step 2
In this screen you need to enter:
JDE Edwards libraries directory: the folder SERVER_jar_File created in section Preliminary Setup.
Select the JDBC driver for you vendor: The driver inside the folder JDBC_Vendor_Drivers created in section Preliminary Setup.
Target directory for your bundle: the folder Bundle created in section Preliminary Setup..
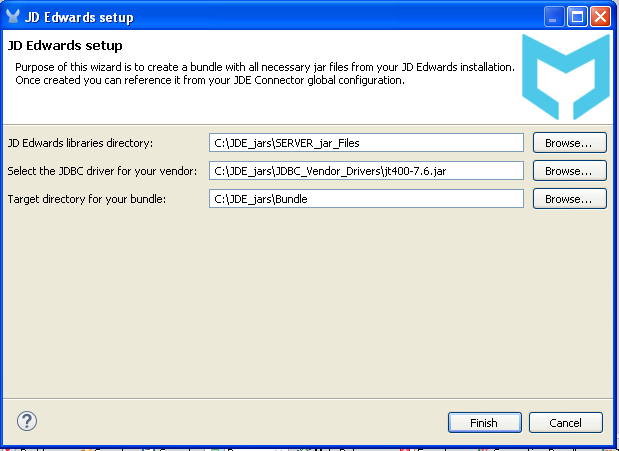
Press the button Finish and wait at the process end. You can see the advanced in the Progress tab at the bottom:

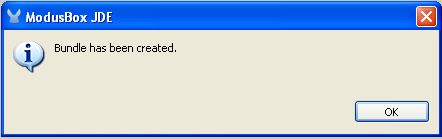
Step 3
When the process finishes, a windows show you the result.
You can open the bundle folder to see the JDE Edwards jar file generated:
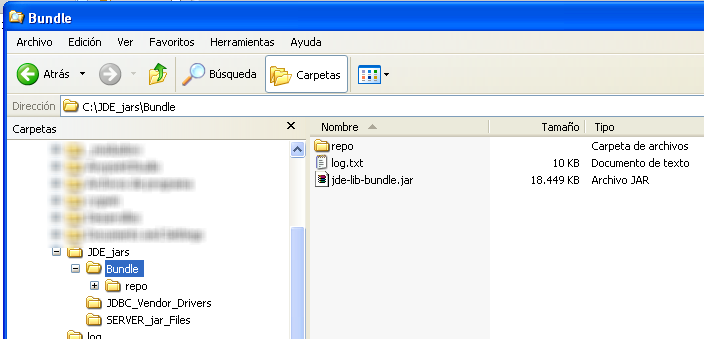
This JAR file will be used in the connector setup.
Note: If you are creating the JDE Edwards bundle from a Maven Project, the jar file will be in the Maven Repository. Folder [MAVEN REP]com\jdedwards\jde-lib-bundle\1.0.0
F.A.Q
-
Add here a all the items you consider useful.
See Also
-
Access full reference documentation for the connector.