Introduction
The ModusBox’s JDE Connector leverages the internal capabilities of Oracle’s JD Edwards EnterpriseOne™ solution to a broader extent.
The JDE Connector aims to provide integration from and to Oracle’s JD Edwards EnterpriseOne™.
ModusBox’s JDE Connector leverages the power of Oracle’s Java Dynamic Connector to provide interoperability with Oracle’s JD Edwards EnterpriseOne™ and external systems.
After reading this guide, you should be able to accomplish the following scenarios:
-
Log into JD Edwards EnterpriseOne™
-
Invoke a BSFN on the server using proper parameters.
-
Invoke a BSFN on the server using Transaction Processing.
-
Invoke a UBE by name.
-
Check a UBE call’s status asynchronously.
-
Poll Events.
-
Poll EDI Events.
-
Log out.
At design time, the JDE Connector allows you to discover functions by name providing full access to all BSFN signatures. Given that discovery is a heavy duty process, the Connector manages a cache repository for all function’s metadata used at least once.
The results of a function call will be injected into the flow as a Map containing key-value pairs with the invocation’s output values. This approach gives the end user freedom of choice to construct complex flows and manage custom exception strategies.
Prerequisites
This document assumes that you are familiar with Oracle’s JD Edwards EnterpriseOne™ basics, Mule the Anypoint™ Studio interface.
Requirements
-
Mule 3.6.1 server Runtime or higher
-
Anypoint Studio January 2015 onwards
-
Access to your Oracle’s JD Edwards EnterpriseOne™ installation java libraries
-
As ModusBox’s JDE Connector is based on Oracle’s JD Edwards EnterpriseOne interoperability solution.is required to activate inside Enterprise Server:
-
XML Dispatch Kernel
-
The XML CallObject kernel
-
The XML Transaction kernel
-
The XML List kernel
-
XMLLookupInfo section for XML Request type 7 inside jde.ini To activate Submit UBE.
-
This configuration must be done by CNC administrator. Refer to JD Edwards EnterpriseOne Tools Interoperability Guide
Compatibility Matrix
The following matrix displays the Oracle’s JD Edwards EnterpriseOne™ Tools versions supported by version
1.3.0 |
Tool Release 8.98 Update 4. onwards |
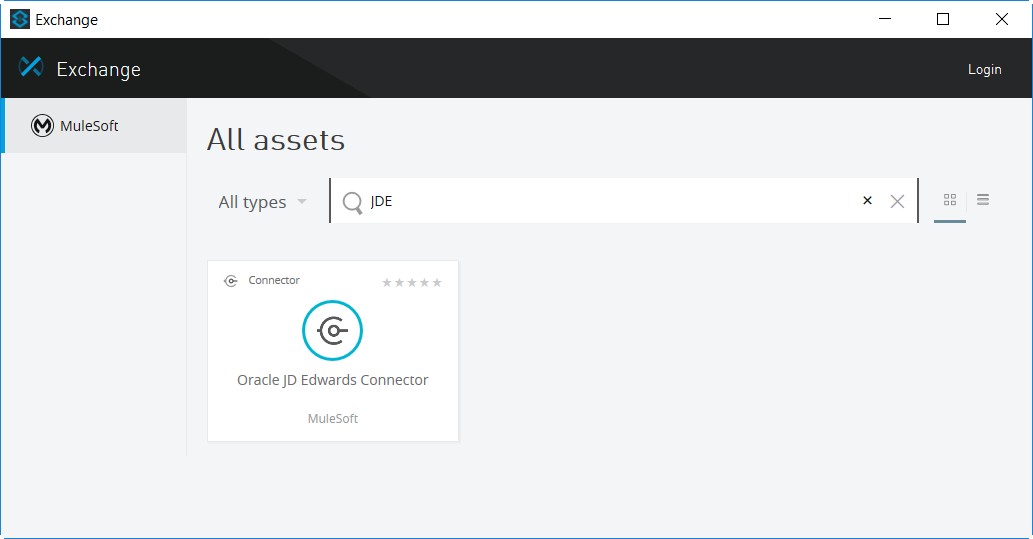
Install the Connector
Installing
You can install JDE Connector in Anypoint Studio using the instructions in Installing a Connector from Anypoint™ Exchange
Installing JDE Connector Setup
-
Launch Anypoint Studio and click on Help → Install New Software.
-
Press Add to create a new repository.
-
Type in "ModusBox Inc" in the Name field and http://modusbox.com/jde-update-site/ in the Location field
-
Expand Select and select JDE Connector Setup. Press Next > to review the items to be installed.
-
Press Next > again to review and accept the license. Press Finish to install the connector.
-
Press OK to accept the prompted security dialog box and allow Anypoint Studio to restart.
Updating From an Older Version
If you’re currently using an older version of the connector, a small popup appears in the bottom right corner of Anypoint Studio with an "Updates Available" message.
-
Click the popup and check for available updates.
-
Click the Connector version checkbox and click Next and follow the instructions provided by the user interface.
-
Restart Studio when prompted.
-
After restarting, when creating a flow and using the Object Store Connector, if you have several versions of the connector installed, you may be asked which version you would like to use. Choose the version you would like to use.
Additionally, we recommend that you keep Studio up to date with its latest version.
These are the changes that you need to consider after the update.
-
The attribute Folder Specs Image Cache in JDE Configuration has been removed. In the XML configuration, look for the
<jde:config>tag and remove parameterimageFolderCache. The JDE Connector will use the system temporary directory plus environment folder concatenated. -
This versions will redirecting JDE Logger to Mule Logger. It allows seeing JDE activity in both Console and JDE file defined in jdelog.properties. It will require to add these Asyng Logger to log4j2.xml file.
<!-- JDE Connector wire logging -->
<AsyncLogger name="org.mule.modules.jde.handle.MuleHandler" level="INFO" />
<AsyncLogger name="org.mule.modules.jde.JDEConnector" level="INFO" />-
DNS resolver has been added to allow JDE Connectors works on CloudHub including with VPC. To allow this, it’s necessary to include JDEdwards servers name using in the connection at the end of jdeinterop.ini file. (It allow to use FQDN or IP)
. . .
[TEST]
username=JDE
password=JDE
env=DV910
role=*ALL

[OCM_SERVERS]
# modusboxe1=modus****.modusbox.com
modusboxe1=129.144.***.***
modusboxe2=129.144.***.**-
The connector now has the possibility to deploy more than one set of INI files for each environment.

-
From now on, the JDE Connector operations will throw its own Exception object instead of throwing always RuntimeException object.
-
The new exceptions are:
-
org.mule.modules.jde.exceptions.CallBSFNException for Call BSFN operation.
-
org.mule.modules.jde.exceptions.BSFNTransactionException for BSFN Transaction operation.
-
org.mule.modules.jde.exceptions.JobStatusException for Get Batch Process Information operation.
-
org.mule.modules.jde.exceptions.SubmitUBEException for Submit Barch Process operation.
-
org.mule.modules.jde.exceptions.EventException for both EDI Outbounds and Poll Events operations.
-
-
These exceptions are extended of JDEConnectorException.
-
The Call Business Function operation now will return a XML in the parameter_BSFNDetailErrors instead of a String. This XML will be a representation of CallObjectErrorList object.
Configure the Connector Global Element
Preliminary Setup
In addition to meeting the requirements listed in the Prerequisites and Requirements section, a bundle has to be created to establish a connection to the JDE Enterprise Server. This bundle will be created only for the first time and it can be reused in other applications.
This adapter is a bundle of JAR files that come with the JD Edwards EnterpriseOne distribution.
These steps illustrate how to create bundle connector component so that you can include in the flow that needs connect to JDE Enterprise Server.
Step 1
Create a folder in the file system that it will include the following subfolder:
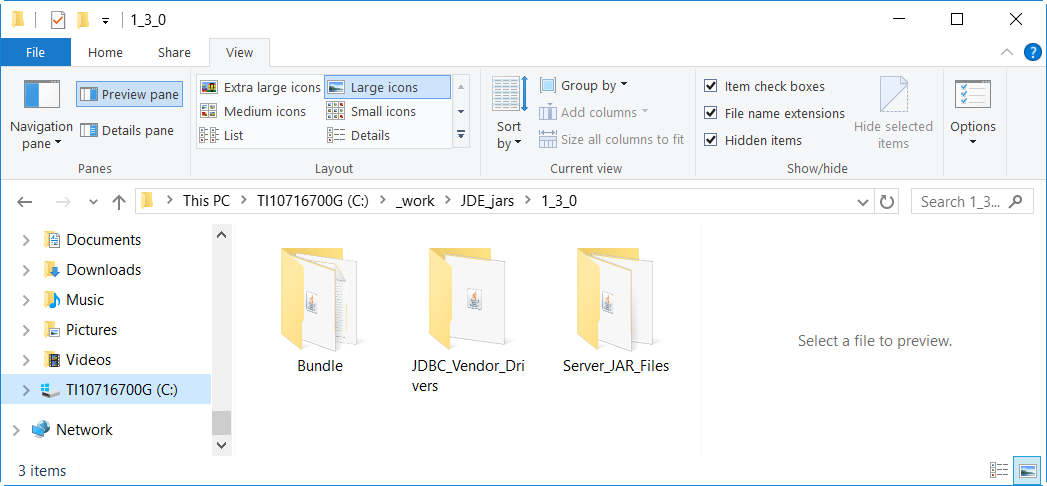
In the folder Server_jar_files we need all the jar file that come with the JD Edwards EnterpriseOne distribution. The files can be found at <Enterprise Server directory>\system\classes on the JDE Enterprise Server to which you are connecting.
For Tools Release 8.98, copy these files:
-
ApplicationAPIs_JAR.jar
-
ApplicationLogic_JAR.jar
-
Base_JAR.jar
-
BizLogicContainer_JAR.jar
-
BizLogicContainerClient_JAR.jar
-
BusinessLogicServices_JAR.jar
-
castor.jar
-
commons-httpclient-3.0.jar
-
commons-logging.jar
-
Connector.jar
-
EventProcessor_JAR.jar
-
Generator.jar
-
j2ee1_3.jar
-
JdbjBase_JAR.jar
-
JdbjInterfaces_JAR.jar
-
JdeNet_JAR.jar
-
jmxremote.jar
-
jmxremote_optional.jar
-
jmxri.jar
-
log4j.jar
-
ManagementAgent_JAR.jar
-
Metadata.jar
-
MetadataInterface.jar
-
PMApi_JAR.jar
-
Spec_JAR.jar
-
System_JAR.jar
-
SystemInterfaces_JAR.jar
-
xmlparserv2.jar
For Tools Releases Tools Release 9.1 prior Update 4, copy these files:
-
ApplicationAPIs_JAR.jar
-
ApplicationLogic_JAR.jar
-
Base_JAR.jar
-
BizLogicContainer_JAR.jar
-
BizLogicContainerClient_JAR.jar
-
BusinessLogicServices_JAR.jar
-
castor.jar
-
commons-httpclient-3.0.jar
-
commons-logging.jar
-
Connector_JAR.jar
-
EventProcessor_JAR.jar
-
Generator.jar
-
JdbjBase_JAR.jar
-
JdbjInterfaces_JAR.jar
-
JdeNet_JAR.jar
-
jmxremote.jar
-
jmxremote_optional.jar
-
jmxri.jar
-
ManagementAgent_JAR.jar
-
Metadata.jar
-
MetadataInterface.jar
-
PMApi_JAR.jar
-
Spec_JAR.jar
-
System_JAR.jar
-
SystemInterfaces_JAR.jar
-
xmlparserv2.jar
For Tools Releases Tools Release 9.1 Update 4 and later updates, copy these files:
-
ApplicationAPIs_JAR.jar
-
ApplicationLogic_JAR.jar
-
Base_JAR.jar
-
BizLogicContainer_JAR.jar
-
BizLogicContainerClient_JAR.jar
-
BusinessLogicServices_JAR.jar
-
castor.jar
-
commons-codec.jar
-
commons-lang2.6.jar
-
commons-logging.jar
-
Connector.jar
-
EventProcessor_JAR.jar
-
Generator_JAR.jar
-
httpclient.jar
-
httpcore.jar
-
httpmime.jar
-
j2ee1_3.jar
-
JdbjBase_JAR.jar
-
JdbjInterfaces_JAR.jar
-
JdeNet_JAR.jar
-
jmxremote.jar
-
jmxremote_optional.jar
-
jmxri.jar
-
ManagementAgent_JAR.jar
-
Metadata.jar
-
MetadataInterface.jar
-
PMApi_JAR.jar
-
Spec_JAR.jar
-
System_JAR.jar
-
SystemInterfaces_JAR.jar
-
xml-apis.jar
-
xmlparserv2.jar
For Tools Releases Tools Release 9.2 and later, copy these files:
-
ApplicationAPIs_JAR.jar
-
ApplicationLogic_JAR.jar
-
Base_JAR.jar
-
BizLogicContainer_JAR.jar
-
BizLogicContainerClient_JAR.jar
-
BusinessLogicServices_JAR.jar
-
commons-codec.jar
-
castor.jar
-
commons-lang2.6.jar
-
commons-logging.jar
-
Connector.jar
-
EventProcessor_JAR.jar
-
Generator.jar
-
httpclient.jar
-
httpcore.jar
-
httpmime.jar
-
j2ee1_3.jar
-
JdbjBase_JAR.jar
-
JdbjInterfaces_JAR.jar
-
JdeNet_JAR.jar
-
jmxremote.jar
-
jmxremote_optional.jar
-
jmxri.jar
-
ManagementAgent_JAR.jar
-
Metadata.jar
-
MetadataInterface.jar
-
PMApi_JAR.jar
-
Spec_JAR.jar
-
System_JAR.jar
-
SystemInterfaces_JAR.jar
-
xerces.jar
-
xml-apis.jar
-
xmlparserv2.jar
In the folder JDBC_Vendor_Drivers we need the JDBC driver files that correspond to the database to which you are connecting.
The folder Bundle will be an empty folder that will be used be the JD Edwards Setup to prepare the bundle jar file.
JDE Server configuration required
To ensure correct operation of all of the JDE Connector features the Enterprise Server requires the following jde.ini file settings:
Please refer to JD Edwards EnterpriseOne Tools Interoperability Guide to check updates.
-
Ensure that sufficient processes are available for the XML List Kernel
Use these settings for a Microsoft Windows platform:
| [JDENET_KERNEL_DEF16] |
|---|
krnlName=XML List Kernel dispatchDLLName=xmllist.dll dispatchDLLFunction=_XMLListDispatch@28 maxNumberOfProcesses=3 numberOfAutoStartProcesses=1 |
Please refer to JD Edwards EnterpriseOne Tools Interoperability Guide to get provides the different .dll extensions for other platforms.
-
Ensure that sufficient processes are available for the XML Dispatch Kernel
Use these settings for a Microsoft Windows platform:
| [JDENET_KERNEL_DEF22] |
|---|
dispatchDLLName=xmldispatch.dll dispatchDLLFunction=_XMLDispatch@28 maxNumberOfProcesses=1 numberOfAutoStartProcesses=1 |
Please refer to JD Edwards EnterpriseOne Tools Interoperability Guide to get provides the different .dll extensions for other platforms.
-
Ensure that sufficient processes are available for the XML Service Kernel
Use these settings for a Microsoft Windows platform:
| [JDENET_KERNEL_DEF24] |
|---|
krnlName=XML Service KERNEL dispatchDLLName=xmlservice.dll dispatchDLLFunction=_XMLServiceDispatch@28 maxNumberOfProcesses=1 numberOfAutoStartProcesses=0 |
Please refer to JD Edwards EnterpriseOne Tools Interoperability Guide to get provides the different .dll extensions for other platforms.
-
Ensure that the LREngine has a suitable output storage location and sufficient disk allocation
Use these settings for a Microsoft Windows platform:
| [LREngine] |
|---|
System=C:\JDEdwardsPPack\E920\output Repository_Size=20 Disk_Monitor=YES |
-
Ensure that the XML Kernels are correctly defined
| [XMLLookupInfo] |
|---|
XMLRequestType1=list XMLKernelMessageRange1=5257 XMLKernelHostName1=local XMLKernelPort1=0 XMLRequestType2=callmethod XMLKernelMessageRange2=920 XMLKernelHostName2=local XMLKernelPort2=0 XMLRequestType3=trans XMLKernelMessageRange3=5001 XMLKernelHostName3=local XMLKernelPort3=0 XMLRequestType4=JDEMSGWFINTEROP XMLKernelMessageRange4=4003 XMLKernelHostName4=local XMLKernelPort4=0 XMLKernelReply4=0 XMLRequestType5=xapicallmethod XMLKernelMessageRange5=14251 XMLKernelHostName5=local XMLKernelPort5=0 XMLKernelReply5=0 XMLRequestType6=realTimeEvent XMLKernelMessageRange6=14251 XMLKernelHostName6=local XMLKernelPort6=0 XMLKernelReply6=0 XMLRequestType7=ube XMLKernelHostName7=local XMLKernelMessageRange7=380 XMLKernelPort7=0 XMLKernelReply7=1 |
Enterprise Server connection considerations
-
Enable Predefined JDENET Ports in JDE.INI
When there is a firewall between the Mulesoft ESB and the Enterprise Server, set the PredfinedJDENETPorts setting to 1 in the JDE.INI file of the Enterprise Server. This setting enables JDENET network process to use a predefined range of TCP/IP ports. This port range starts at the port number that is specified by serviceNameListen and ends at the port that is calculated by the equation serviceNameListen = maxNetProcesses - 1. You must open these ports in a firewall setup to successfully connect the Mulesoft ESB to the Enterprise Server.
Please refer to JD Edwards EnterpriseOne Tools Security Administration Guide to check updates.
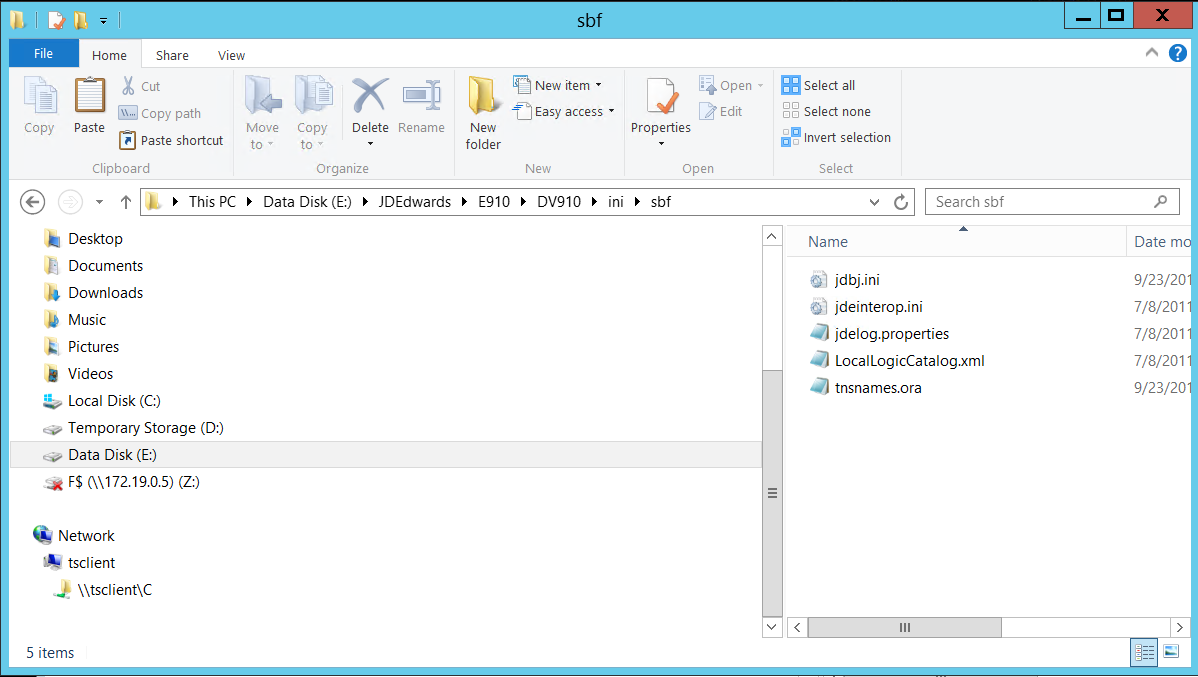
Configuring the INI File for JDE Connector
The JDE Connector relies on Oracle’s Java Dynamic Connector to establish the link to the server. In order to achieve this, setting up the follwing standard configuration files is needed:
-
"jdbj.ini"
-
"jdeinterop.ini"
-
"jdelog.properties"
-
"tnsnames.ora" (for Oracle RDBMS based installations only)
These files are distributed with both Fat Clients or Enterprise Server modules.
In case you get the files from a Fat Client, the folder containing them can be found under the path ini/sbf of your installation.
|
You must need assistance from a CNC technical. |
-
JDBJ.INI
This file is used by Dynamic Java Connector of JD Edwards to introspects business function metadata.
One point to start is seeing HTML server jdbj configuration. Using JD Edwards EnterpriseOne Server Manager inside HTML instance and under Configuration section, there is one option called Database.
-
JDEINTEROP.INI
One point to start is seeing HTML server jas configuration. Using JD Edwards EnterpriseOne Server Manager inside HTML instance and under Configuration section, there are options called Miscellaneous, Network and Security.
There is addtional configurations needed inside JDEINTEROP.INI. You need to add the following section:
| [EVENT] | |
|---|---|
lockEventsYN=N |
Flag used by the JDE Connector to lock transactions events before consumed. It must be used if the connector run in more that one Mule instance. |
specialEDITables=<F470462> |
List of EDI tables without EDLN in its column definitions (between < and >) |
validateEnterpriseServicesWith=BOTH |
(optional) This options is used by the Test Connection to Validate Enterprise Servicies. The values are BSFN, UBE, BOTH or NONE. |
validateEnterpriseServicesUBEName=R0008P_XJDE0001 |
(optional) This is the UBE used to validate the connection. |
If you need to run the application on CloudHub, you will need to add the section OCM_SERVERS with the servers that the JDE Connector will use in the connection. The JDE Servers Names are in the column OMSRVR of F98611 table. To add these servers on the OCM_SERVERS section you will need to follow this format is simple: JDE Server Name = FQDN or IP
| [OCM_SERVERS] | |
|---|---|
jdeserver01=jdeserver01.yourdomain.com |
The JDE Connector will ask to the DNS Server the IP of jdeserver01.yourdomain.com. Then, The JDE Connector will use this IP for each reference to jdeserver01 |
jdeserver02=10.168.45.1 |
The JDE Connector will use the IP 10.168.45.1 for each reference to jdeserver02 |
-
jdelog.properties
If you are deploying an Application on Cloudhub, you need to use the tmp directory. This is an example:
[E1LOG]
FILE=/tmp/jdelog/jderoot.log
LEVEL=WARN
FORMAT=APPS
MAXFILESIZE=10MB
MAXBACKUPINDEX=20
COMPONENT=ALL
APPEND=TRUE

#Logging runtime and JAS above APP level will be helpful for application developers.
#Application developers should use this log as a substitute to analyze the flow of events
#in the webclient.

[LOG1]
FILE=/tmp/jdelog/jas.log
LEVEL=APP
FORMAT=APPS
MAXFILESIZE=10MB
MAXBACKUPINDEX=20
COMPONENT=RUNTIME|JAS|JDBJ
APPEND=TRUE

#Logging runtime and JAS at DEBUG level will be helpful for tools developers.
#Tool developers should use this log ato debug tool level issues
[LOG2]
FILE=/tmp/jdelog/jasdebug.log
LEVEL=DEBUG
FORMAT=TOOLS_THREAD
MAXFILESIZE=10MB
MAXBACKUPINDEX=20
COMPONENT=ALL
APPEND=TRUE
Additionally, The new JDE Connector version will redirect JDE Logger to Mule Logger. It will allow seeing JDE activity in both Console and JDE file defined in jdelog.properties. To activate this redirect, It will require adding these Asyng loggers to log4j2.xml file
<AsyncLogger name="org.mule.modules.jde.handle.MuleHandler" level="INFO" />
<AsyncLogger name="org.mule.modules.jde.JDEConnector" level="INFO" />|
To report an issue you will need to use DEBUG level |
Create Mule Project
Create a new Mule Project with Mule Server 3.8.4 or larger EE as runtime:
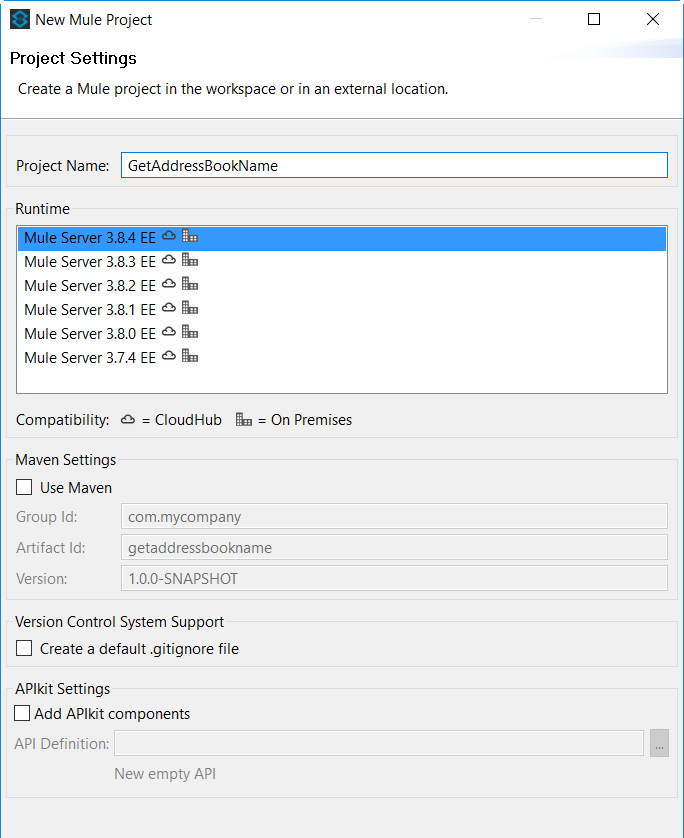
We will need this project to generate Bundle.
Generate Bundle
After create the project, you need to build the Oracle JD Edwards' lib bundle.
This jar bundle will be created once and it can be reused for all the projects that it needs connect to JD Edwards.
Step 1
Select the project created and press right mouse button to show context menu.
Select JD Edwards setup from the JDE Context Menu options.
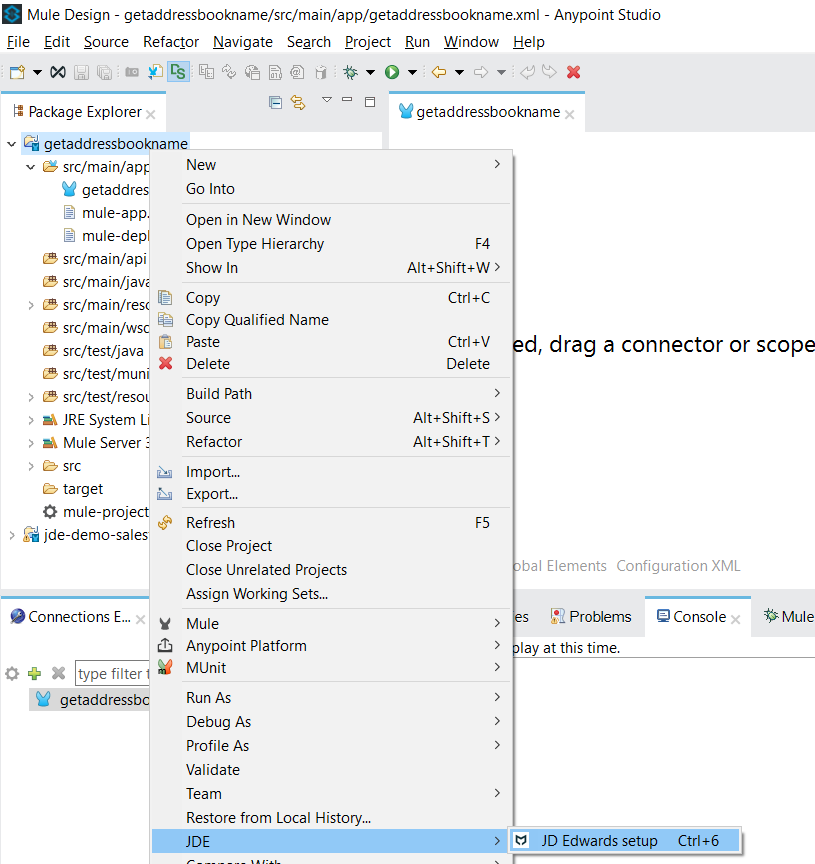
This option will open the following screen:
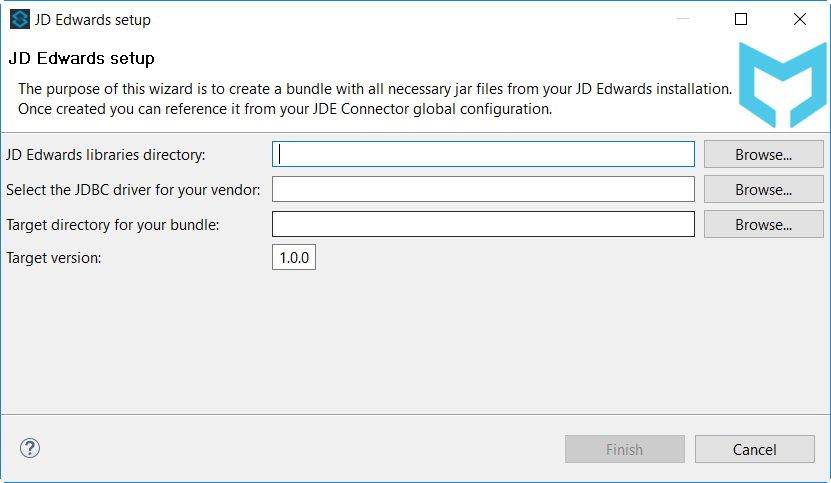
Step 2
In this screen you need to enter:
JDE Edwards libraries directory: the folder SERVER_jar_File created in section Preliminary Setup.
Select the JDBC driver for you vendor: The driver inside the folder JDBC_Vendor_Drivers created in section Preliminary Setup.
Target directory for your bundle: the folder Bundle created in section Preliminary Setup..
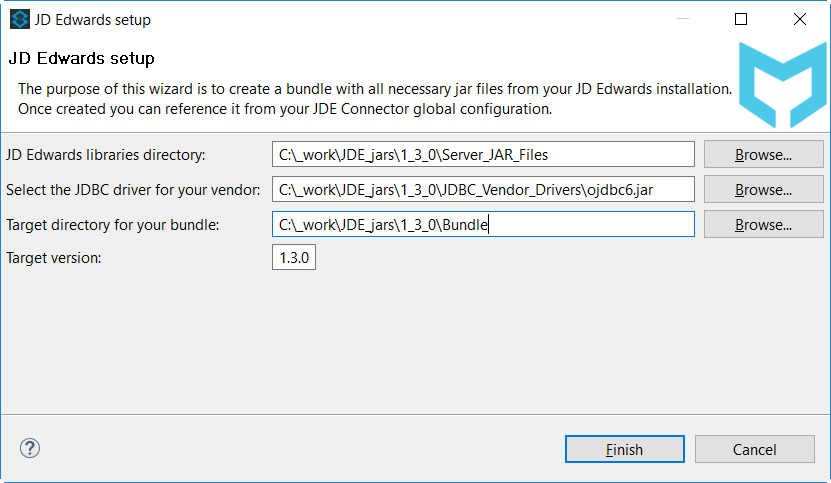
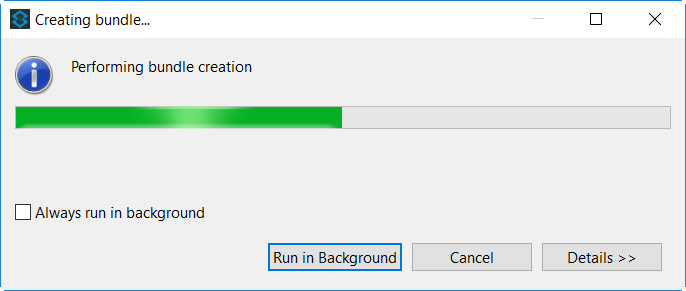
Press the button Finish and wait at the process end. You can see the advanced in the Progress tab at the bottom:
Step 3
When the process finishes, a windows show you the result.
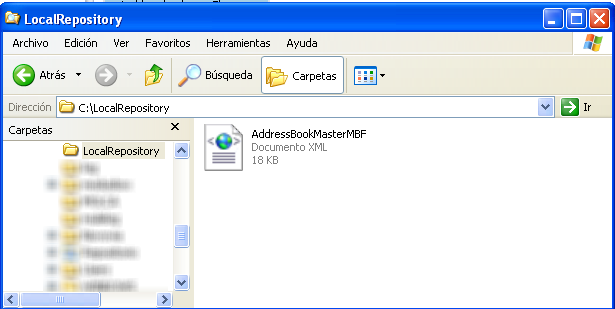
You can open the bundle folder to see the JDE Edwards jar file generated:
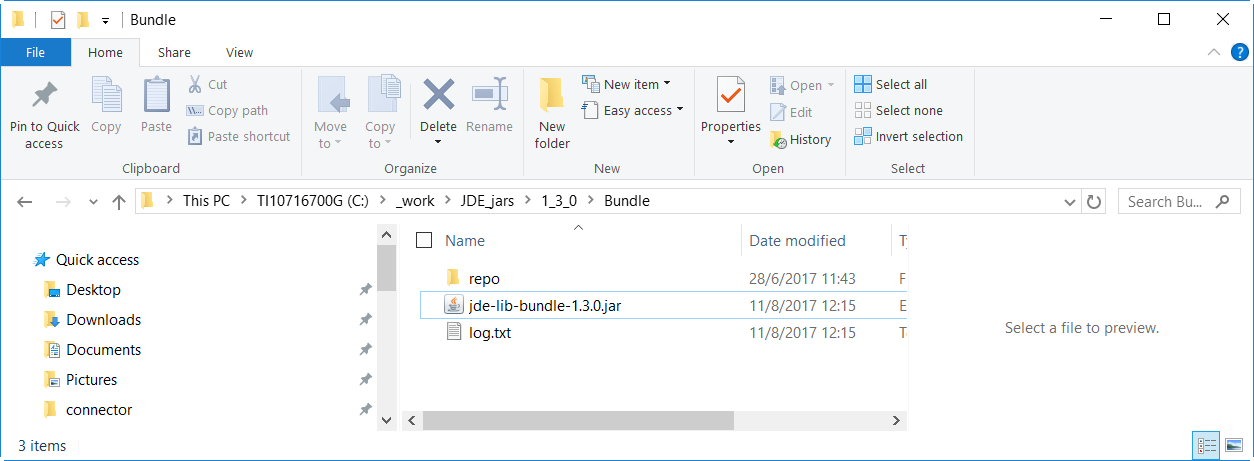
This JAR file will be used in the connector setup.
|
If you are creating the JDE Edwards bundle from a Maven Project, the jar file will be in the Maven Repository. Folder [MAVEN REP]com\jdedwards\jde-lib-bundle\[Version] |
Copy JDE ini Files inside the Project
Step 1
Put the files inside the project folder in the folder:
-
source/main/resource
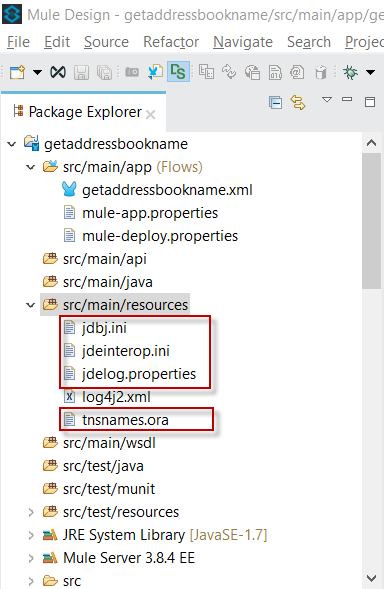
|
From 1.3.0, The connector now has the possibility to deploy more than one set of INI files for each environment. To allow that, you need to create a folder with the same JDE environment under the folder source/main/resource. Ex. source/main/resource/JPS920 for testing. This folder name must match the Environment used by the connector. 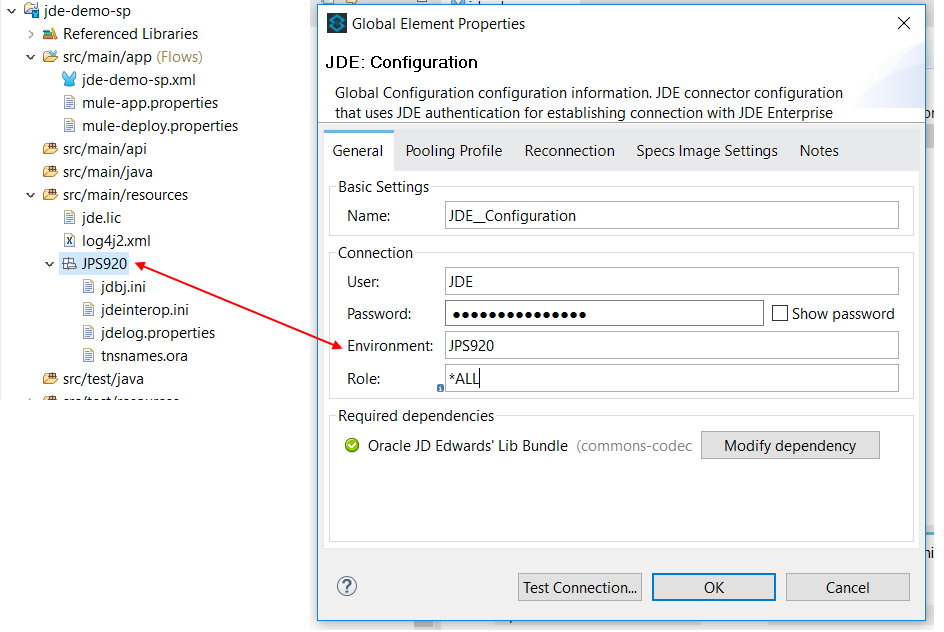
|
Step 2
Edit jdeinterop.ini, jdelog.properties, and jdbj.ini for proper settings.
|
Refer to the Guide "JD Edwards EnterpriseOne Tools Connectors Guide" |
Configure Global Element
To use the ModusBox’s JDE Connector in your Mule application, you must configure a global ModusBox’s JDE Connector element that can be used by the ModusBox’s JDE Connector (read more about Global Elements).
The ModusBox’s JDE Connector offers the following global configuration(s), requiring the following credentials:
General → Connection
| Field | Description |
|---|---|
User |
Enter JDE User used to initialize the JDE Session. |
Password |
Enter Password used to authenticate the JDE user |
Environment |
Enter JDE Environment |
Role |
Enter JDE User Role |
General → Check Enable DataSense (Only on old Anypoint Studio)
General → Required Dependency
| Field | Description |
|---|---|
Oracle JD Edwards' Lib Bundle |
Select Jar File generated in section Generate Bundle or include maven reference. (See below) |
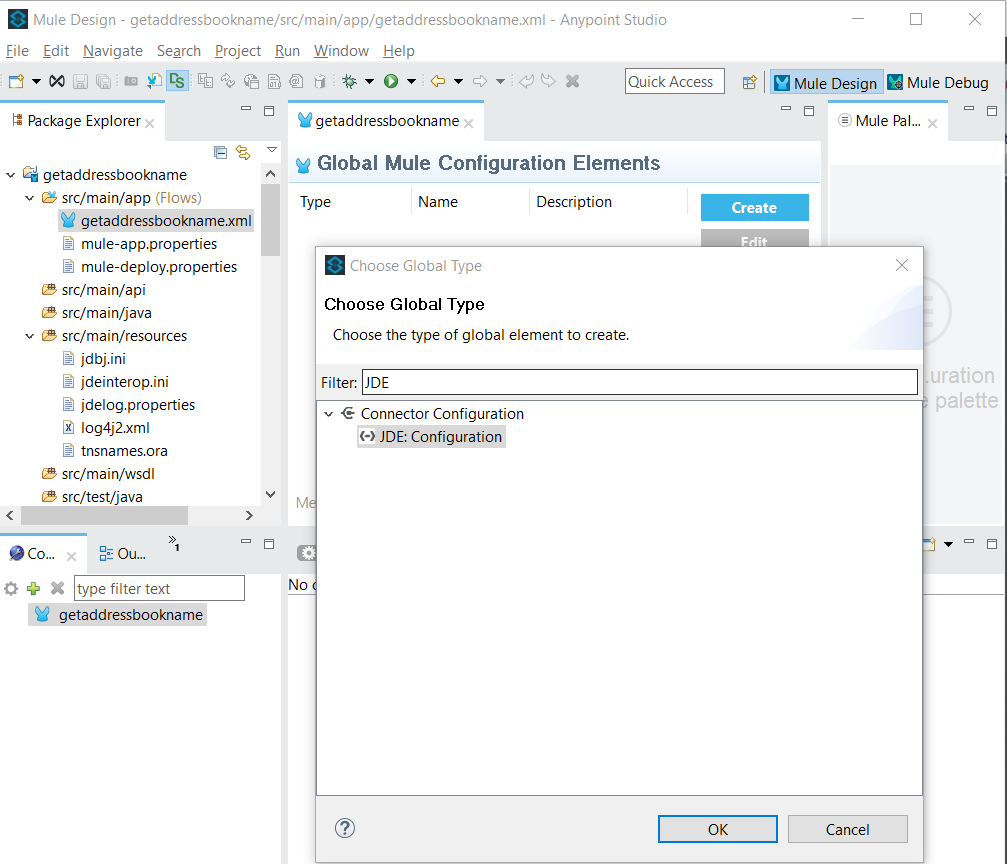
The first step is create a JDE Global Mule Configuration Elements:
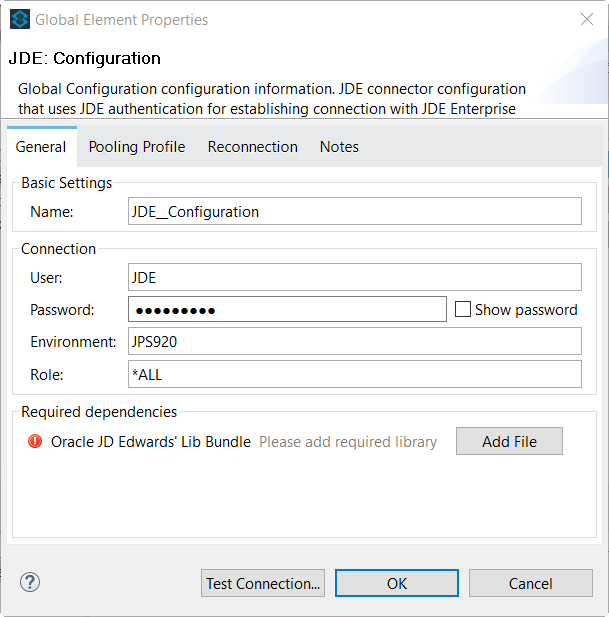
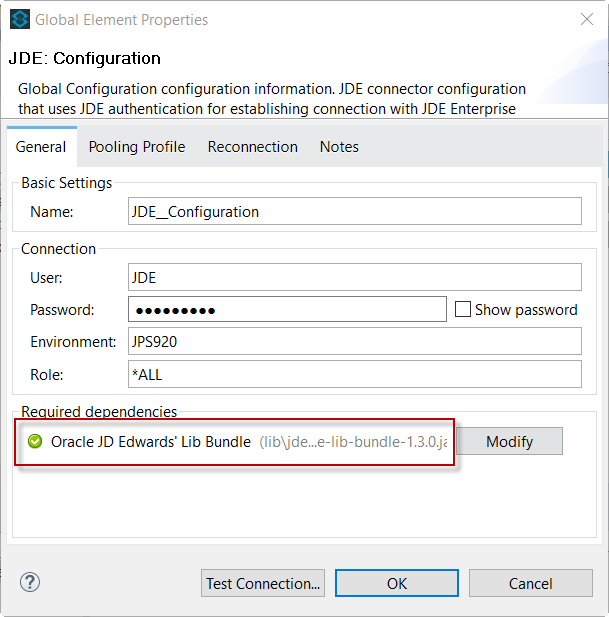
To include the Oracle JD Edwards' lib bundle generated previously:
Press button Add File and select JD Edwards' bundle created.
the result will be:
For Maven Project:
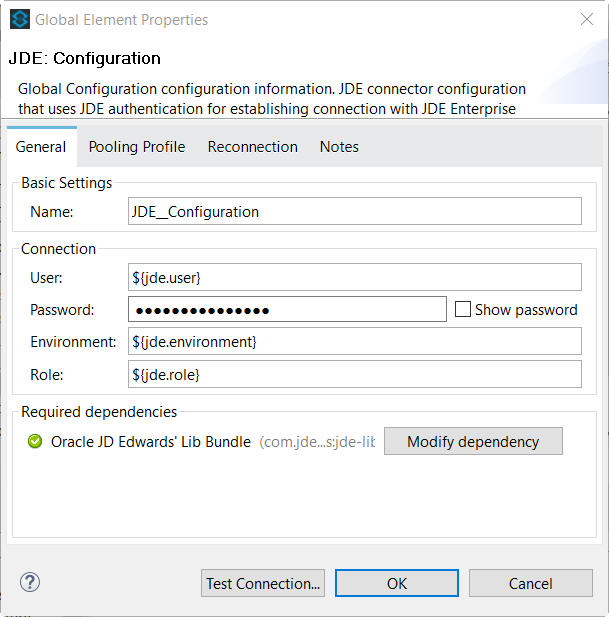
Press button Add Dependency and select JD Edwards' bundle created.
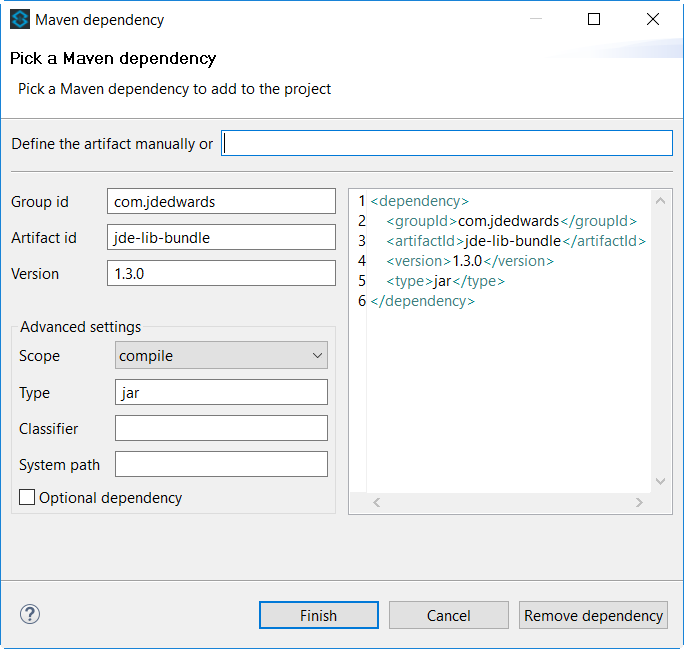
the result will be:
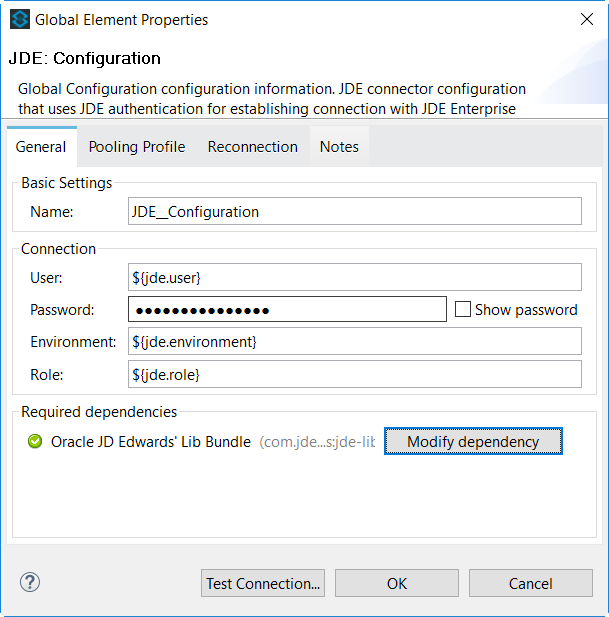
Before continue, you need to test connection pressing TEST CONNECTION… button
Using the Connector
You can use the connector to
-
Invoke a BSFN on JD Edwards Enterprise Server.
-
Invoke a BSFN on JD Edwards Enterprise Server using Transaction Processing.
-
Submit a UBE.
-
Get UBE Job Status for a UBE using JDE Job Id.
-
Get Outbound Events from a JD Edwards Application.
-
Get EDI Event from EDI Application.
Connector Namespace and Schema
When designing your application in Studio, the act of dragging the connector from the palette onto the Anypoint Studio canvas should automatically populate the XML code with the connector namespace and schema location.
Namespace: http://www.mulesoft.org/schema/mule/jde
Schema Location: http://www.mulesoft.org/schema/mule/jde http://www.mulesoft.org/schema/mule/jde/current/mule-jde.xsd
If you are manually coding the Mule application in Studio’s XML editor or other text editor, define the namespace and schema location in the header of your Configuration XML, inside the <mule> tag.
|
  1
2
3
4
5
6
7
8
9
10
11
12

  <mule xmlns="http://www.mulesoft.org/schema/mule/core"
      xmlns:xsi="http://www.w3.org/2001/XMLSchema-instance"
      xmlns:jde="http://www.mulesoft.org/schema/mule/jde"
      xsi:schemaLocation="
               http://www.mulesoft.org/schema/mule/core
               http://www.mulesoft.org/schema/mule/core/current/mule.xsd
               http://www.mulesoft.org/schema/mule/connector
               http://www.mulesoft.org/schema/mule/jde http://www.mulesoft.org/schema/mule/jde/current/mule-jde.xsd">

      <!-- put your global configuration elements and flows here -->

</mule>
Using the Connector in a Mavenized Mule App
If you are coding a Mavenized Mule application, this XML snippet must be included in your pom.xml file.
  1
2
3
4
5

  <dependency>
    <groupId></groupId>
    <artifactId></artifactId>
    <version></version>
</dependency>
|
Inside the
|
Demo Mule Applications Using ModusBox’s JDE Connector
-
Invoke a BSFN.
-
Invoke a BSFN with Transaction Processing.
-
Invoke a UBE.
-
Get UBE Job Status.
-
Get Outbound Events from a JD Edwards Application.
-
Get EDI Event to generate Order Acknowledgments 855 EDI Doc.
Using the JDE Connector in your application is explained in detail in the Example Use Case section below.
Invoke a BSFN
This use case example will create a simple flow to get the address book name from the Address Book table (A/B) invoking the Master Business Function (MBF) on Oracle’s JDE EnterpriseOne Server.
Step 1
Use Mule Project created in the Section Create Mule Project.
Step 2
Locate the HTTP Endpoint connector on the right hand-side palette:
Step 3
Drag the connector over to the canvas:
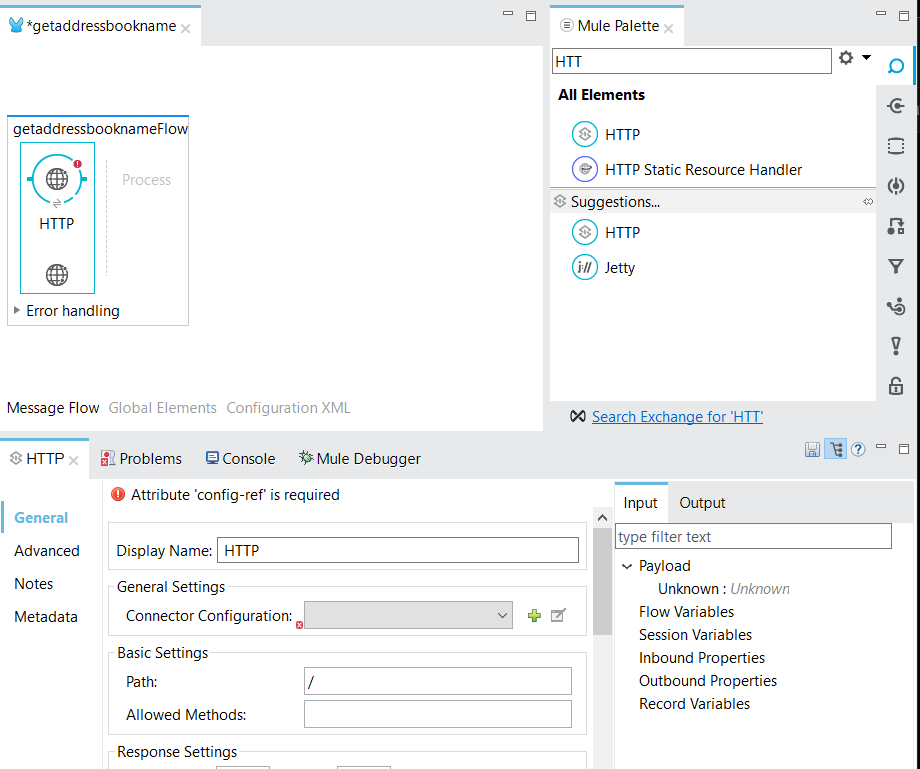
Step 4
The connector requires an Connector Configuration; click on Add to create a connector configuration.
Step 5
Give the HTTP endpoint a more descriptive name like get-AddressBookName-http-endpoint and press OK to go back to the global HTTP endpoint dialog box:
Step 6
Add a path to the URL like getaddressbookname and press SAVE the project. The connector will be ready to process requests.

Step 7
Back to the Message Flow view, you need to Locate the JDE Connector on the right hand-side palette:
Step 8
Drag the connector over to the canvas:

Step 9
You need to select Connector Configuration created in Configure Global Element section:
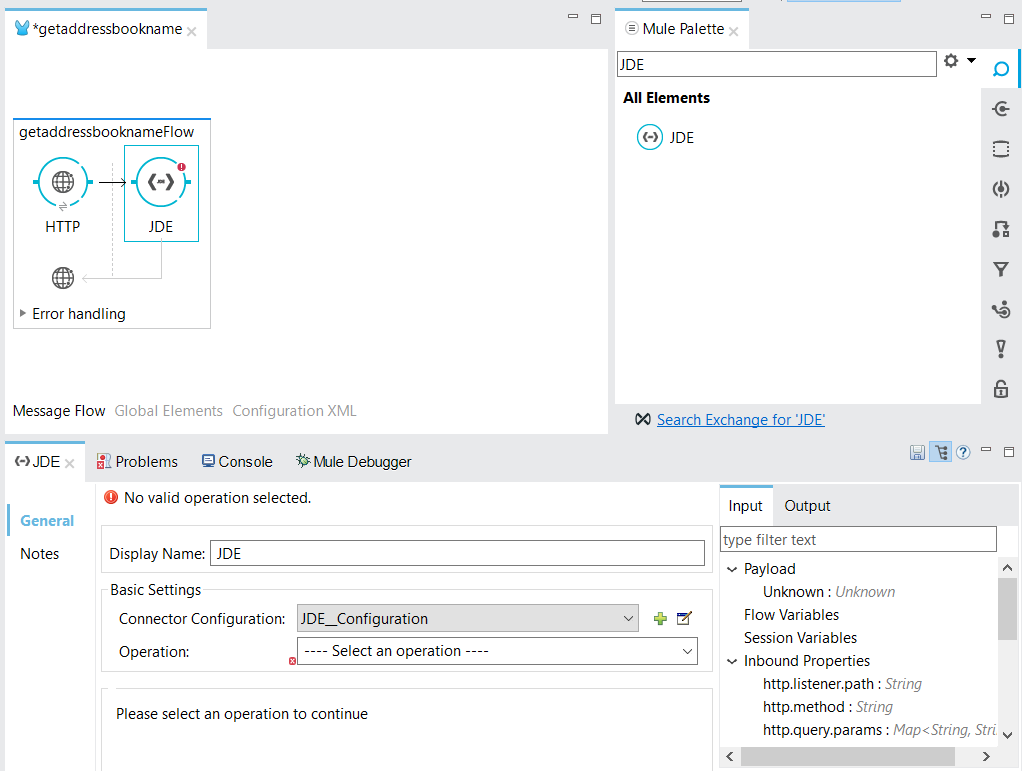
Step 10
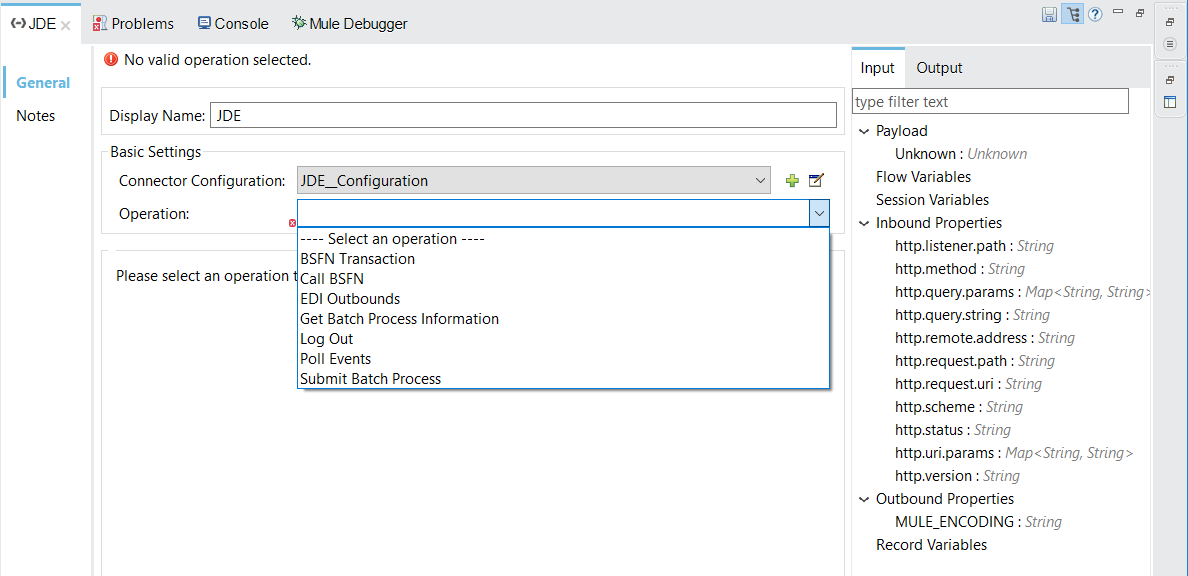
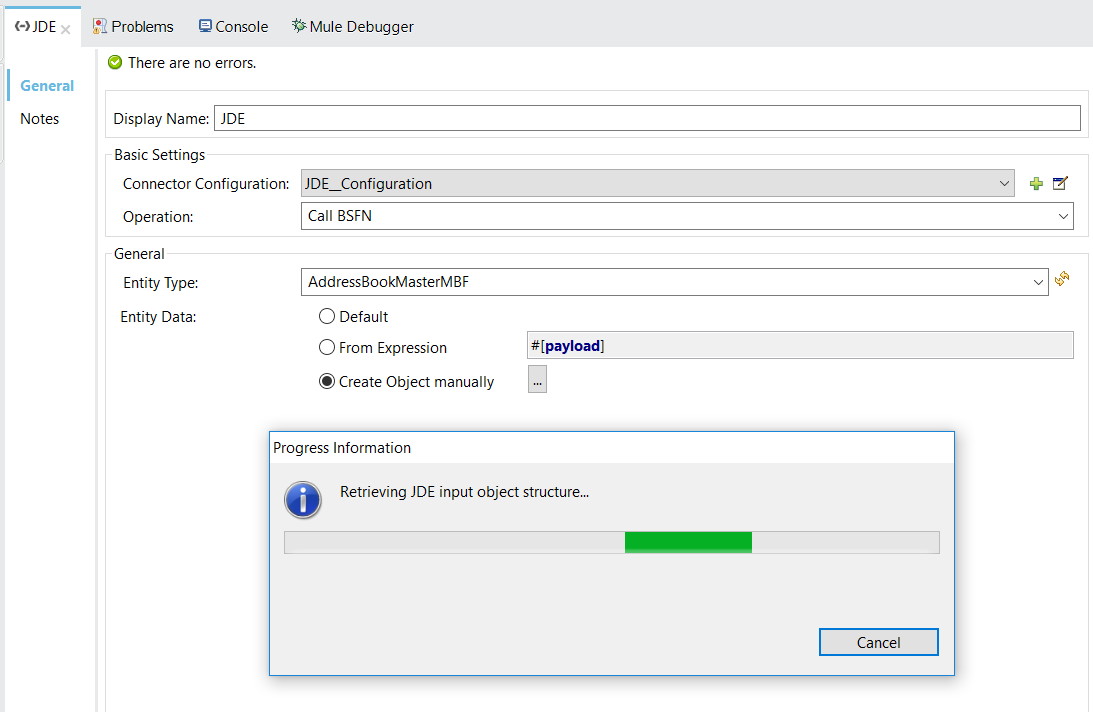
You need to select the operation Call BSFN
Step 11
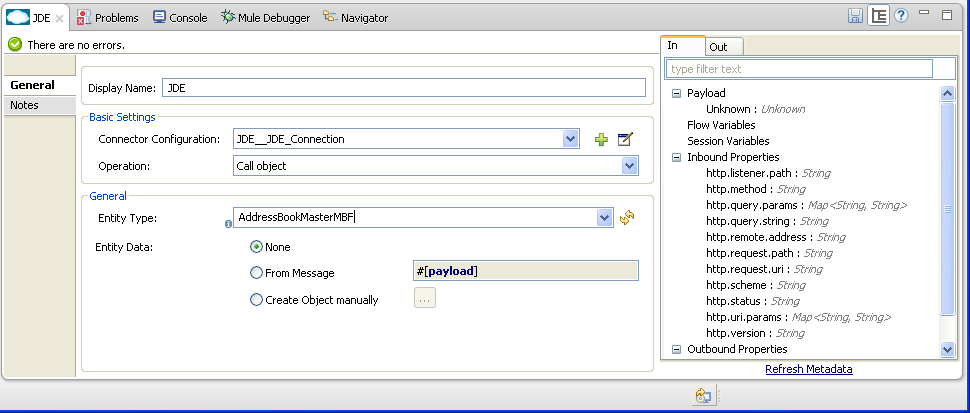
Now, you need to select the bsfn to call in the Entity Type field and press ENTER. In this example we will use AddressBookMasterMBF.
|
The first time it will take more time because the JDE connector is getting the full BSFN list and it will be saved in a local file as functions.json: 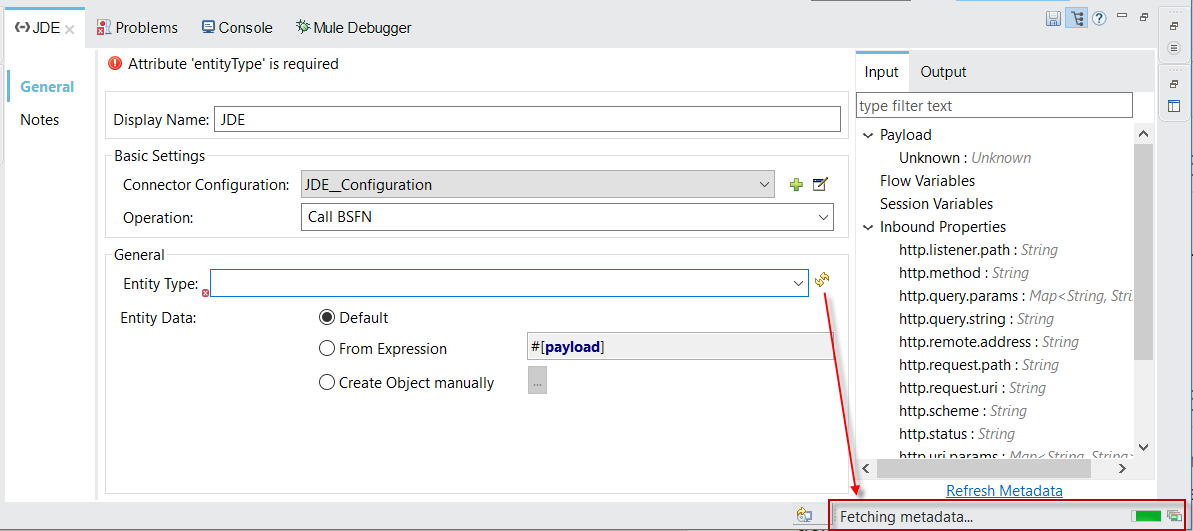
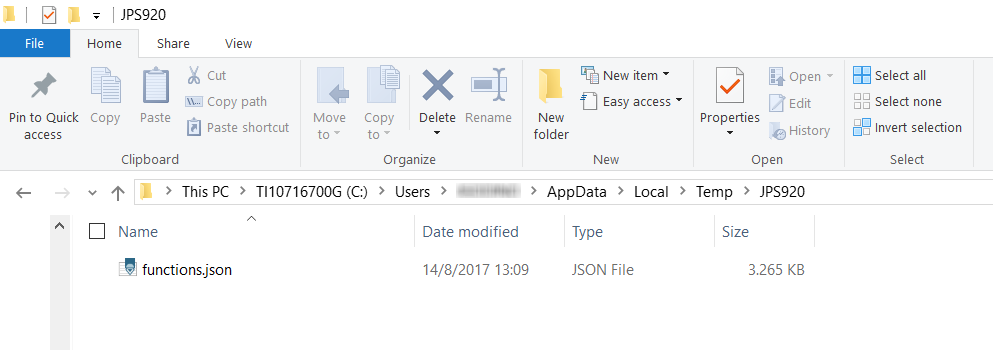
The JDE Connector will use java.io.tmpdir plus environment as destination folder. To know where is the temporary directory you can use Anypoint Studio Installation Details from Help menu. 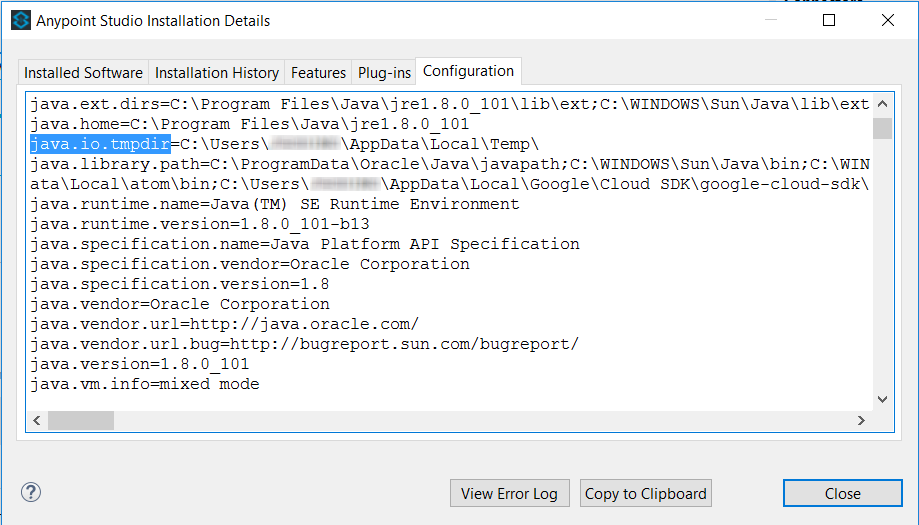
|
The connector will get the specification from the server and it will put the specification in the local repository.
Step 12
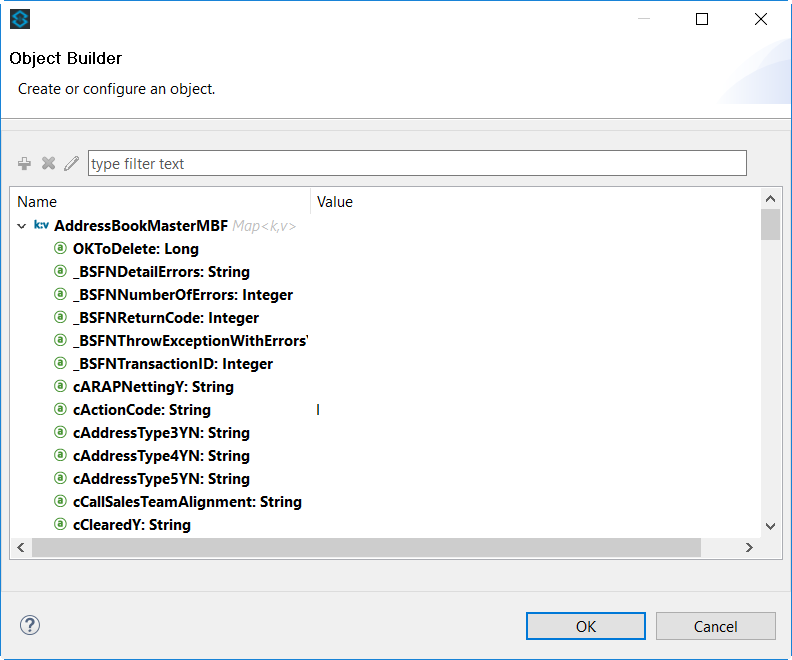
You need to select the option: Create Object manually
The first time that the BSFN is used, the connector get the specs from the server.
Under java.io.tmpdir plus environment folder, the JDE Connector will save the specs.

After that you will need to populate the parameters. To do this press the button […] and populate the parameters:
Action Code to "I" Inquire
And mnAddressBookNumber the address number that will be part of the URL parameter.
Ex: localhost:8081/getaddressbookname?addressbook=1
Enter:
#[message.inboundProperties.'http.query.params'.addressbook]
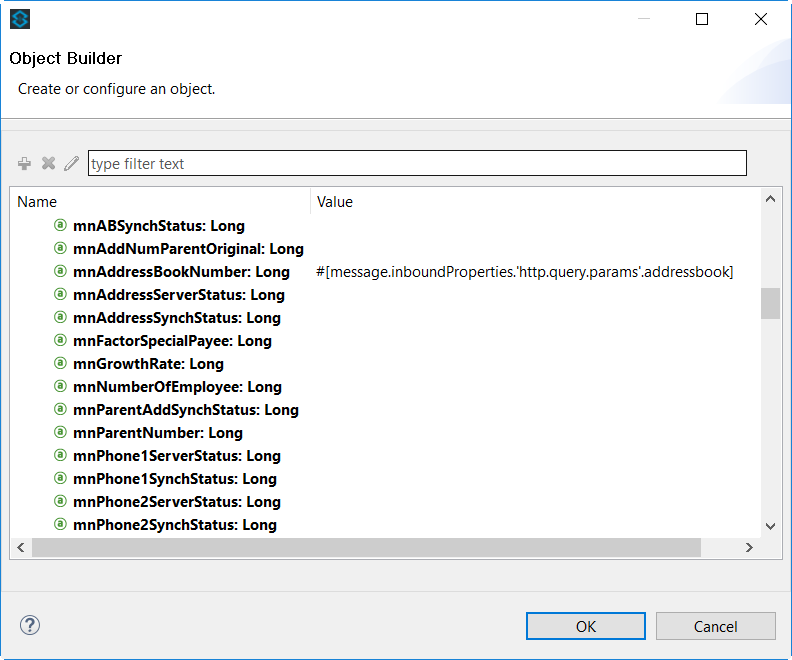
Press OK button to return to JDE Connector configuration. Then, save the project.
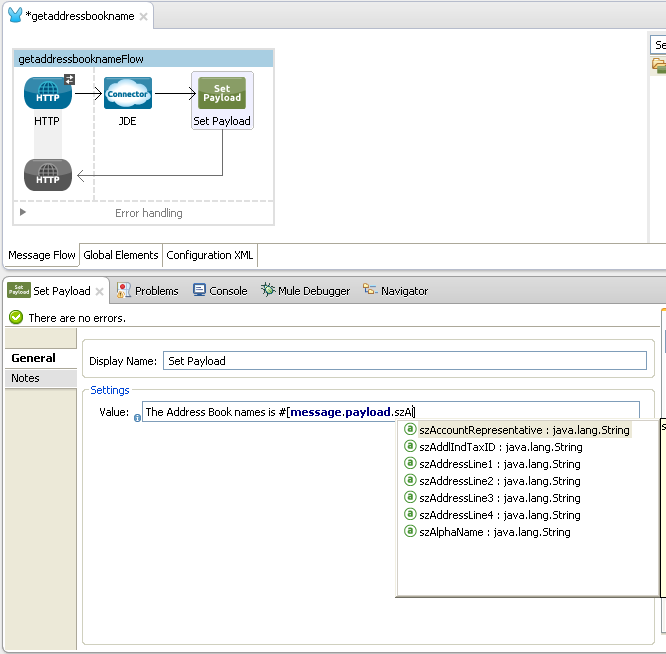
Step 13
Back to the Message Flow view, and you need to Locate the Set Payload on the right hand-side palette to return the address book name.
Step 14
Drag the Transformer over to the canvas and write the answer.
Step 15
Finally, run the example as a Mule application
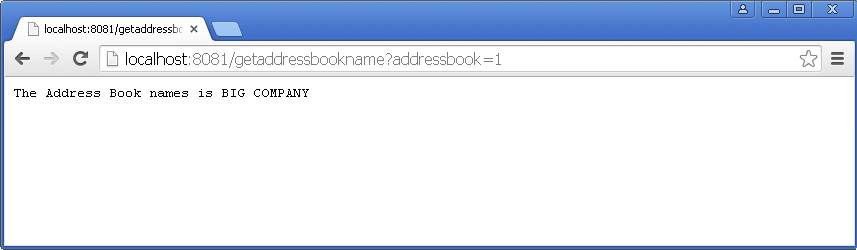
Step 16
Test the Mule Application
Write the URL:
http://localhost:8081/getaddressbookname?addressbook=1
and you will see the address book name:
|
From JDE Connector version 1.3.0, you need to include these AsyncLogger in log4j.xml to see the JDE Connector log under console windows: |
How to use common Call BSFN parameters
There is four common parameters to invoke a BSFN:
| Parameter | Input/Output | Type | Description |
|---|---|---|---|
_BSFNThrowExceptionWithErrorsYN |
Input |
STRING |
Values: Y, The flow will throw Runtime Exception with cause: org.mule.modules.jde.exceptions.CallBSFNException. |
_BSFNReturnCode |
Output |
INTEGER |
Values: 0: Processed Correctly, 1: There is warnings, 2: There is errors. |
_BSFNNumberOfErrors |
Output |
INTEGER |
Number of errors |
_BSFNDetailErrors |
Output |
STRING |
Detail of the error. It return a XML representation of CallObjectErrorList |
This is an example of CallObjectErrorItem object:
<com.jdedwards.system.kernel.JdeNetCallObjectErrorList>
<mErrors>
<com.jdedwards.system.kernel.CallObjectErrorItem>
<mErrorId>0</mErrorId>
<mDDItem>1212</mDDItem>
<mLineNumber>315</mLineNumber>
<mFileName>b0100094.c</mFileName>
<mSubText>�</mSubText>
<mAlphaDescription>Error: Address Number Already Assigned</mAlphaDescription>
<mGlossaryText>CAUSE . . . . The Address Number entered is already assigned.
RESOLUTION. . Enter an Address Number that is not already assigned.
</mGlossaryText>
<mErrorLevel>1</mErrorLevel>
</com.jdedwards.system.kernel.CallObjectErrorItem>
<com.jdedwards.system.kernel.CallObjectErrorItem>
<mErrorId>11</mErrorId>
<mDDItem>018A</mDDItem>
<mLineNumber>544</mLineNumber>
<mFileName>rtk_ddvl.c</mFileName>
<mSubText>Search Type|Y|01|ST�</mSubText>
<mAlphaDescription>Error: Y not found in User Defined Code 01 ST�</mAlphaDescription>
<mGlossaryText>CAUSE . . . . Search Type Y was not found in User Defined Code
for system 01 , type ST� .
RESOLUTION. . Enter a valid Search Type or use Visual Assist to search
for a valid value.
</mGlossaryText>
<mErrorLevel>1</mErrorLevel>
</com.jdedwards.system.kernel.CallObjectErrorItem>
</mErrors>
<mBsfnErrorCode>2</mBsfnErrorCode>
</com.jdedwards.system.kernel.JdeNetCallObjectErrorList>|
From 1.3.0 version, the connector has the possibility to handle with CallBSFNException instead of RuntimeException. This is an example how to use it. 
|
Invoke a BSFN with Transaction Processing
This use case example will reuse the previous flow to add a Customer. In this case, we will need to invoke two Master Business Function (MBF) on Oracle’s JDE EnterpriseOne Server in the same transaction.
Step 1
Select the current JDE component to modify the Entity Data to use #[payload] instead of use Create Object manually:

Step 2
Locate the Transform Message component on the right hand-side palette. Drag the connector over to the canvas before JDE component.

Step 3
Switch to the XML view by clicking Configuration XML to replace CDATA element inside Transform Message definition:

with:
<![CDATA[%dw 1.0
%output application/java
---
{
        "_BSFNThrowExceptionWithErrorsYN": 'Y',
        "_BSFNTransactionID": 0,
        cActionCode: 'A',
        cUpdateMasterFile: '1',
        cSuppressErrorMessages: '0',
        szVersion: 'ZJDE0001',
        mnAddressBookNumber: 0,
        szLongAddressNumber: '',
        szSearchType: 'C',
        szAlphaName: 'Customer Name X',
        szMailingName: 'Customer Name X',
        szAddressLine1: 'Address Line 1',
        szAddressLine2: 'Address Line 2',
        szAddressLine3: 'Address Line 3',
        szAddressLine4: 'Address Line 4',
        szPostalCode: '88999',
        szCity: 'Seatle',
        szState: 'WA',
        szCountry: 'US',
        cPayablesYNM: 'N',
        cReceivablesYN: 'Y',
        szProgramId: 'Mule',
        szVersionconsolidated: 'ZJDE0003'
}]]>
Step 4
Drag a new JDE component over to the canvas after current JDE component. You need to select the operation Call BSFN.
After that, you need to select the BSFN to call in the Entity Type field and press ENTER. In this case we will use MBFCustomerMaster.

Step 5
Back to the Message Flow view, and you need to Locate the Transform Message on the right hand-side palette.
Drag the connector over to the canvas between JDE components.

Step 6
Switch to the XML view by clicking Configuration XML to replace CDATA element inside Transform Message definition:

with:
<![CDATA[%dw 1.0
%output application/java
---
{
        "_BSFNThrowExceptionWithErrorsYN": 'Y',
        "_BSFNTransactionID": 0,
        cActionCode: 'A',
        cUpdateMasterFile: '1',
        cProcessEdits: '1',
        cSuppressErrorMessage: '0',
        szVersion: 'ZJDE0001',
        szCompany: '00000',
        cBatchProcessingMode: '.',
        mnCustomerNumber: payload.mnAddressBookNumber,
        szVersionconsolidated: 'ZJDE0003',
        DateEntered: now as :string {format:"MM/dd/yyyy"}
}]]>
Step 8
Back to the Message Flow view. Select the transformer Set Payload and replace the value with:
The customer number added is #[payload.mnCustomerNumber]

Step 9
Drag a new JDE component over to the canvas after current JDE component.
You need to select the operation BSFN Transaction.
After that, you need to select Begin Transaction in the Entity Type field.
Then, you need to populate the parameter Transaction ID with 0 pressing the button […]:

Step 10
Wrap this component with the Scope: Message Enricher:

You need to create a new flow variable to save the Transaction Id.

This variable will be used to commit or rollback the transaction.
Step 11
Replaces both Call BSFN parameters with the new Transaction ID.


Step 12
Drag a new JDE component over to the canvas after last JDE component and before Set Payload.
You need to select the operation BSFN Transaction.

After that, you need to select Commit Transaction in the Entity Type field.
Then, you need to populate the parameter Transaction ID with 0 pressing the button […]:

Step 13
Wrap this component with the Scope: Message Enricher:

You need to create a new flow variable to save the commit payload.

Step 14
Drag a new JDE component over to the canvas after components under Catch Exception Strategy.
You need to select the operation BSFN Transaction.
After that, you need to select Rollback Transaction in the Entity Type field.
Then, you need to populate the parameter Transaction ID with 0 pressing the button […]:

Step 15
Back to the Message Flow view, and you need to select HTTP Connector to change the Path

Step 16
Finally, run the example as a Mule application
Step 17
Test the Mule Application
Write the URL:
http://localhost:8081/addcustomer
and you will see the customer number created:

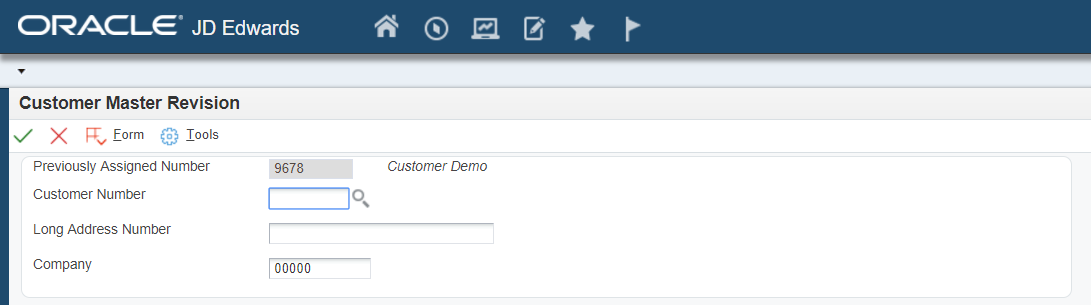
Step 18
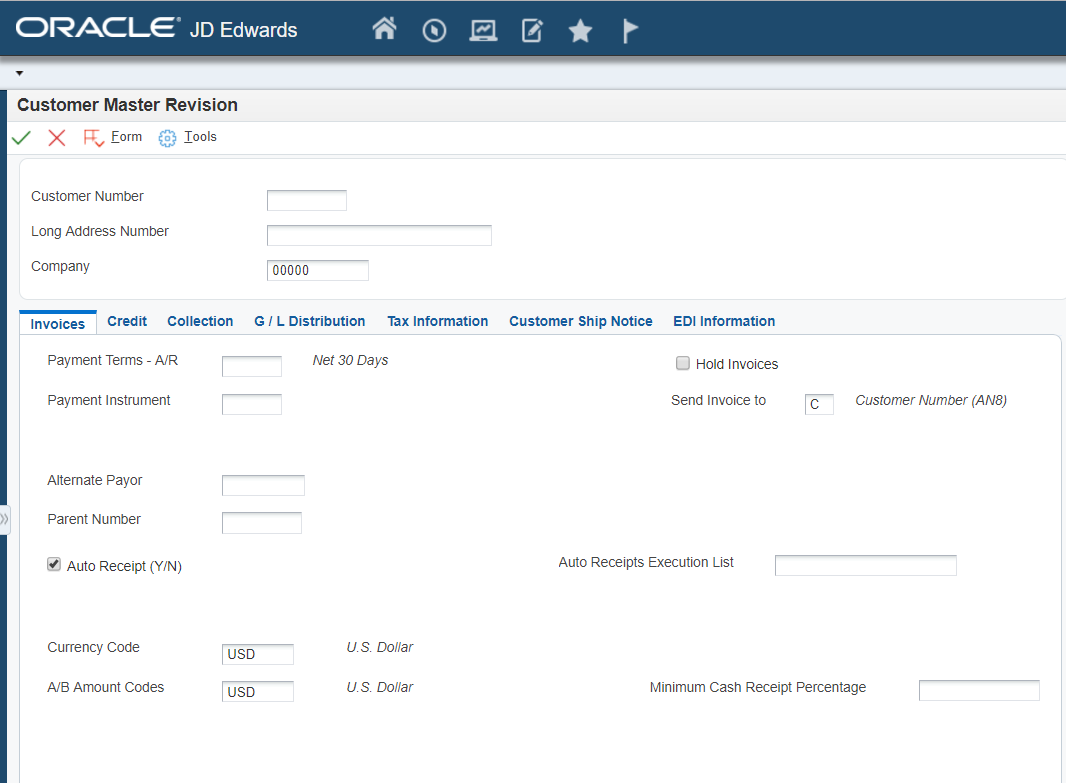
Check Customer generated. Enter a Customer using Customer Master information:
Application: P03013
Version: ZJDE0002

Submit an UBE
This use case example will create a simple flow to submit an UBE to JDE Enterprise Server.
Step 1
Use Mule Project created in the Section Create Mule Project.
Step 2
Locate the HTTP Endpoint connector on the right hand-side palette:
Step 3
Drag the connector over to the canvas:
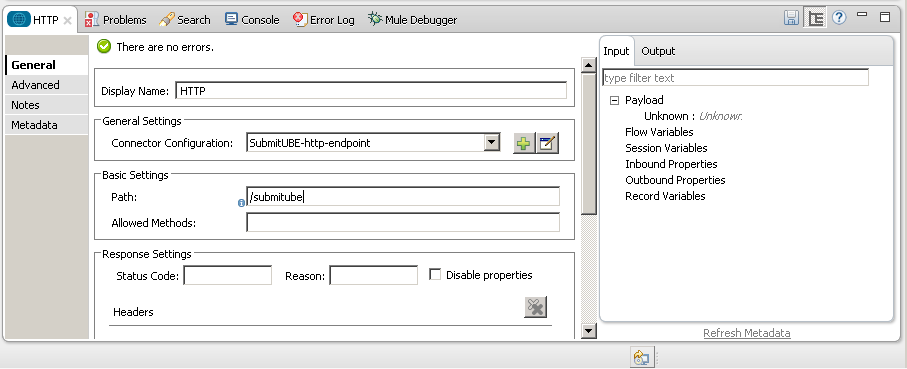
Step 4
The connector requires an Connector Configuration; click on Add or to create a connector configuration.
Step 5
Give the HTTP endpoint a more descriptive name like SubmitUBE-http-endpoint and press OK to go back to the globa HTTP endpoint dialog box.
Step 6
Add a path to the URL like submitube and press SAVE the project.
The connector will be ready to receive request.
Step 7
Back to the Message Flow view, you need to Locate the JDE Connector on the right hand-side palette:
Step 8
Drag the connector over to the canvas:
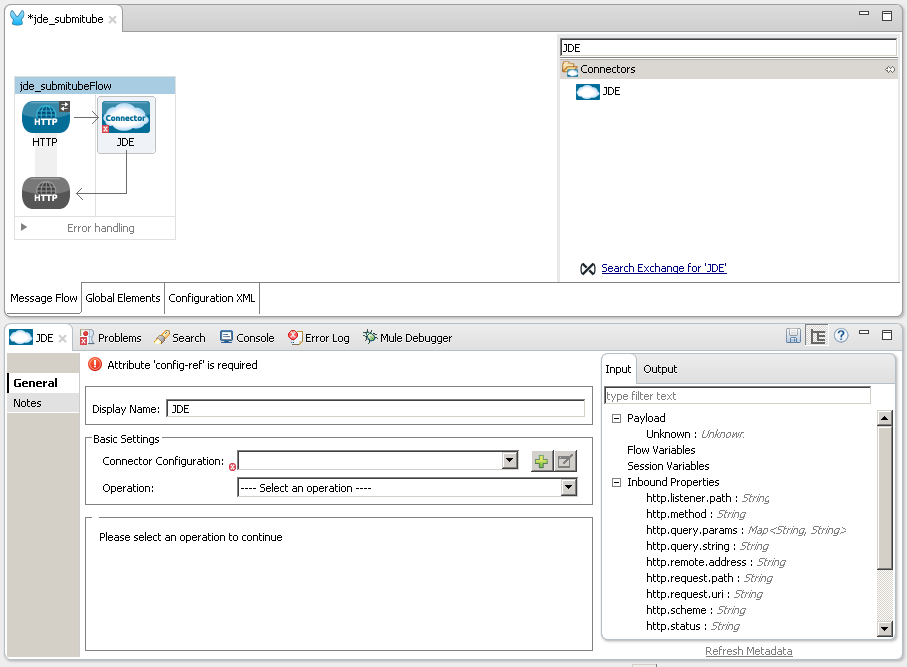
Step 9
You need to select Connector Configuration created in Configure Global Element section:
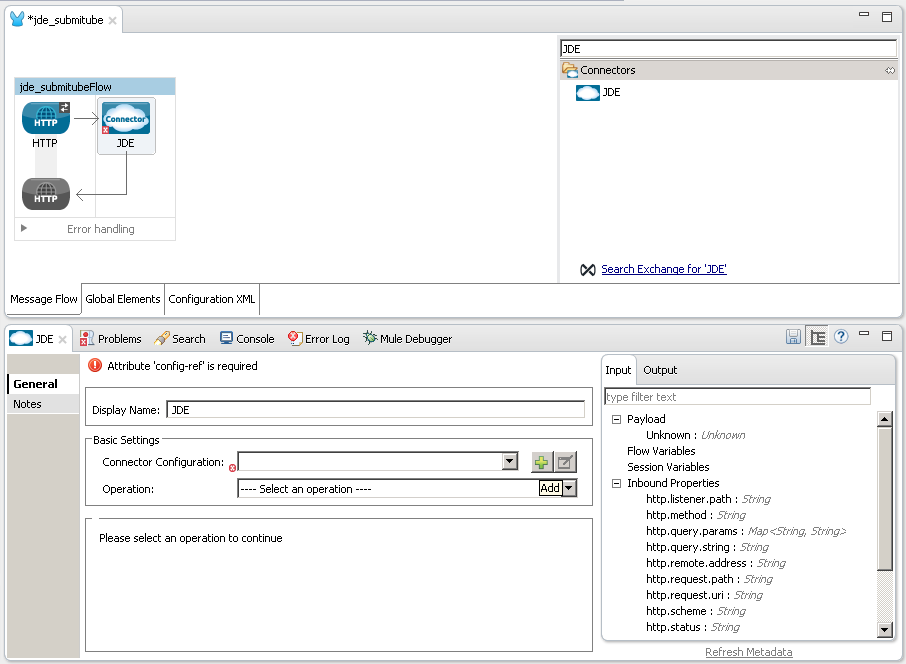
Step 10
You need to select the operation Submit batch process:

Step 11
Now, you need to write the UBE/Version (Ex. R0008P_XJDE0001) to submit in the Entity Type field and press ENTER:
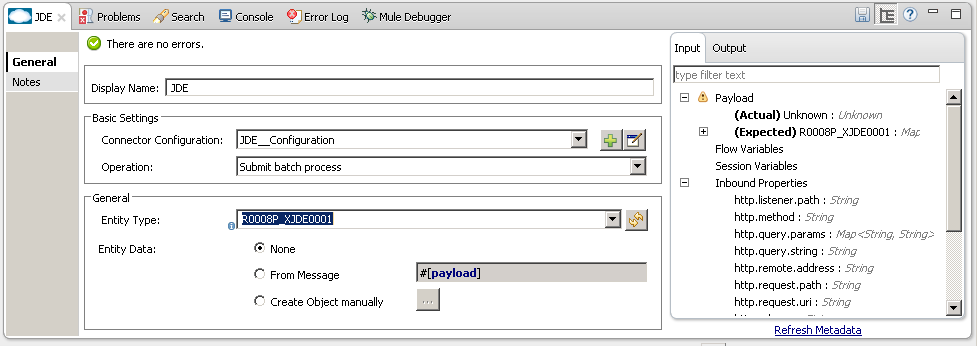
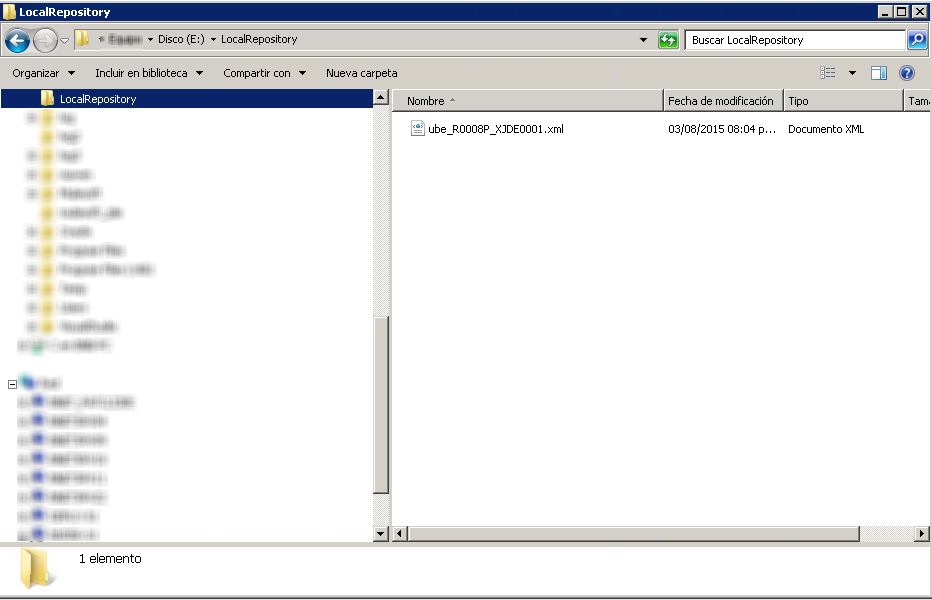
The connector will get the specification from the server and it will put the specification in the local repository under java.io.tmpdir plus environment as destination folder
Step 12
After the connector get the specs from the server, you will need to populate the parameters.
To do this, you need to select the option: Create Object manually

Press the button […] and populate the parameters:
_Job Queue: Enter the Job Queue or empty if you prefer default job queue for the UBE selected
_Selection: F0010.CO = ''00000''
cFiscalDatePattern: F
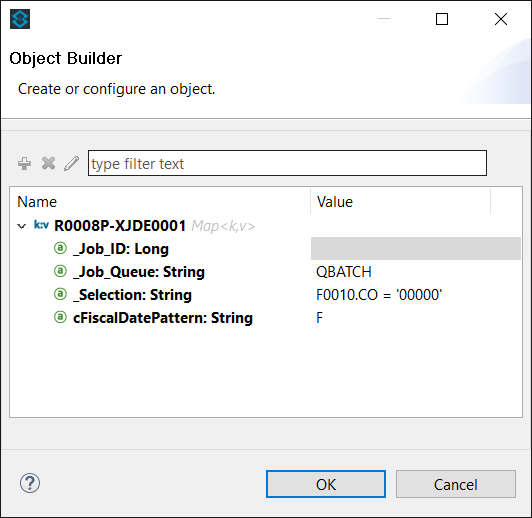
Press OK button to return to JDE Connector configuration. Save the project.
Step 13
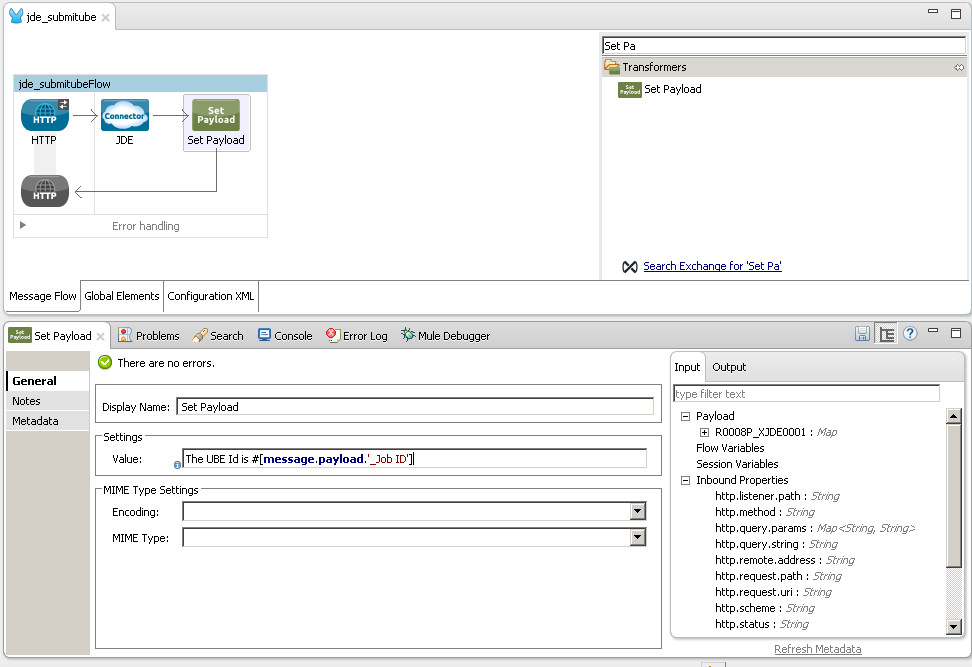
Back to the Message Flow view, and you need to Locate the Set Payload on the right hand-side palette to return the address book name.
Step 14
Drag the Transformer over to the canvas and write the following payload:
The UBE id submited is #[payload._Job_ID]
Step 15
Finally, run the example as a Mule application
Step 16
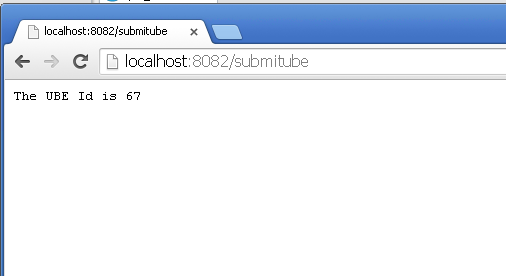
Test the Mule Application
Write the URL:
http://localhost:8081/submitube
and you will see the Job Id generated in the enterprise server.
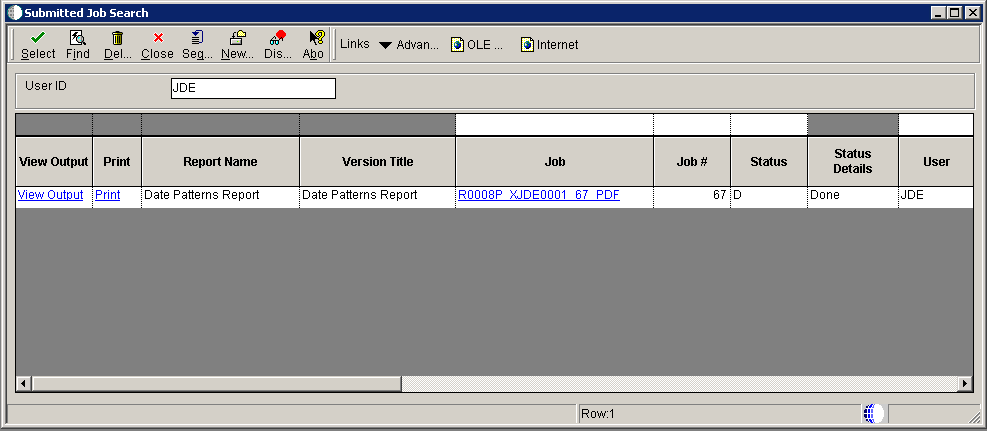
Step 17
Check Work Submit Job from E1
|
From 1.3.0 version, the connector has the possibility to handle with org.mule.modules.jde.exceptions.SubmitUBEException instead of RuntimeException. This is an example how to use it: 
|
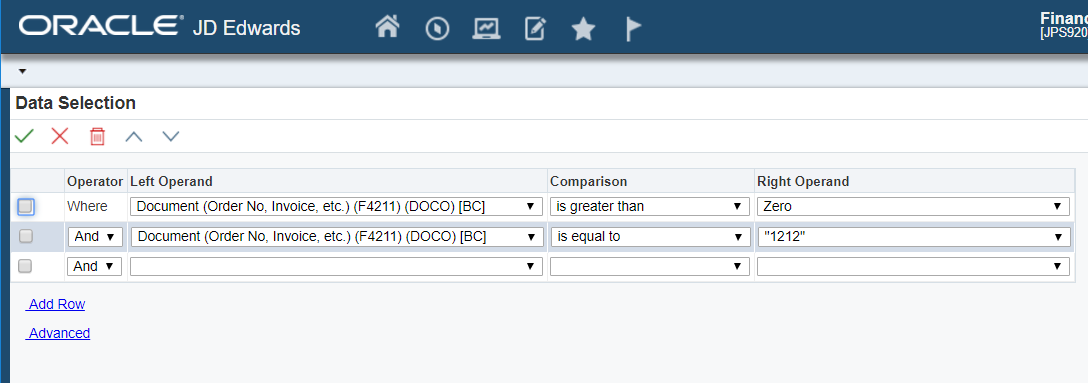
How define Data Selection
The parameter _Selection is used to define UBE Data Selection.
The sentence is like a WHERE of SQL sentence.
The _Sentence syntax is:
table.column_name operator [value|table.column_name];The table must be a JDE table that it belong to main view. Column Name must be an JDE’s Alias.
The following operators can be used in the _Sentence:
| Operator | Description |
|---|---|
= |
Equal |
<> |
Not equal |
<> |
Not equal |
> |
Greater than |
< |
Less than |
>= |
Greater than or equal |
⇐ |
Less than or equal |
BETWEEN |
Between an inclusive range |
NOT BETWEEN |
Not Between an exclusive range |
IN |
To specify multiple possible values for a column |
NOT IN |
To exclude multiple possible values for a column |
The values can be literals or another column table.
Literals can be String or Number
The sentence can include AND condition and the OR condition
To override the default precedence you need to use parenthesis as:
C1 AND (C2 OR C3)The sentence only accept one level of Parenthesis.
For example, this is a valid sentence because the maximum level of Parenthesis opened is 1.
C1 AND (C2 OR C3) AND (C4 OR C5)otherwise, this is an invalid sentences because the maximum level of Parenthesis opened is 2.
C1 AND (C2 OR (C3 AND C4))Examples:
F4211.KCOO = '00001' AND F4211.DOCO > 10332 F4211.KCOO = '00001' AND F4211.DOCO >= 10332 F4211.KCOO = '00001' AND F4211.DOCO <= 10332 F4211.KCOO = '00001' AND F4211.DOCO <> 10332 F4211.KCOO = '00001' AND ( F4211.DCTO = 'SO' OR F4211.DCTO = 'SI' ) F4211.KCOO = '00001' AND F4211.DCTO IN ('SO','SI') F4211.KCOO = '00001' AND F4211.DCTO NOT IN ('SO','SI') F4211.KCOO = '00001' AND F4211.DOCO BETWEEN 1022 AND 400 F4211.KCOO = '00001' AND F4211.DOCO NOT BETWEEN 1022 AND 400 F4211.MCU = F4211.EMCU AND F4211.DOCO NOT BETWEEN 1022 AND 400Get an UBE state
This use case example will add an control to the previous example to get an UBE state from JDE Enterprise Server after Submit UBE.
Step 1
Back to the Message Flow view, you need to Locate the Variable on the right hand-side palette:
Step 2
Drag the Transformer over to the canvas after JDE Connector:
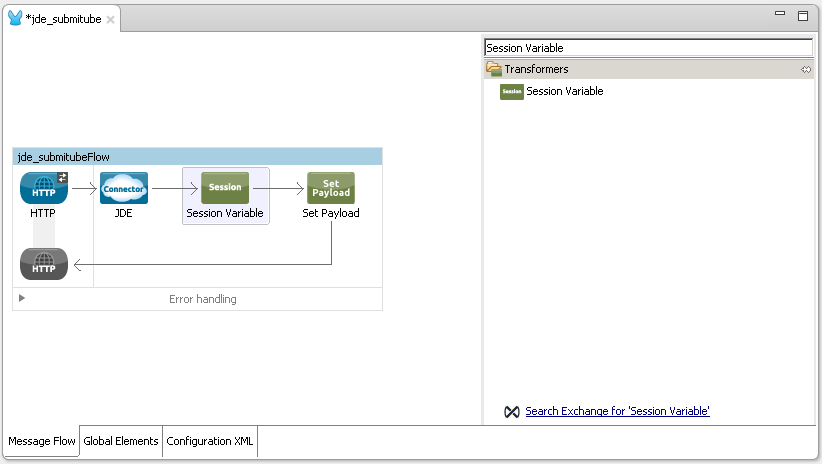
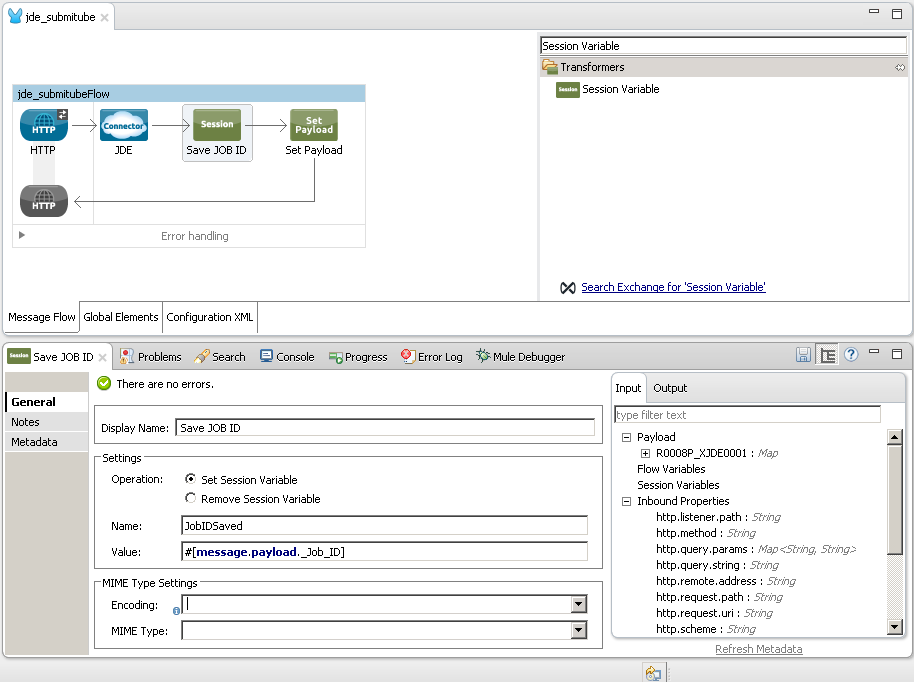
We use this transformer to save the JOB ID generated by the previous UBE Submit.
Edit Variable and add the following values:
Display Name: Save JOB ID
Name: JobIDSaved
Value: #[payload._Job_ID]
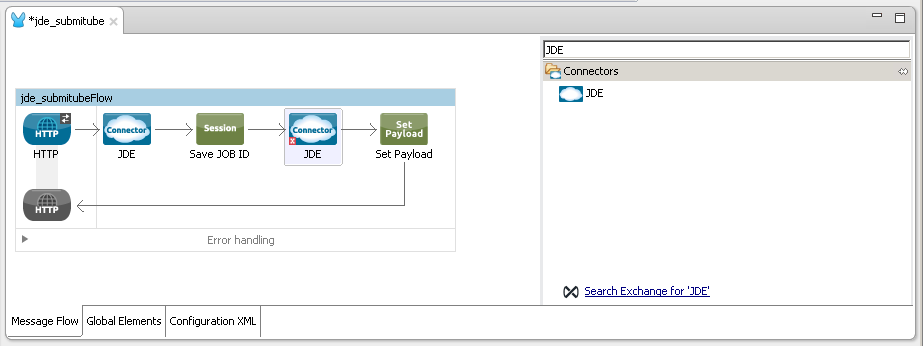
Step 3
Back to the Message Flow view, you need to Locate the JDE Connector on the right hand-side palette:
Step 4
Drag the connector over to the canvas after Variable Save JOB ID:
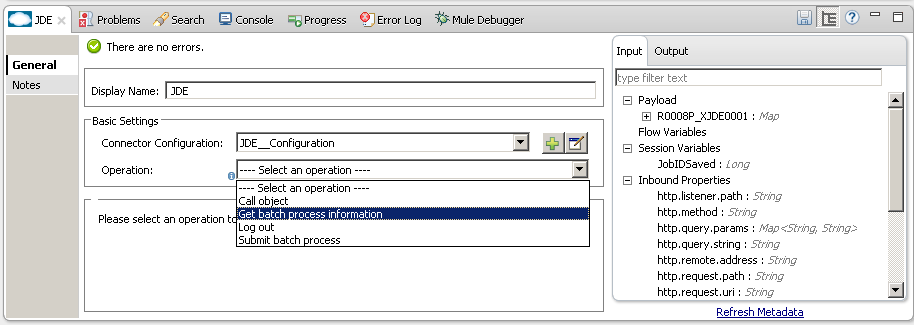
Step 5
You need to select the same Connector Configuration as previous connector.
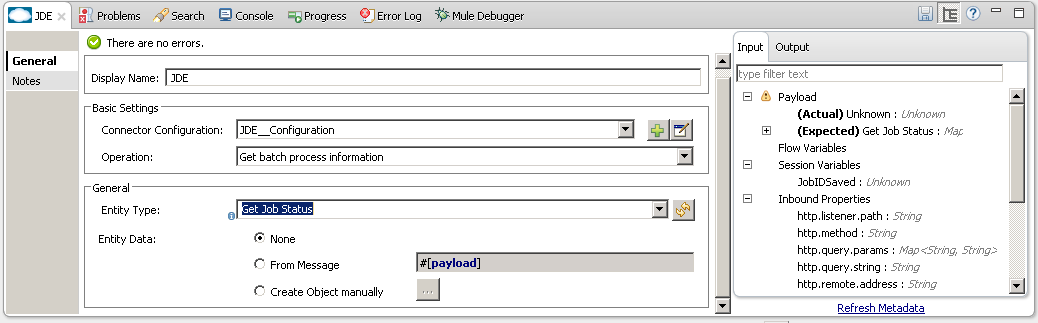
Step 6
You need to select the operation Get batch process information
Step 7
Refresh metadata and select Get Job Status
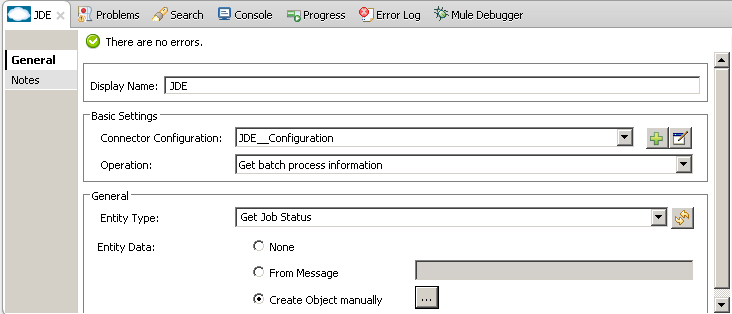
Step 8
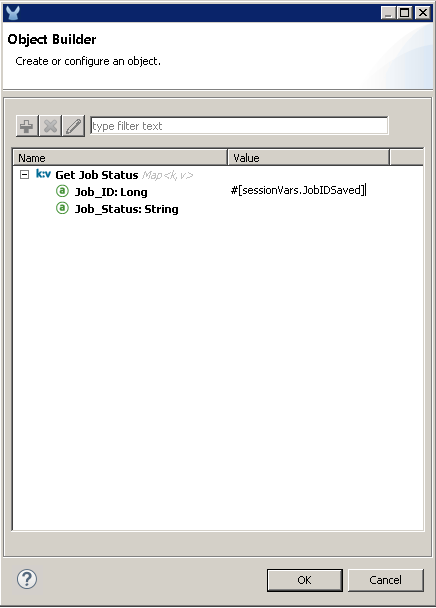
You will need to populate the parameters. To do this, you need to select the option: Create Object manually and press the button […]:
Populate the parameters:
Set Job_ID to value: #[flowVars.JobIDSaved]
Step 9
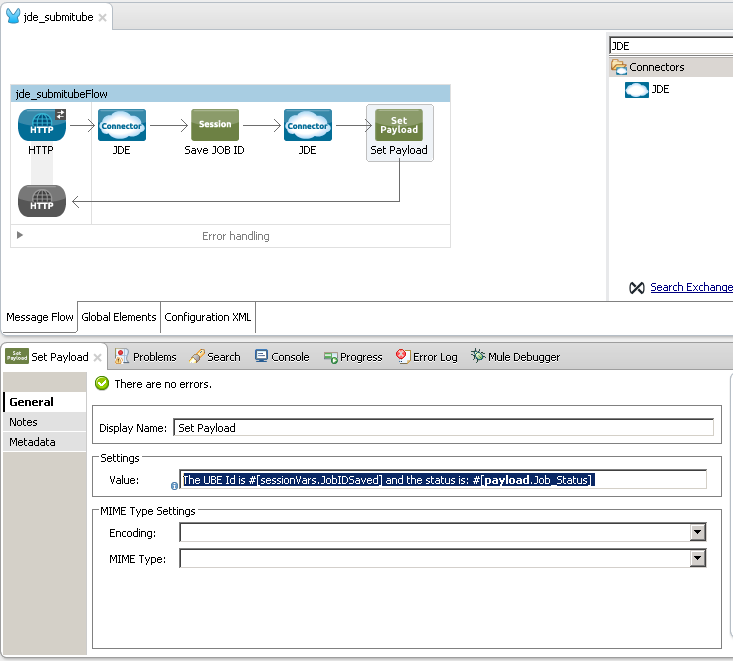
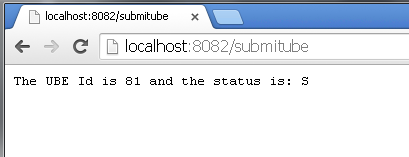
Update the last "Set Payload" with the following value:
The UBE id submited is #[flowVars.JobIDSaved] and the status is: #[payload.Job_Status]
Step 10
Finally, run the example as a Mule application
Step 11
Test the Mule Application
Write the URL:
http://localhost:8081/submitube
and you will see the Job Id generated and its status in the enterprise server.
The possible values of job status are:
| Status | Description |
|---|---|
S |
In Queue |
W |
Waiting |
P |
Processing |
D |
Done |
E |
Error |
H |
Hold |
|
From 1.3.0 version, the connector has the possibility to handle with org.mule.modules.jde.exceptions.JobStatusException instead of RuntimeException: This is an example how to use it: 
|
Capture outbound events
This use case example will create a simple flow to get outbound events that it come from an application that uses a Master Business Function to generate transactions.
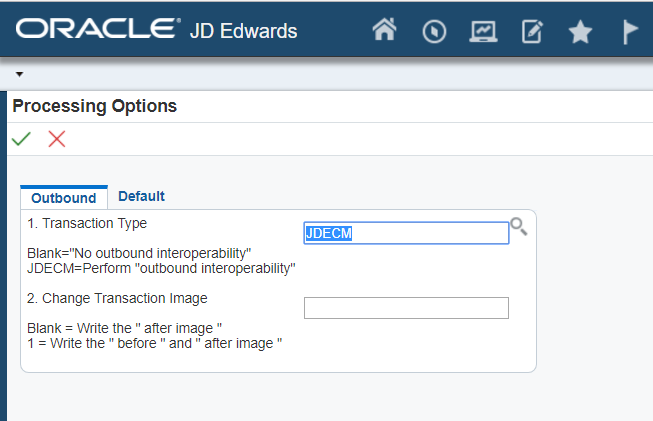
JDE outbound transactions requires that you set a Processing Option specifying a transaction type. Additionally, some entry programs enable you to specify a version of the Master Business Function Processing Options program that, in turn, enables you to specify a version of the Interoperability Processing Options program.
For example, to get customer entered by the application Customer Master information (P03013) is necessary setup the following Processing Options:
Versions -> Customer Master MBF (P0100042) Version with the value ZJDE0002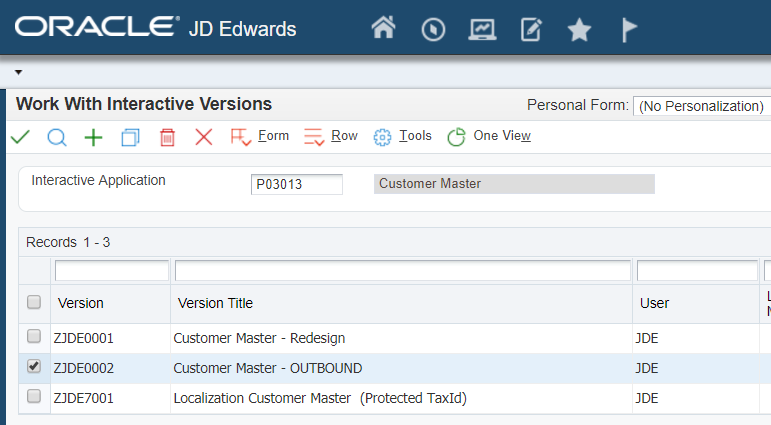
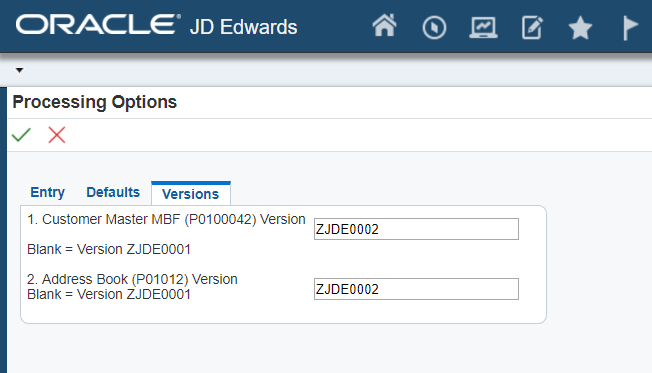
Then, the P0100042 version ZJDE0002 needs to have the following value in
Outbound -> Transaction Type with the value JDECM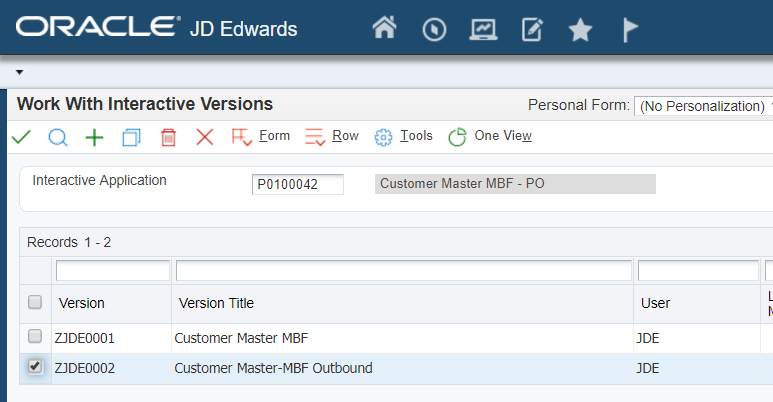
The last configuration that is needed is inform to JDE connector the outbound table used by the MBF to inform the event:
Using "Flat File Cross-Reference (P47002)" form "Work With Flat File Cross-Reference" adds the following record:
| Table | Record Type |
|---|---|
F03012Z1 |
1 Header |
Follow next steps to create a flow that it will capture Customers that it added using Customer Master information (P03013)*
| For more Outbound Interoperability alternatives from JDE you need to read JD Edwards EnterpriseOne Applications Interoperability Fundamentals Implementation Guide |
Step 1
Use Mule Project created in the Section Create Mule Project section:
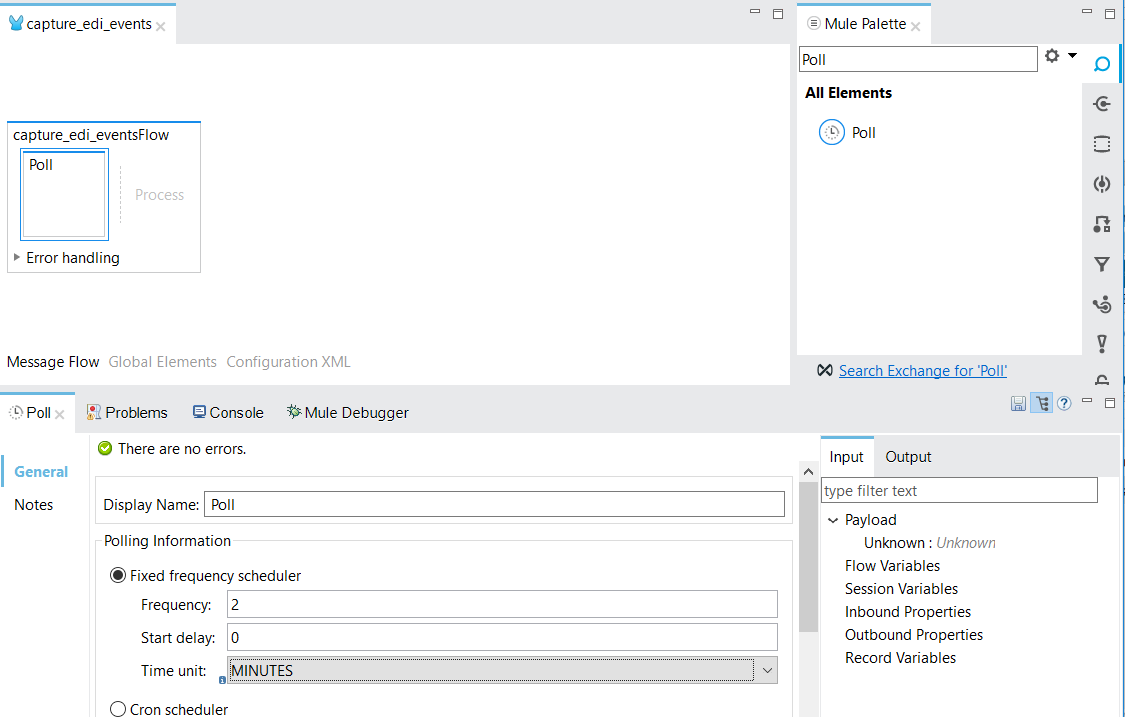
Step 2
Locate the Poll Endpoint connector on the right hand-side palette:
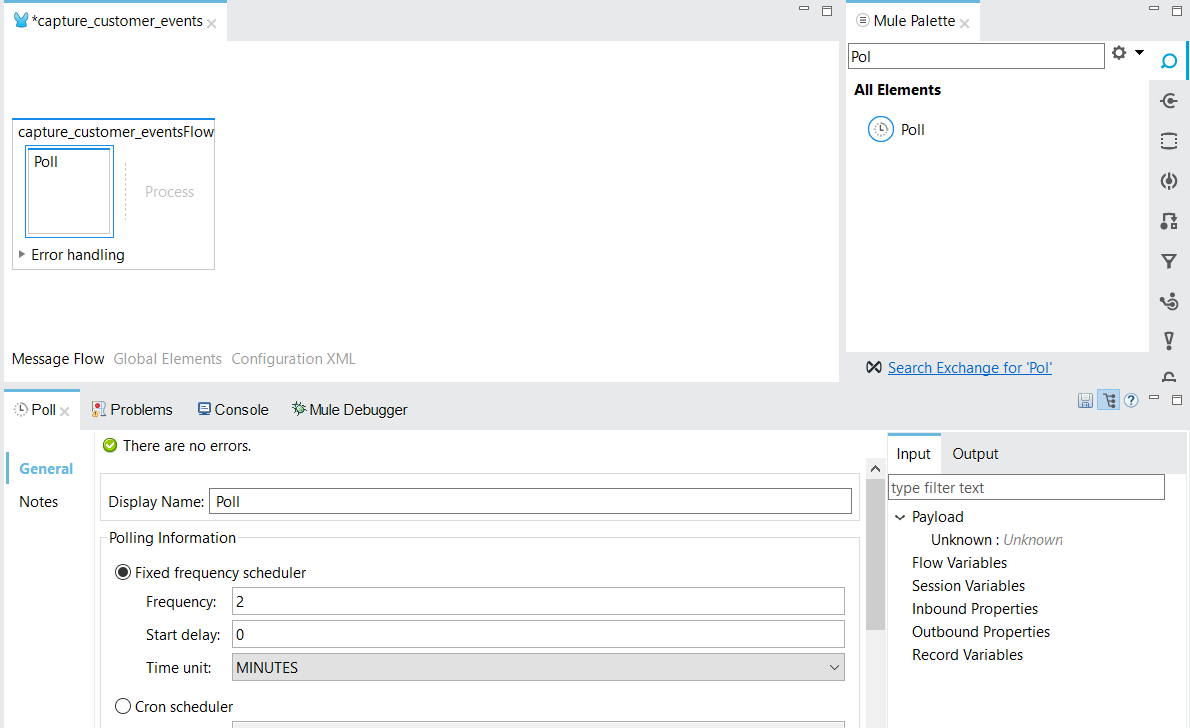
Step 3
Drag the JDE connector over to the canvas:
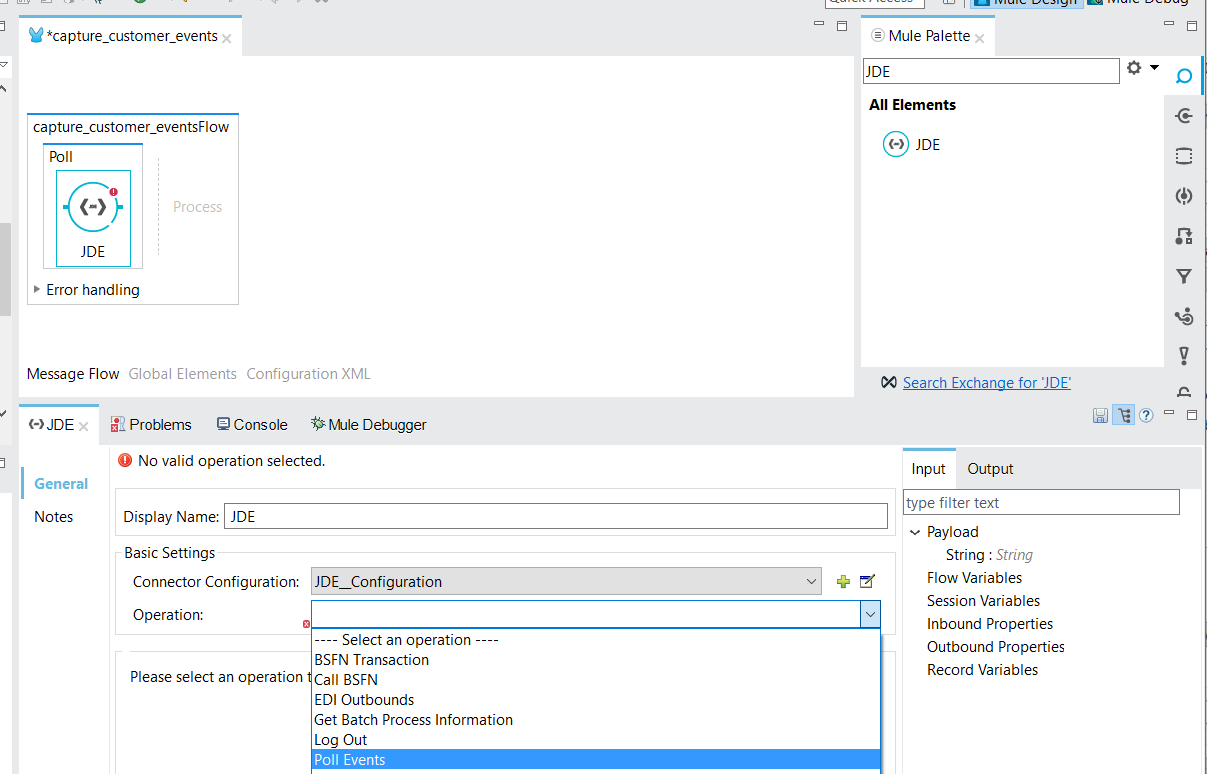
Step 4
You need to select the operation Poll Events:
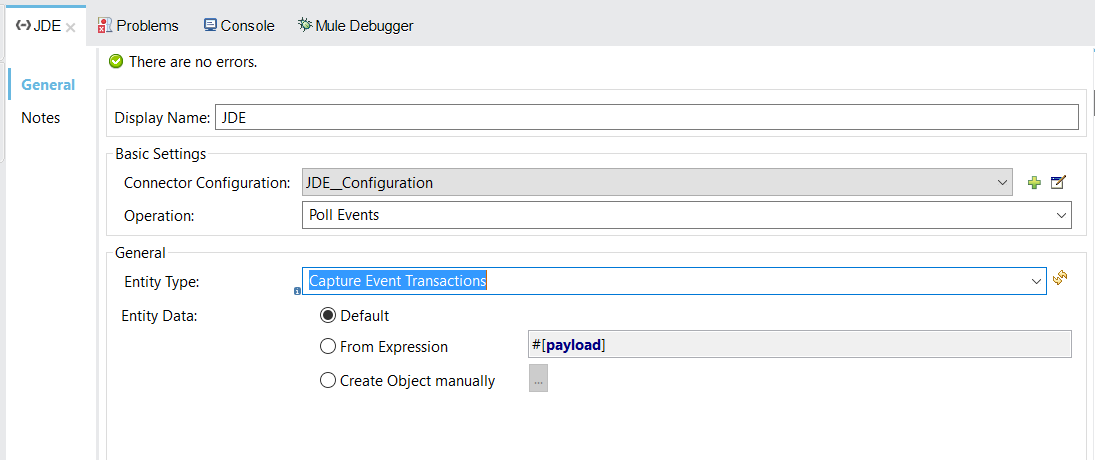
Step 5
Now, you need to select Capture Event Transactions in the Entity Type field and press ENTER:
Step 6
Now, You will need to populate the parameters. To do this, you need to select the option: Create Object manually

Press the button […] and populate the parameters:
Transaction Code Enter JDECM value
Max Qty Transactions to Read Enter 3 value
Last Batch Number (EDBT): #['']
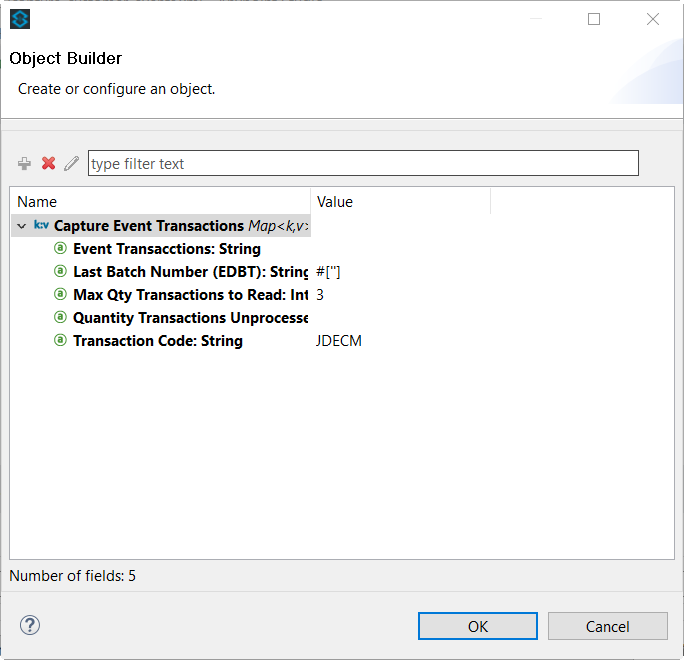
Press OK button to return to JDE Connector configuration. Save the project.
Step 7
Back to the Message Flow view, and you need to Locate the Set Payload on the right hand-side palette to return the address book name.
Drag the component over to the canvas and write this value:
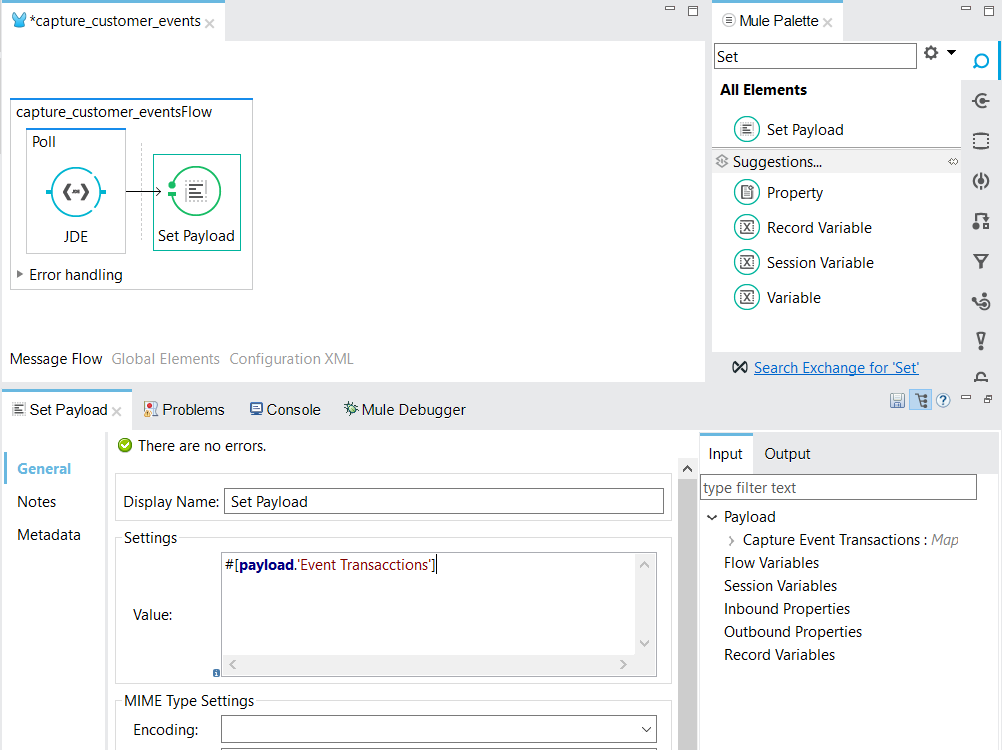
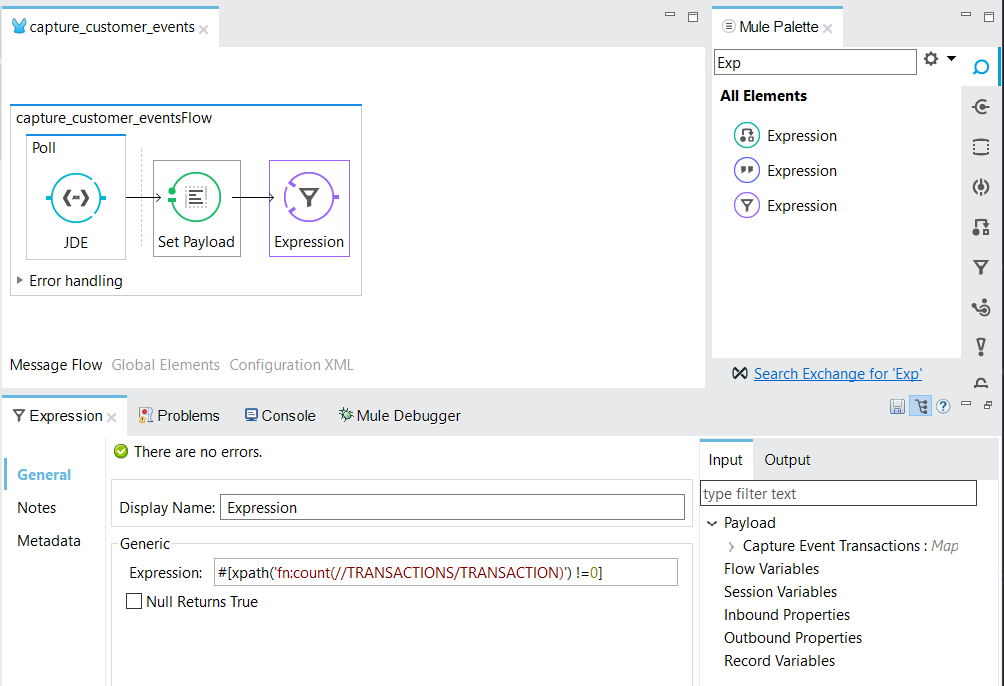
Step 8
Back to the Message Flow view, and you need to Locate the Filter Expression on the right hand-side palette to return the address book name.
Drag the component over to the canvas and write this value:
#[xpath('fn:count(//TRANSACTIONS/TRANSACTION)') !=0]
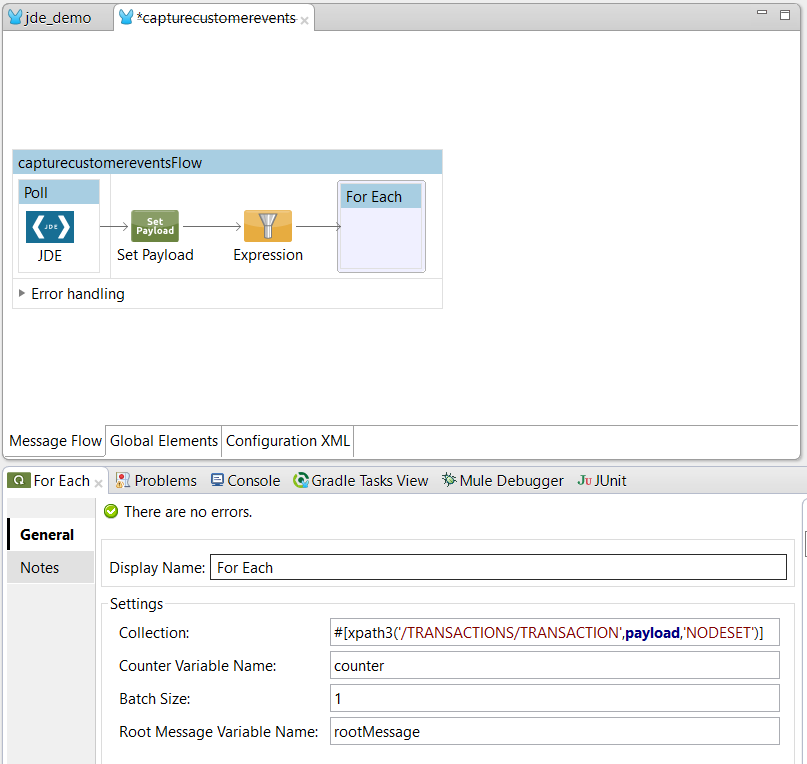
Step 9
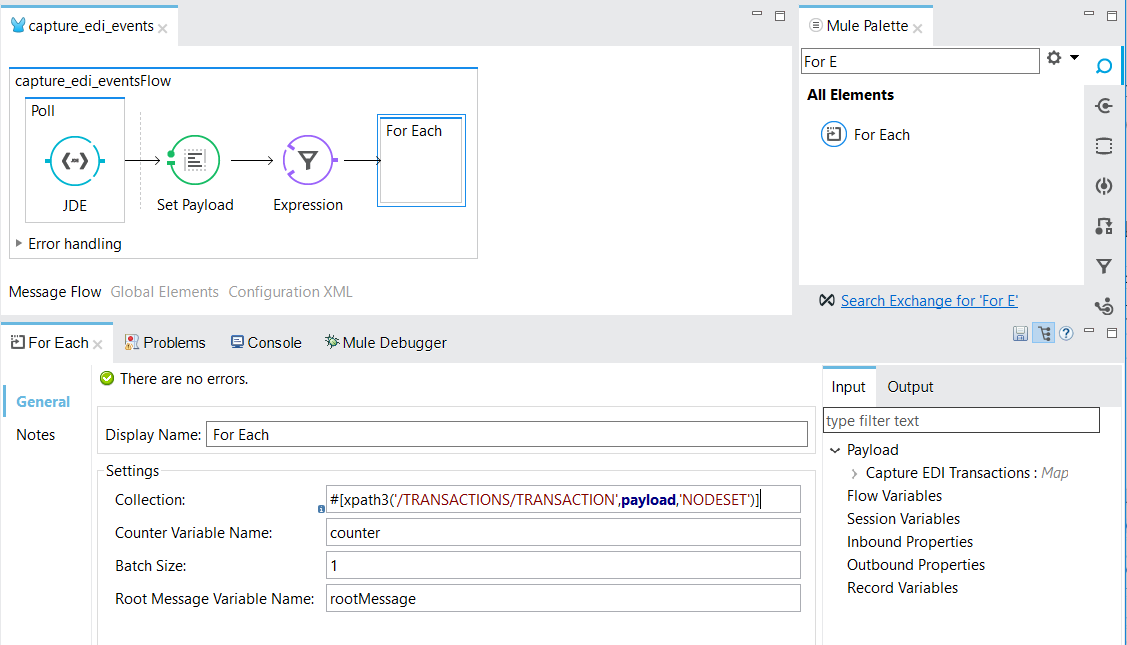
Back to the Message Flow view, and you need to Locate the For Each on the right hand-side palette to return the address book name.
Drag the component over to the canvas and write this value:
#[xpath3('/TRANSACTIONS/TRANSACTION',payload,'NODESET')]
Step 10
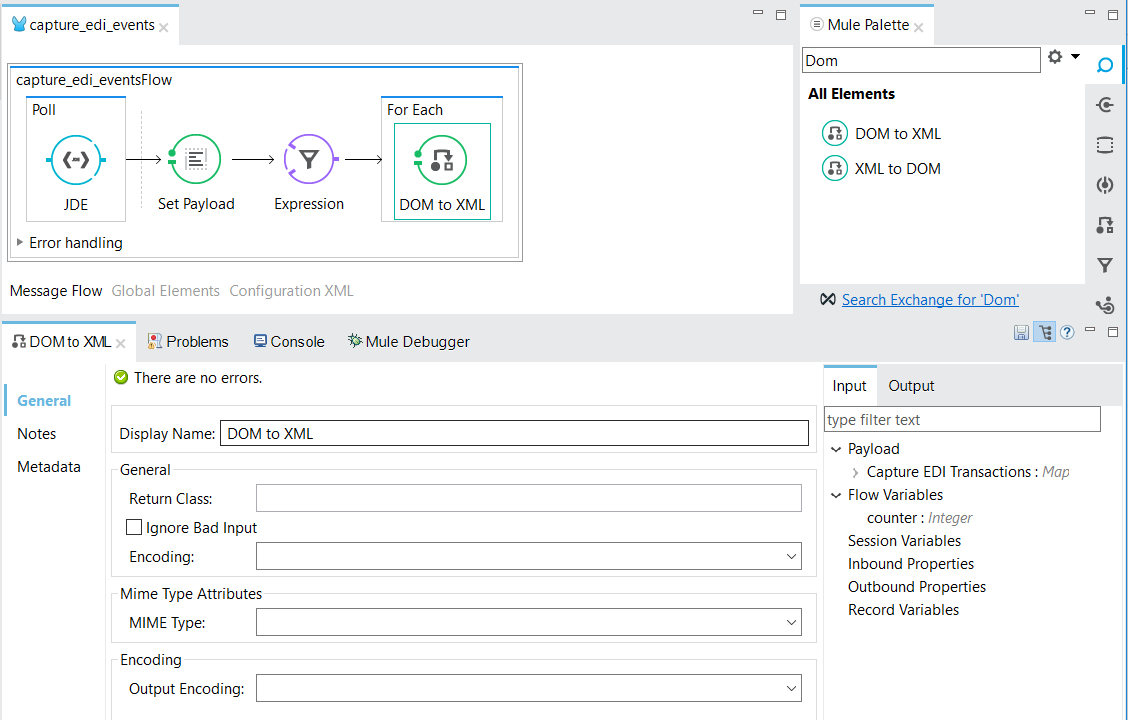
Back to the Message Flow view, and you need to Locate the Dom to XML on the right hand-side palette to return the address book name.
Drag the component over to the canvas:
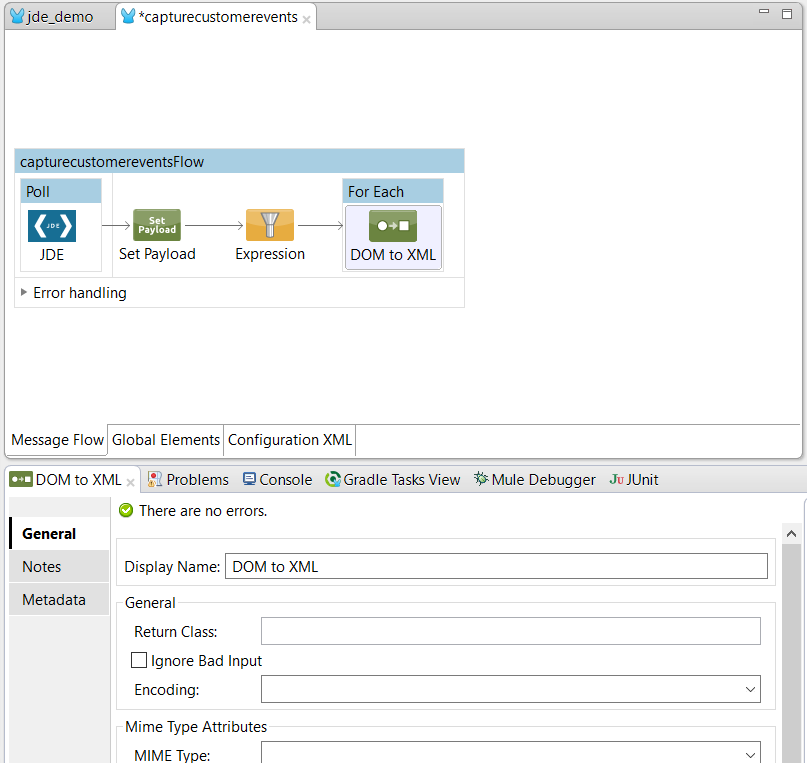
Step 11
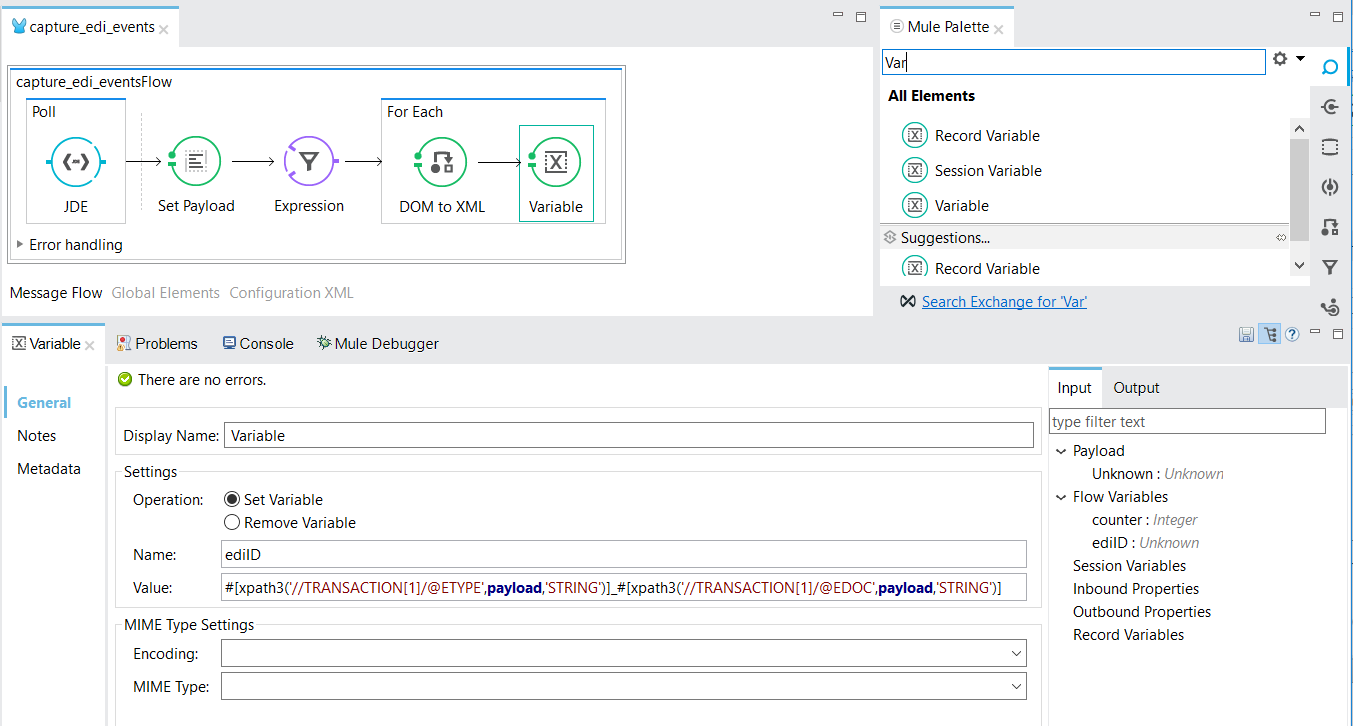
Back to the Message Flow view, and you need to Locate the Variable on the right hand-side palette to return the address book name.
Drag the component over to the canvas and write this variable Name and its value:
Name:
ediID
Value:
#[xpath3('//TRANSACTION[1]/@ETYPE',payload,'STRING')]_#[xpath3('//TRANSACTION[1]/@EDBT',payload,'STRING')]
Step 12
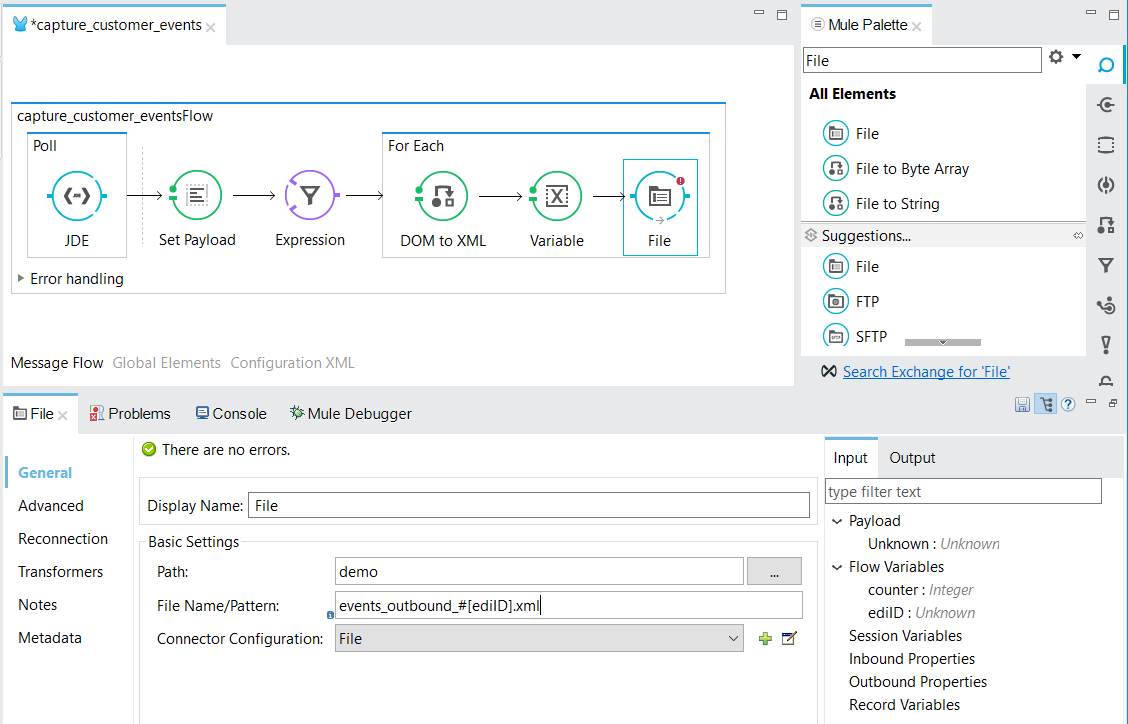
Back to the Message Flow view, and you need to Locate the File on the right hand-side palette to return the address book name.
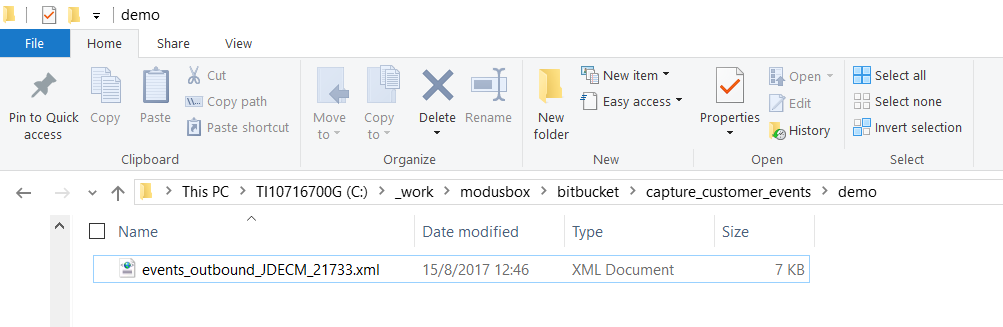
Drag the component over to the canvas and write this values:
Path: demo File Name/Pattern: events_outbound_#[ediID].xml Connector: create a new connector configuration
Step 13
Finally, run the example as a Mule application
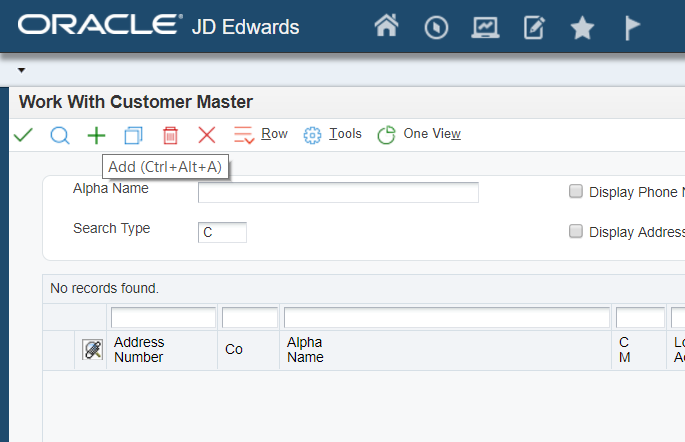
Step 14
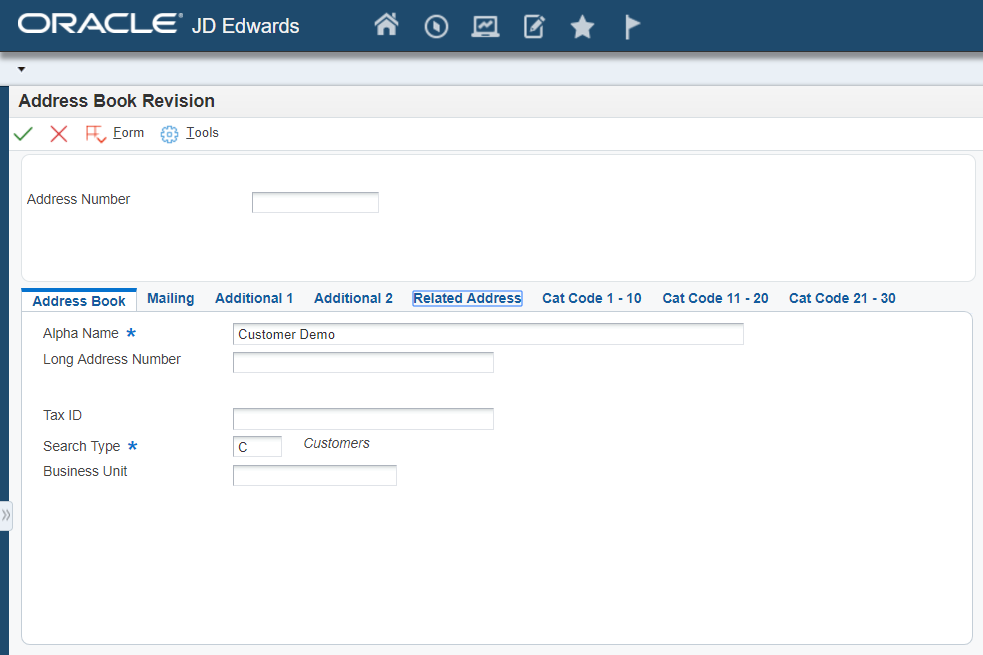
Enter a Customer using Customer Master information:
Application: P03013
Version ZJDE0002*

Step 15
Check file generated
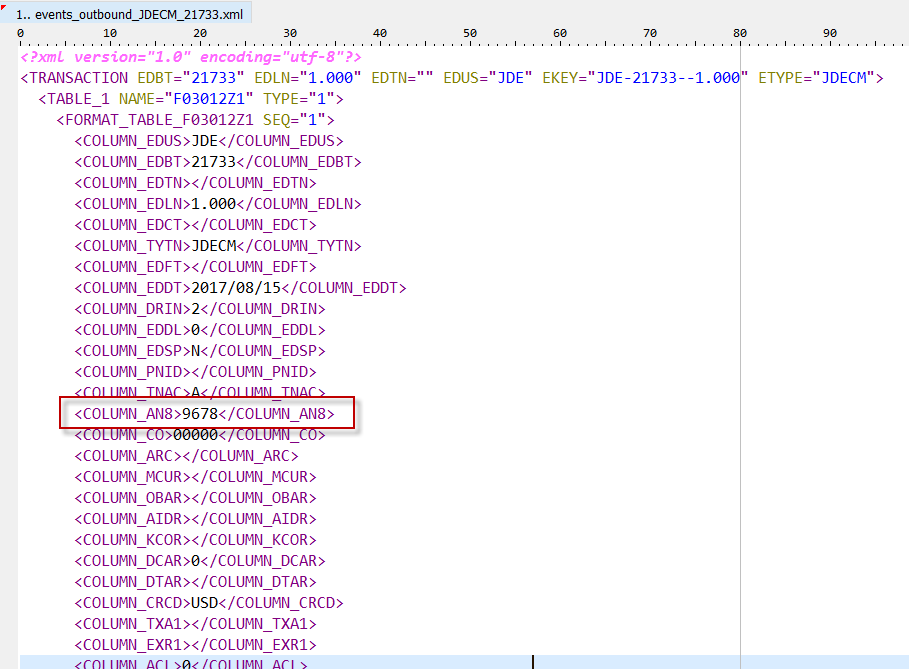
|
From 1.3.0 version, the connector has the possibility to handle with org.mule.modules.jde.exceptions.EventException instead of RuntimeException. This is an example how to use it: 
|
Capture EDI outbound events
This use case example will create a simple flow to generate a Order Acknowledgments (855/ORDRSP) document in a local folder.
| It’s important to read the guide: JD Edwards EnterpriseOne Applications Data Interface for Electronic Data Interchange Implementation Guide |
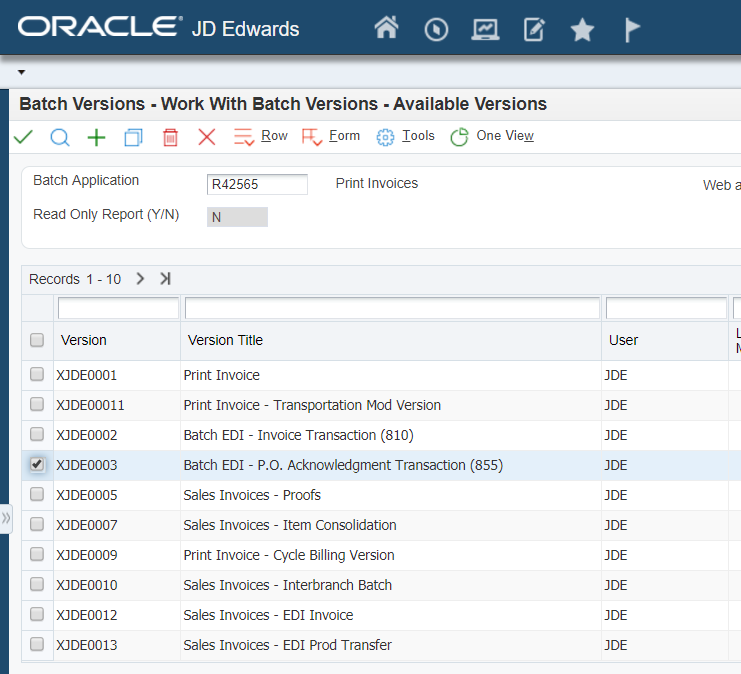
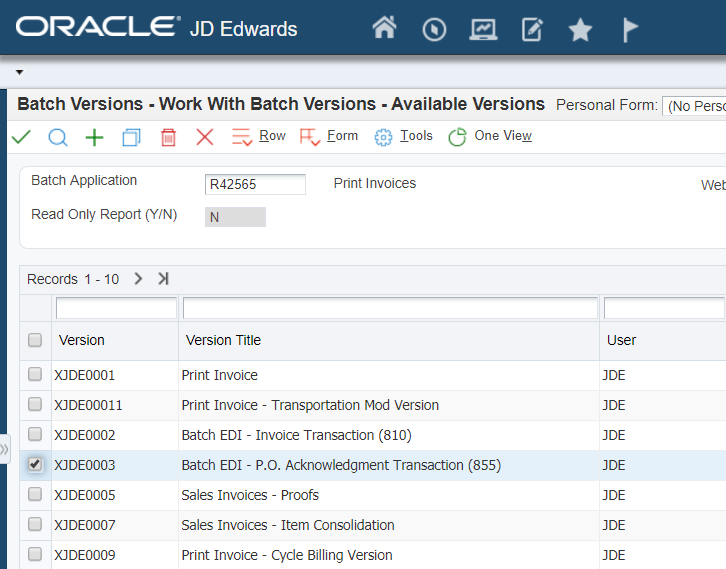
First, you need to create a new UBE version for R42565 or use standard XJDE0003 version.
and configure Processing Options:
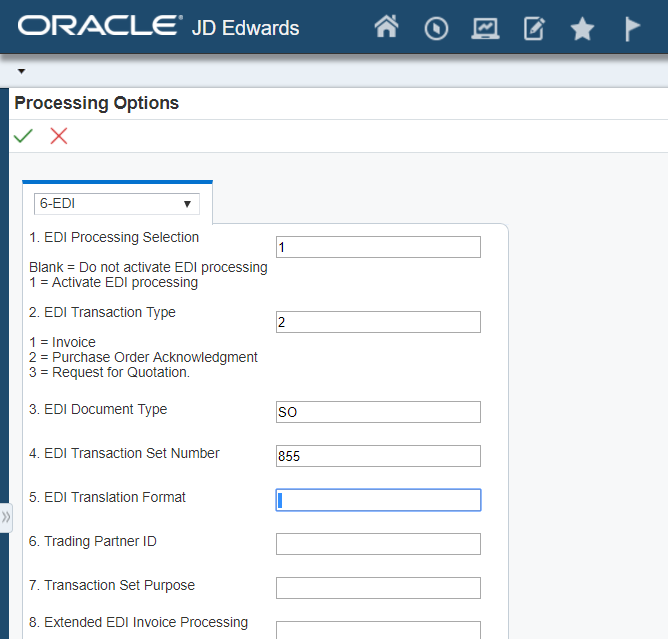
The last configuration that is needed is inform to JDE connector the EDI outbound:
Using "Flat File Cross-Reference (P47002)" form "Work With Flat File Cross-Reference" adds the following record:
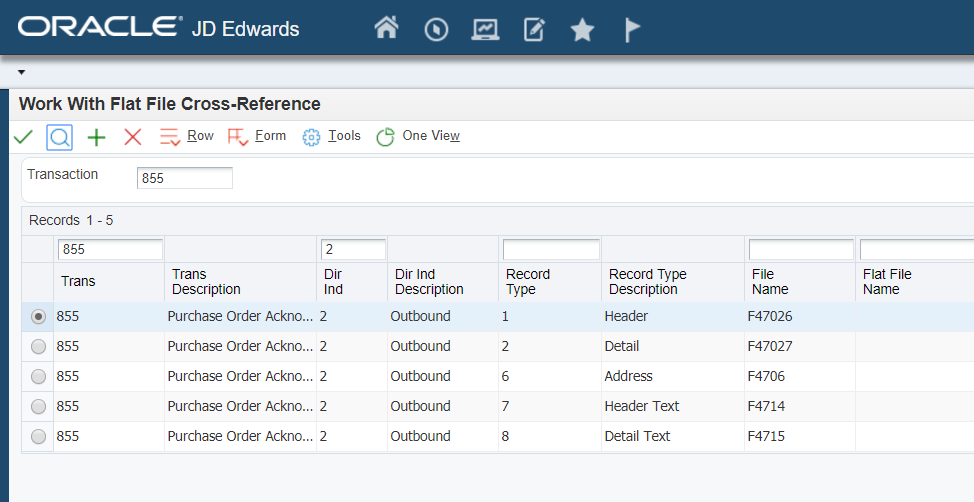
| Table | Record Type |
|---|---|
F47026 |
1 Header |
F47027 |
2 Detail |
F4706 |
6 Address |
F4714 |
7 Header Text |
F4715 |
8 Detail Text |
Follow next steps to create a flow that it will capture EDI outbound to generate EDI doc in a local folder.
Step 1
Use Mule Project created in the Create Mule Project Section.
Step 2
Locate the Poll Endpoint connector on the right hand-side palette:
Step 3
Drag the JDE connector over to the canvas:
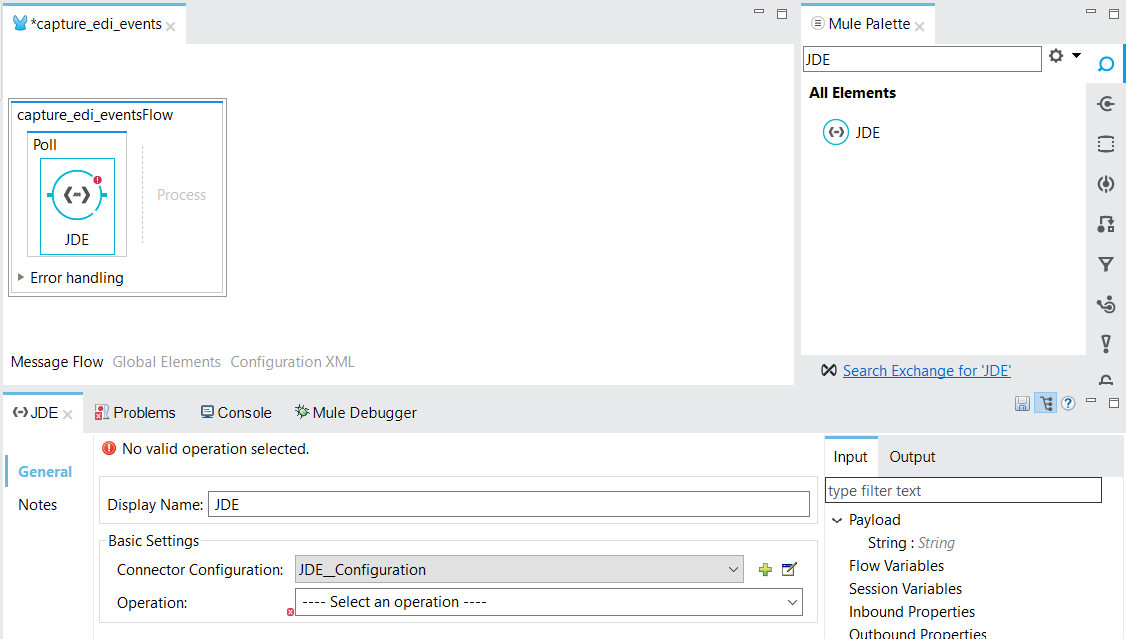
Step 4
You need to select the operation EDI Outbounds:
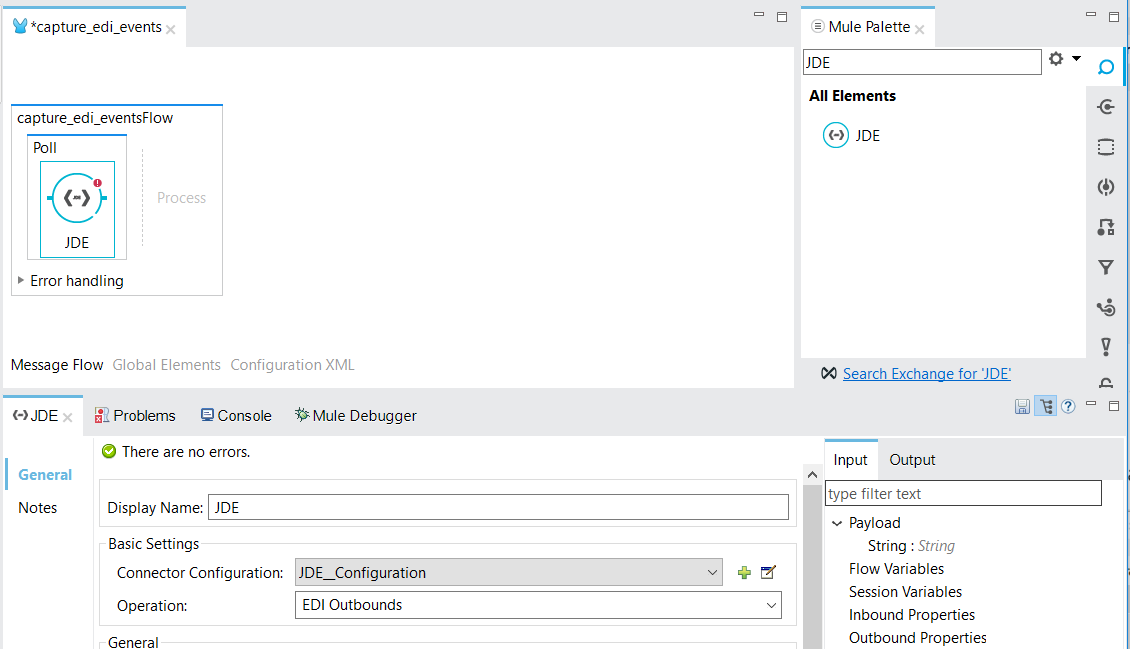
Step 5
Now, you need to select Capure EDI Transactions in the Entity Type field and press ENTER:
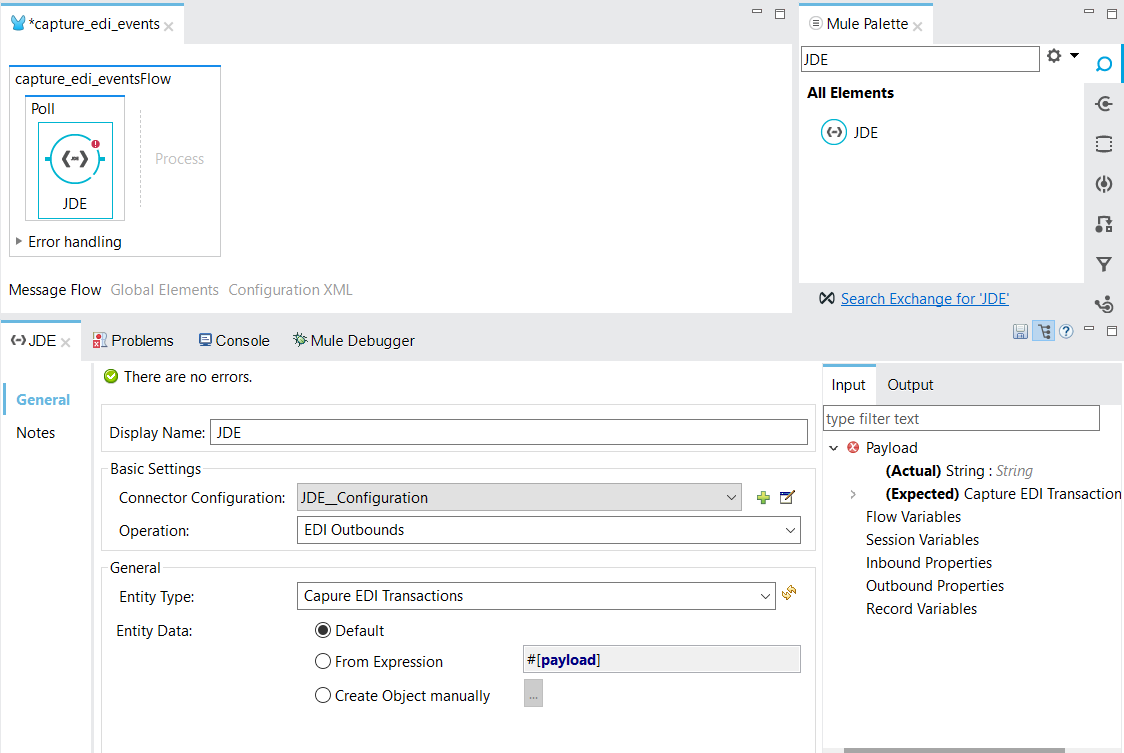
Step 6
Now, You will need to populate the parameters. To do this, you need to select the option: Create Object manually
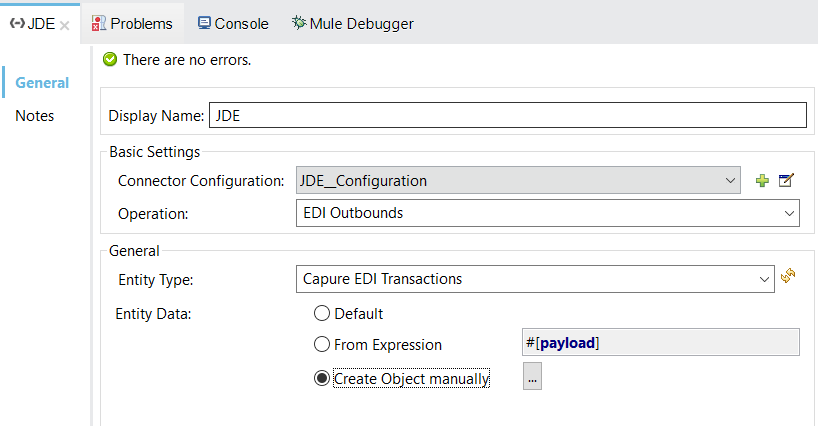
Press the button […] and populate the parameters:
EDI Code Enter 855 value
EDI Document Type Enter SO value
EDI Last EDI Document: Enter #[0L] value
EDI UBE-VERSION to update Transaction Enter R47027-XJDE0001 value. Standard UBE to update Order Acknowledgments
Max Qty Transactions to Read: Enter 10 value
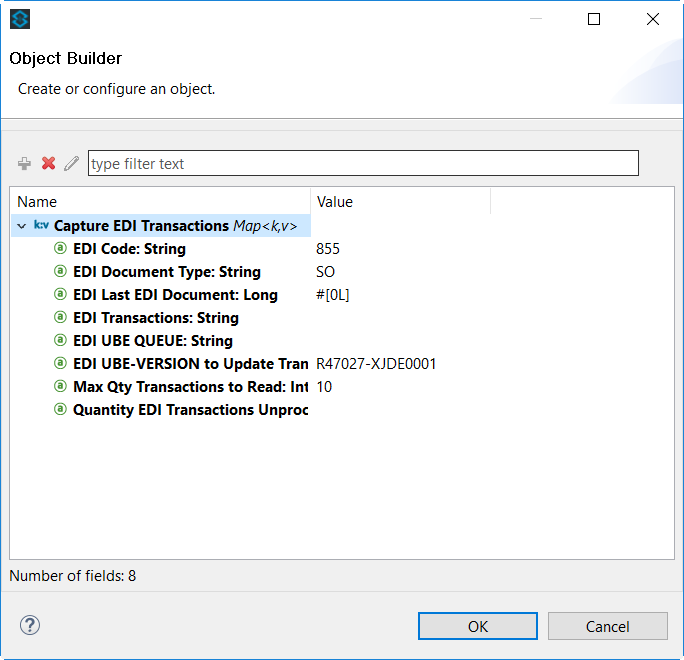
Press OK button to return to JDE Connector configuration. Save the project.
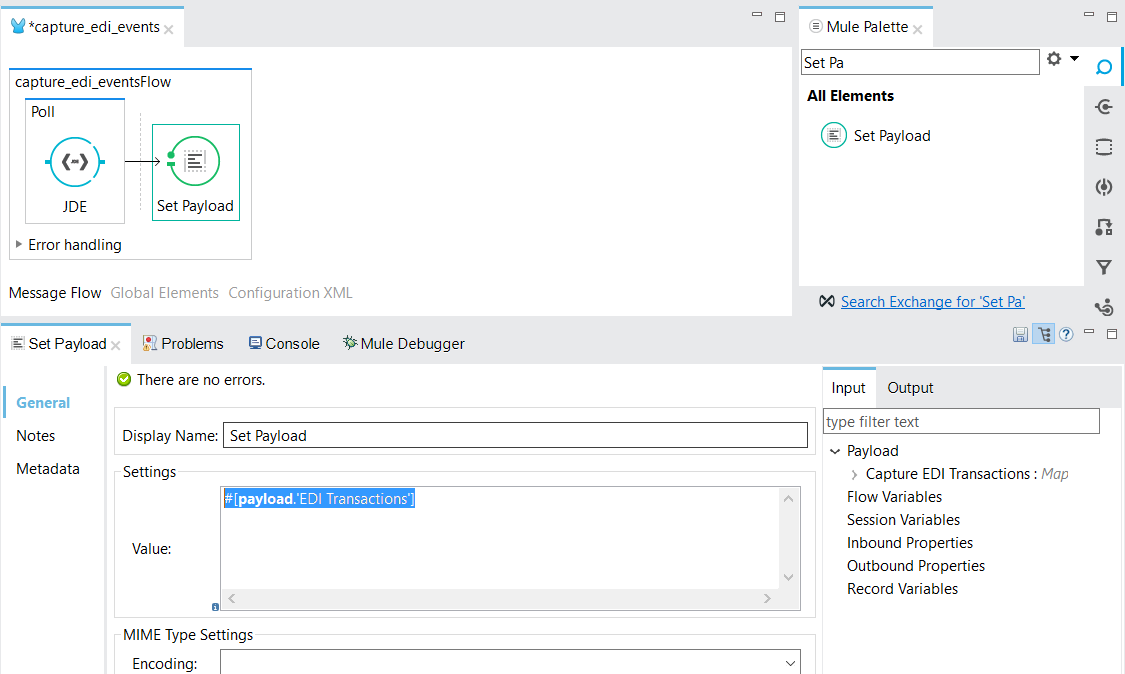
Step 7
Back to the Message Flow view, and you need to Locate the Set Payload on the right hand-side palette to return the address book name.
Drag the component over to the canvas and write this value:
#[payload.'EDI Transactions']
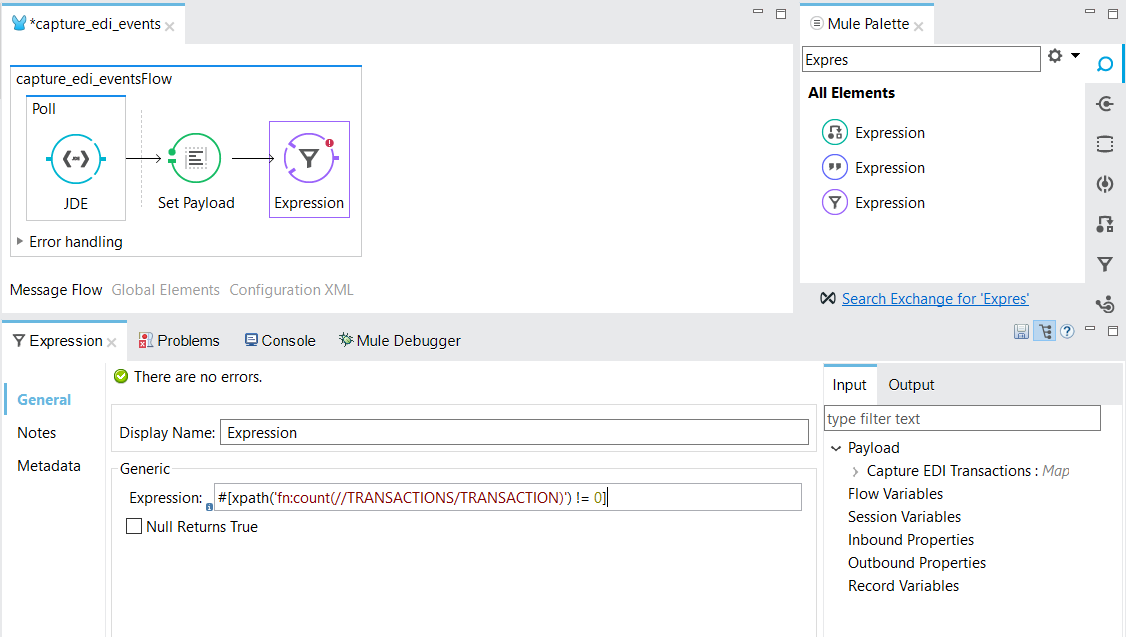
Step 8
Back to the Message Flow view, and you need to Locate the Filter Expression on the right hand-side palette to return the address book name.
Drag the component over to the canvas and write this value:
#[xpath('fn:count(//TRANSACTIONS/TRANSACTION)') != 0]
Step 9
Back to the Message Flow view, and you need to Locate the For Each on the right hand-side palette to return the address book name.
Drag the component over to the canvas and write this Collection Expression:
#[xpath3('/TRANSACTIONS/TRANSACTION',payload,'NODESET')]
Step 10
Back to the Message Flow view, and you need to Locate the Dom to XML on the right hand-side palette to return the address book name.
Drag the component over to the canvas:
Step 11
Back to the Message Flow view, and you need to Locate the Variable on the right hand-side palette to return the address book name.
Drag the component over to the canvas and write this variable Name and its value:
Name:
ediID
Value:
#[xpath3('//TRANSACTION[1]/@ETYPE',payload,'STRING')]_#[xpath3('//TRANSACTION[1]/@EDOC',payload,'STRING')]
Step 12
Back to the Message Flow view, and you need to Locate the X12 on the right hand-side palette to return the address book name.
Drag the component over to the canvas and write this values:
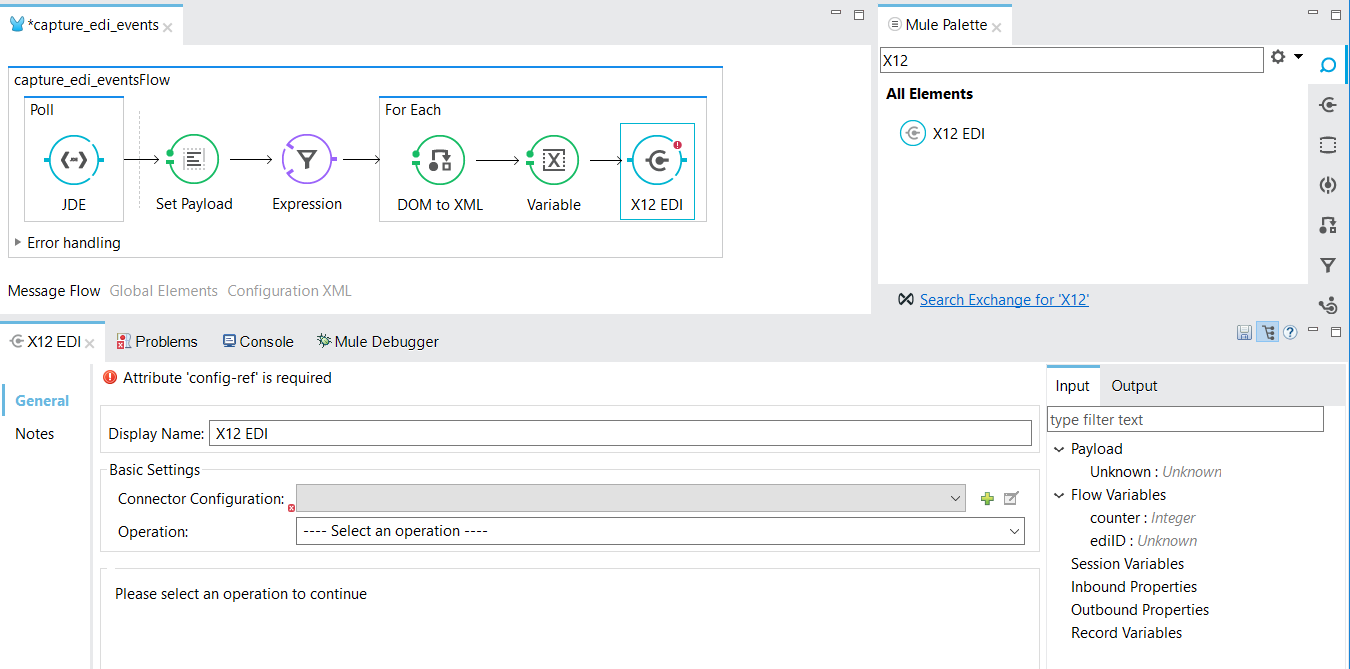
Create a new Connector Configuration:
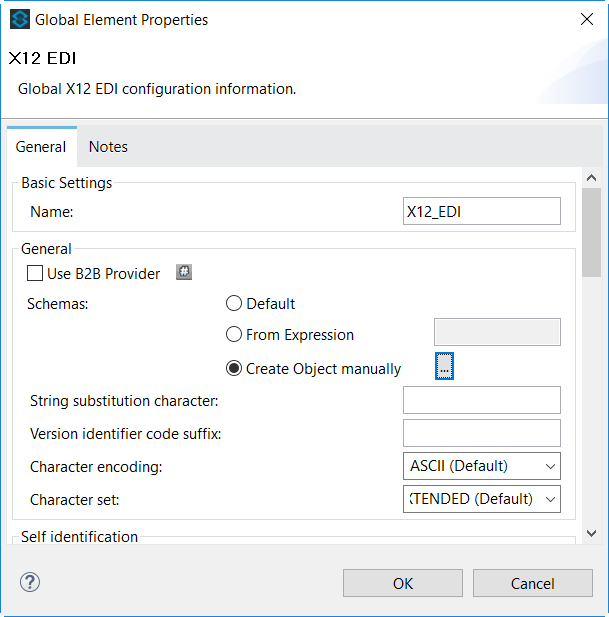
You will need to select the Schema. To do this, you need to select the option: Create Object manually and press the button […]:
/x12/005010/855.esl

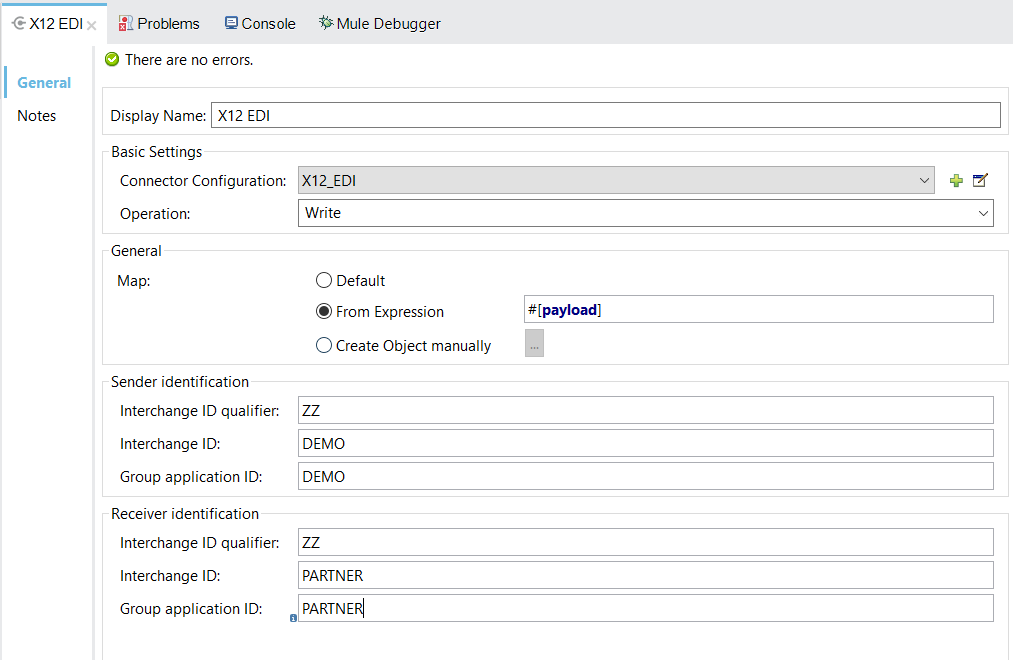
Then, you need to select Write Operation from Payload:
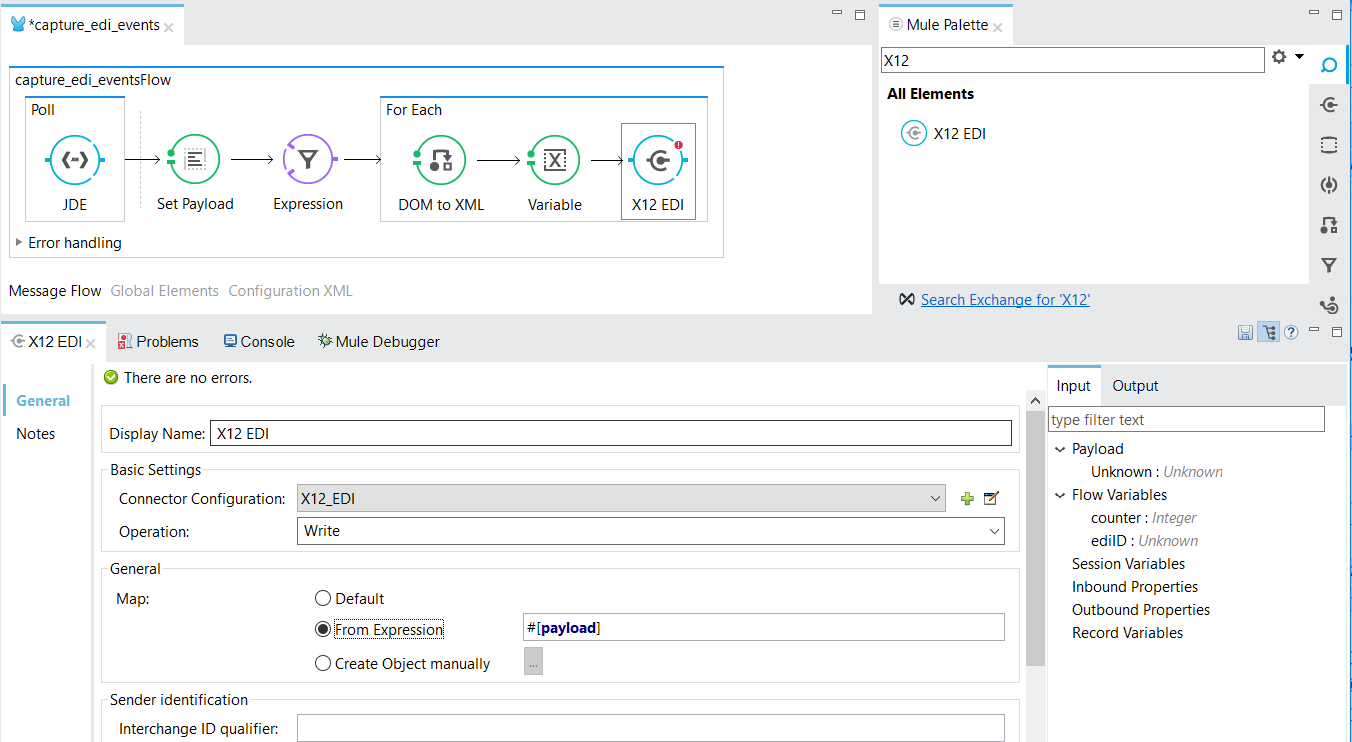
Now you need to configure Sender Identification and Receiver Identification:
Step 13
Back to the Message Flow view, and you need to Locate the Transform Message on the right hand-side palette.
Drag the component over to the canvas between Variable and X12 component:
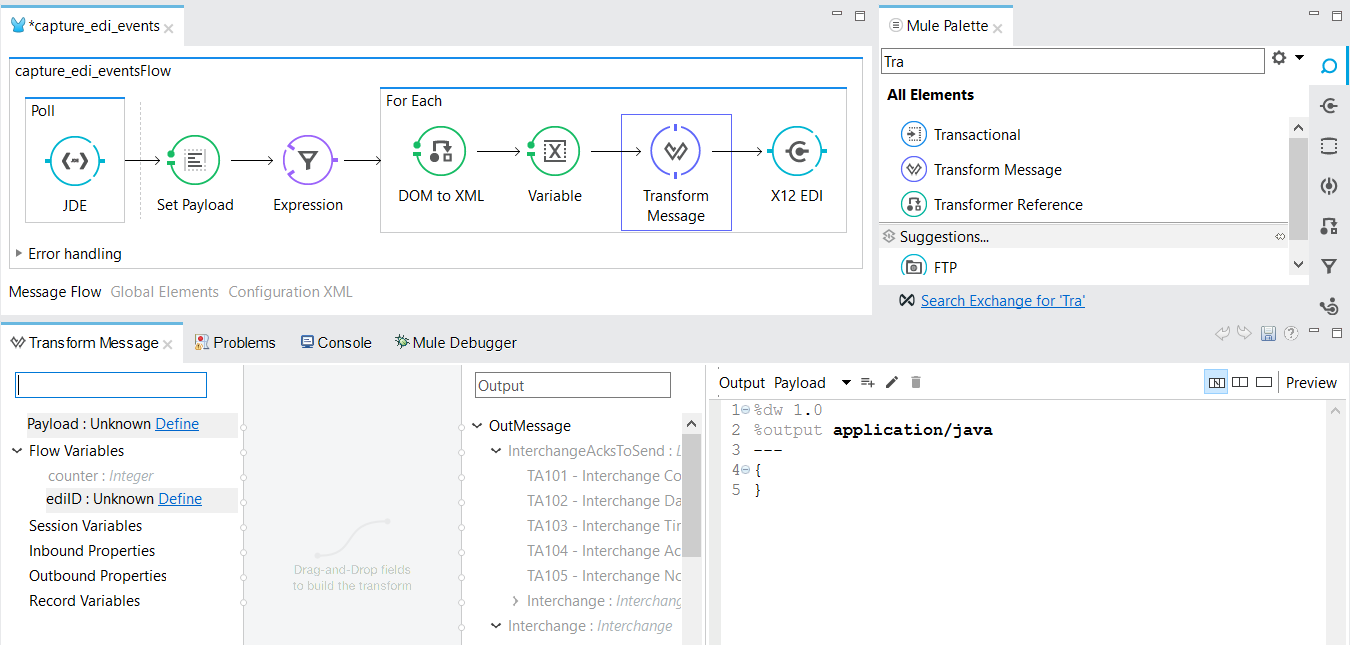
Switch to the XML view by clicking Configuration XML and replace CDATA element inside Transform Message definition with:
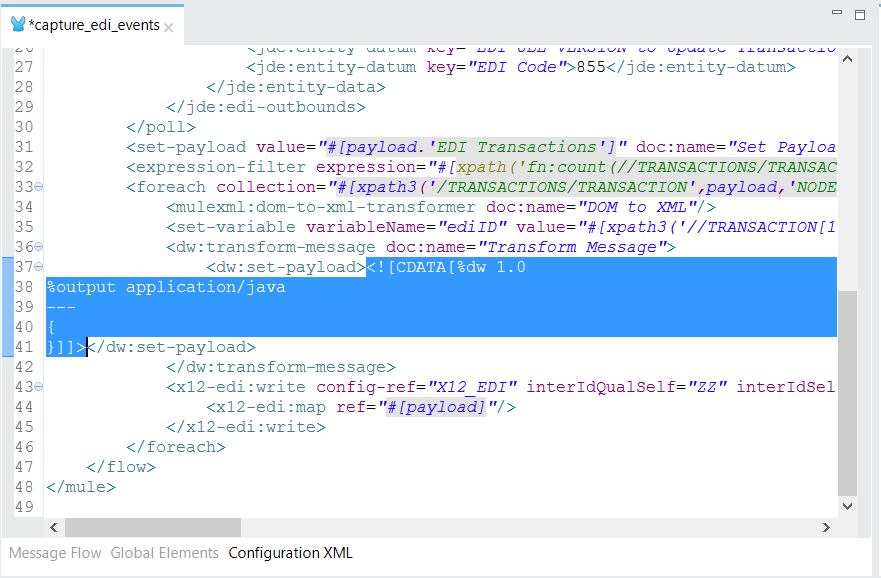
with
<![CDATA[%dw 1.0
%output application/java
%type mytime = :string { format: "HHMM" }
---
{
        TransactionSets: {
        v005010: {
                "855": [{
                        Interchange: {
                                ISA01: "00",
                                ISA03: "00",
                                ISA05: "ZZ",
                                ISA06: "ModusBox",
                                ISA07: "ZZ",
                                ISA08: "Customer",
                                ISA09: now,
                                ISA10: now as :mytime as :number,
                                ISA11: "^",
                                ISA12: "00501",
                                ISA13: payload.TRANSACTION.@EDOC,
                                ISA14: "0",
                                ISA15: "P",
                                ISA16: ">"
                        },
                        Group: {
                                GS01: "PR",
                                GS02: "DEMO",
                                GS03: "PARTNER",
                                GS04: now,
                                GS05: now as :mytime as :number,
                                GS06: 1111,
                                GS07: "X",
                                GS08: "005010"
                        },
                        SetHeader: {
                                ST01: "855",
                                ST02: "530006100"
                        },
                        Heading: {
                                "0200_BAK": {
                                        BAK01: "00",
                                        BAK02: "AD",
                                        BAK03: "PO01",
                                        BAK04: now
                                }
                        },
                        Detail: {
                                "0100_PO1_Loop": payload.TRANSACTION.TABLE_2.*FORMAT_TABLE_F47027 map ((fORMATTABLEF47027 , indexOfFORMATTABLEF47027) -> {
                                        "0100_PO1": {
                                                PO102: fORMATTABLEF47027.COLUMN_UORG as :number,
                                                PO103: fORMATTABLEF47027.COLUMN_UOM,
                                                PO104: fORMATTABLEF47027.COLUMN_UPRC as :number,
                                                PO105: "CP",
                                                PO106: "CB",
                                                PO107: fORMATTABLEF47027.COLUMN_LITM as :string
                                        },
                                        "0500_PID_Loop": [{
                                                "0500_PID": {
                                                        PID01: "F",
                                                        PID05: fORMATTABLEF47027.COLUMN_DSC1 replace /,/ with ""
                                                }
                                        }]
                                })
                        },
                        Summary: {
                                "0100_CTT_Loop": {
                                        "0100_CTT": {
                                                CTT01: sizeOf payload.TRANSACTION.TABLE_2.*FORMAT_TABLE_F47027,
                                                CTT02: 1
                                        }
                                }
                        }
                }]
        }
}
}]]>
Step 14
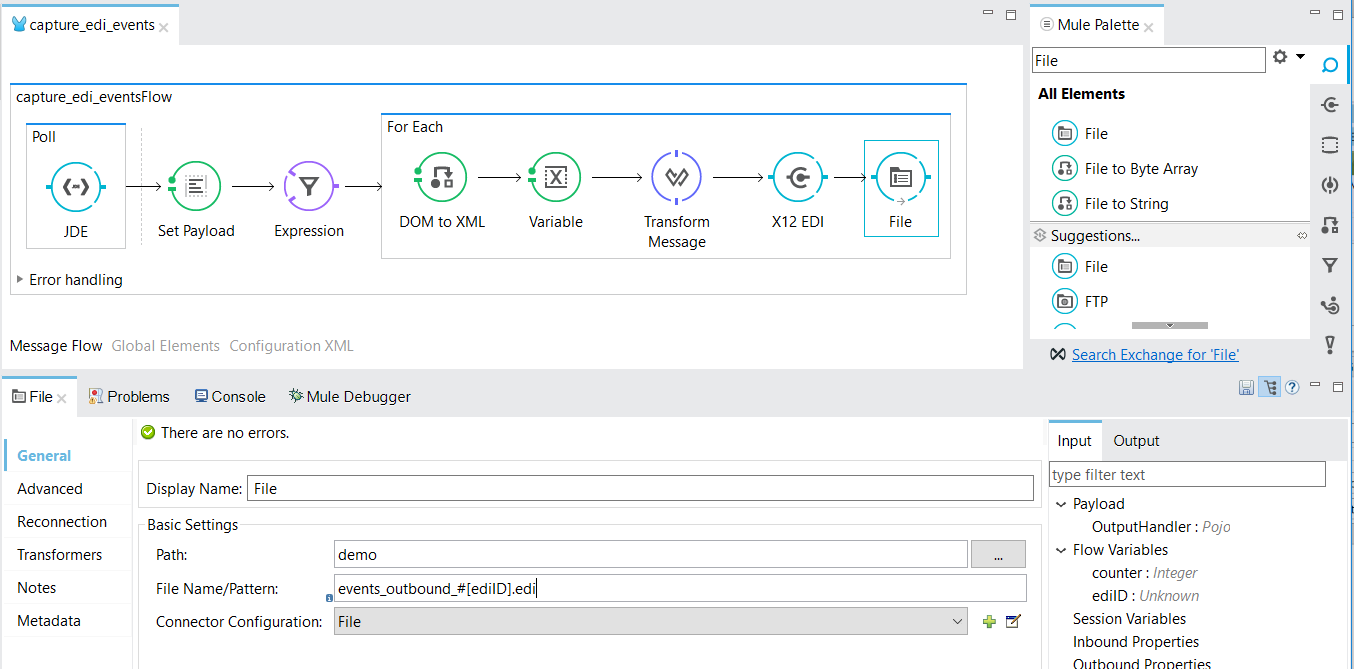
Back to the Message Flow view, and you need to Locate the File on the right hand-side palette to return the address book name.
Drag the component over to the canvas and write this values:
Folder: demo
File Name: events_outbound_#[ediID].edi
Connector: create a new connector configuration
Step 15
Finally, run the example as a Mule application
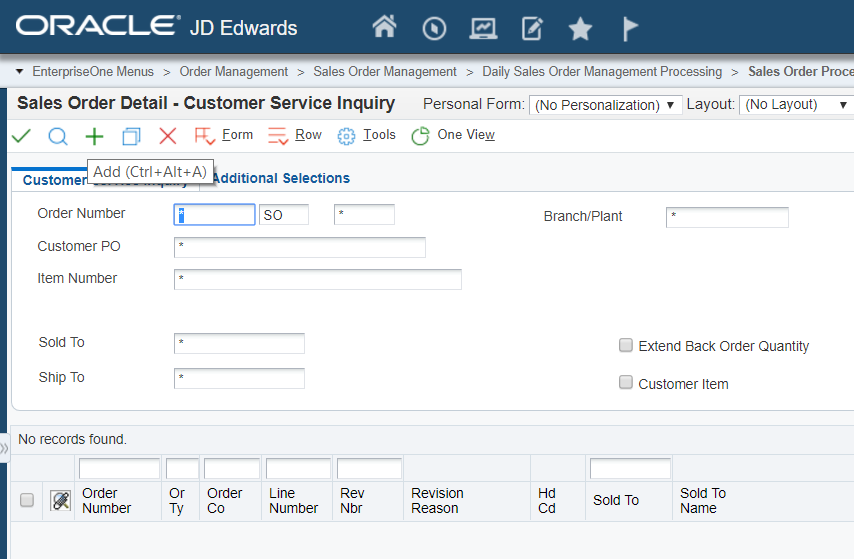
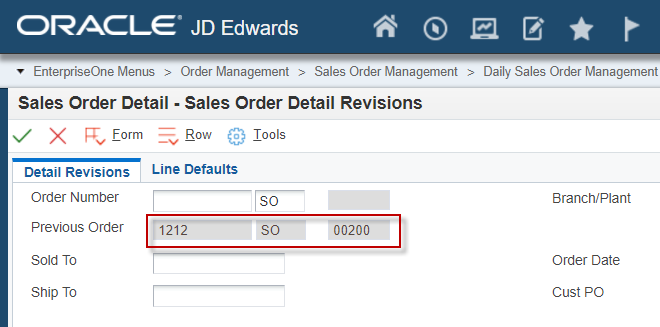
Step 16
Enter a Sales Order:
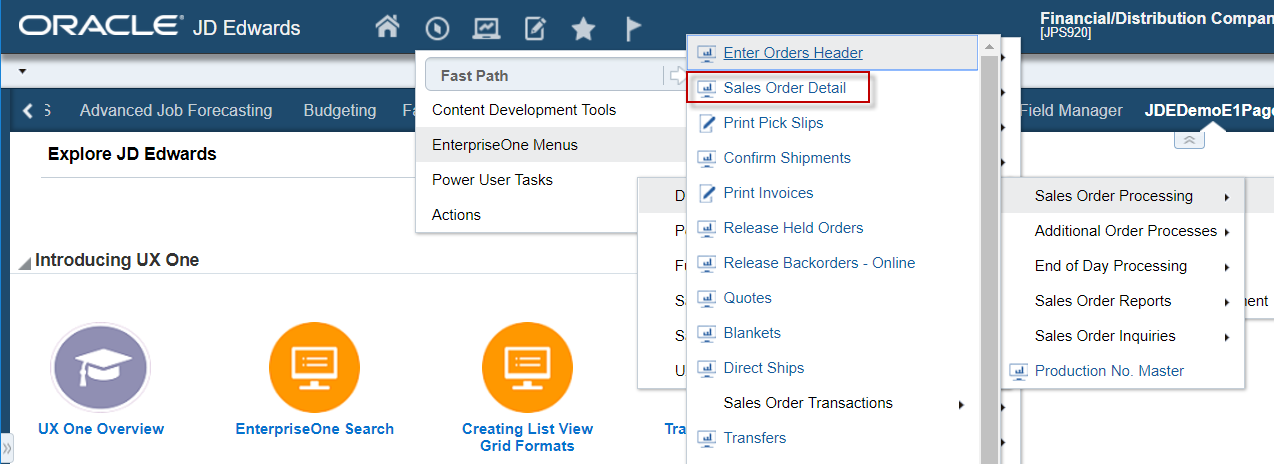

Then, invoke UBE R42565 XJDE0003 [ Batch EDI - P.O. Acknowledgment Transaction (855) ] for the order generated.
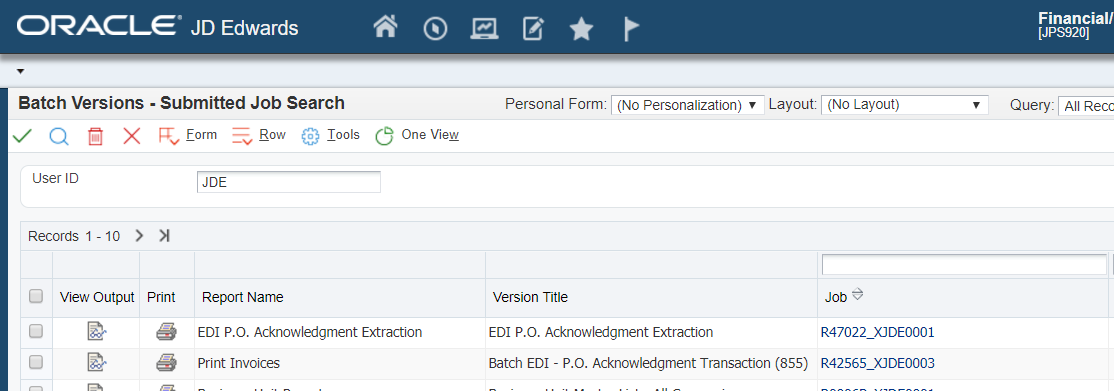
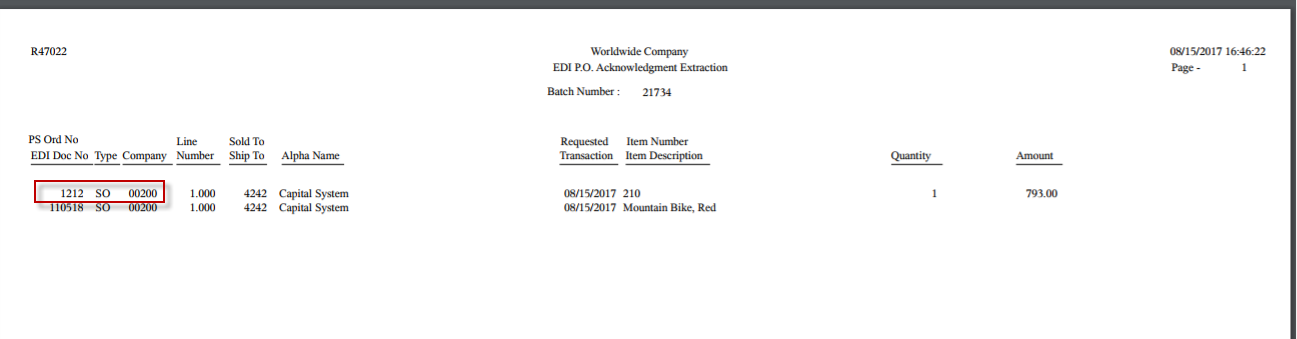
Step 17
Check file generated


|
From 1.3.0 version, the connector has the possibility to handle with org.mule.modules.jde.exceptions.EventException instead of RuntimeException. This is an example how to use it: 
|
Connector Performance
To define the pooling profile for the connector manually, access the Pooling Profile tab in the applicable global element for the connector.
For background information on pooling, see Tuning Performance.
Resources
-
Access the JDE 1.3.0 Connector Release Notes.